This is how to self install RCN internet in your home.
You will need an RCN modem, a computer, and the connection and power cables included in your RCN self-installation kit.
To install RCN internet yourself, you’ll need to connect the RCN modem to the computer, plug in the modem, and turn it on. Once your modem is connected, the second part of the installation process is activating your RCN internet service. To activate internet service, open a browser and follow the directions that appear.
See below for more detailed RCN internet self-installation instructions.
Jump to: How to self-install RCN internet | How to activate RCN account | Common installation issues | Self-install vs. Pro-install | Modems and routers | Contact RCN
Still need to sign up for RCN? Enter your ZIP code to make sure it’s available in your area.
How to self-install RCN internet
When you first purchase RCN, you elect to either self-install or have a technician visit your home. If you choose the former, the equipment will be sent to your home, or you can pick it up at a local payment center.
1. Check the equipment
When you receive your RCN equipment, you should double-check it—just as you would when receiving your food at the Arby’s drive-through window. Make sure the RCN package contains all the requested items, including a modem, a router (or modem and router Wi-Fi gateway), a self-installation guide, and all the necessary cords and adapters. Also, find the packing slip and never let it go—you’ll need it while activating your account for the first time.
Looking to purchase your own modem and router?
If you’d rather purchase your own equipment than rent RCN’s provided modem and router, our experts put together some recommendations for you. But before you buy one, just be sure it’s compatible with RCN by checking the tech specs:
2. Find the sweet spot
Before you pull everything out of the box, figure out where you want to plug in the modem. You should look for a centralized location; it will help transmit the Wi-Fi signal throughout the home.
3. Connect the power cord
Connect the power cord to the modem and plug the power cord into a wall socket.
4. Turn off the computer
Turn off the computer or laptop you’ll be using to set up the internet. This is simply a precaution to avoid complications with the initial installation and account activation.
5. Connect the Ethernet cable

With the computer still off, plug the Ethernet cable into the modem’s Ethernet port. The port will either be labeled “Ethernet” or color-coded to match the cable. Now connect the other end of the Ethernet cable to the computer’s Ethernet port.
6. Turn on the computer
Turn on the computer to initiate the modem’s search for the RCN network. Be patient as the search can take a few minutes.
7. Wait for the lights
Before attempting to activate your RCN account, you should wait for the lights to turn a steady color. This will prevent hiccups in the activation process later on.
How to activate your RCN account
If the lights on the modem or router turn on, you can now activate RCN internet service. Follow these steps to successfully activate your account.
- Open your favorite web browser. The browser will automatically redirect you to the RCN setup page.
- Follow the on-screen instructions and prompts. Most of the information you’ll need to enter can be found on the RCN packing slip.
- Save your changes. If you make any changes to the network name or password, save them before closing out of the browser.
- Reboot the modem. To reboot it, turn off the computer and unplug the modem’s power supply. Next, reconnect the power cord and turn on the computer.
- Open a browser to confirm the internet works as promised and expected.
How to change your modem’s settings
The RCN-supplied modem or router is typically a Linksys model, so RCN has provided its own instructions for updating the router’s settings. If you use your own modem, you will want to find its instruction manual. While the steps usually follow a similar pattern, the starting point often differs. Some modems use a web interface while others, like the Linksys, recommend using the Cisco Connect software to simplify setup and management.
- Install the Cisco Connect software provided with your RCN modem or router.
- Open Cisco Connect.
- Click “change” underneath Router Settings.
- Next, click “change” in the Personalize section.
- A warning appears on the screen. Accept it to continue onward.
- Enter the new router name (SSID) and password.
- Click “change” to save the new settings.
- Update devices with the new router name and password.
In some instances, you will want to use the browser interface. It houses a couple of advanced features not available in Cisco Connect. You also can use the interface to make simple changes, but the Linksys manual warns that using it might interfere with running Cisco Connect later on. To use the web interface, follow these seven steps.
- Open a web browser.
- Input 192.168.1.1.
- If the numerical address doesn’t go anywhere, try myrouter.local.
- You will be asked to enter a username and password. If you didn’t change these when first using Cisco Connect, the username and password are “admin.”
- The main menu opens. Once here, you can change the username, password, and other settings, including guest networks and security protocols.
- Save any changes you make and close out the browser.
- If you change the username and password, update your wireless devices with the new information.
How to solve common self-installation challenges
Self-installing internet service can fell even the mightiest of technophiles. Fortunately, help is available with this short list of common issues and solutions. If these solutions fail to solve your problem, contact RCN Customer Support at 1-800-746-4726 or use the online chat. The ISP is relatively good about answering customer questions on social media, too.
Problem: The modem’s indicator lights never turned on.
- You likely have a loose cable or power issue.
- Check the wall outlet. It could be one with an “on/off” switch. If it is, confirm the switch is “on.” If the power still doesn’t kick in, try plugging the cord into a different electrical socket.
- Check the Ethernet cable. It could have jiggled loose during setup or during a cat’s jaunt behind the desk or shelf.
Problem: The internet is sluggish.
- You should first run a speed test. You’ll want to hardwire the internet connection in for this step because RCN’s demonstrated speeds are based on wired connections, not wireless.
- If you pass the speed test, the issue could be the modem’s location or the number of devices connected to the network.
- Try moving the modem or router to a more centralized location, such as one where the majority of your devices live.
- Hardwire a couple of your devices to reduce the load on the Wi-Fi. Some options include a DVR or gaming system, which typically run better when plugged into a dedicated Ethernet port anyway. And as they perform better, so will your other devices.
Problem: My streaming videos are choppy.
- Your problem could be the equipment or bandwidth.
- Check your computers and devices to see if they can handle the internet speeds provided by RCN.
- Check the modem or router. If it isn’t using DOCSIS 3.0 or higher, you will experience latency and other performance issues.
- If you own the latest equipment, the issue likely is bandwidth related. You should find the device that’s hogging the internet and hardwire it in. This should deliver a clear, smooth stream.
Problem: I can’t connect to the internet.
- Your best bet is to power-cycle the modem or router. Rebooting it flushes out the system and resets connection settings.
- If the reboot doesn’t work, contact Customer Support.
Self-installation vs. professional installation
You face a tough decision when deciding whether to self-install or to let the professionals do the work. RCN often offers a free installation service via a promo code. Setting that factor aside, self-installation could still prove to be the more efficient and convenient choice.
Professional installation
Pros
- Licensed Professionals: Before RCN technicians go into the field, they must first earn their certification from the Society of Cable Telecommunications Engineers (SCTE).
- Financial Credits: If a technician arrives late to an appointment, you receive a $20 credit.
Cons
- Time Commitment: RCN employs a shorter service time window (two hours), but it’s long enough to still require taking a chunk out of your day to wait for a technician to arrive.
- Inconvenient Scheduling: Depending on your schedule, professional installation could be hugely inconvenient, interrupting either your work or someone’s naptime.
Self-installation
Pros
- Flexibility: You decide when to install the internet.
- No Extra Fees: If you miss out on the RCN promo code, you’ll have to pay for the installation service. But if you opt to self-install, the money stays in your pocket.
Cons
- Troubleshooting Responsibility: Setting up a home network poses some potential challenges. If you want to avoid them, you should call in the RCN professionals.
- Possible Frustration: When self-installation takes longer than originally predicted or becomes problematic, blood pressure may rise to new heights.
Choosing the best RCN-compatible modem
If you want to save money on rental fees, you will want to “bring your own modem.” The challenge, however, arises in selecting one that’s compatible. RCN’s 1 Gigabit internet requires the use of its DOCSIS 3.1 modem alone. RCN’s other internet packages demonstrate more leeway. They only demand that the modem or router be DOCSIS 3.0 certified and feature at least twenty-four downstream channels and eight upstream channels.

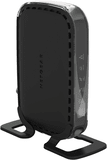
The ARRIS SURFboard beats RCN’s recommendations, featuring thirty-two download channels and eight upload channels. It also supports today’s internet standards, including both IPv4 and IPv6.
Notable Feature: ARRIS excels when it comes to aesthetics and power. Its slim profile and black or white options conceal four Gigabit Ethernet ports and built-in AC1750 Wi-Fi.
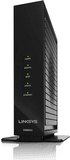
This modem benefits from an easy plug-and-play setup. If you want to be up and running with RCN quickly, the Linksys modem is the ticket.
Notable Feature: The Linksys modem also packs a punch, using an Intel Puma 6 chipset to deliver high speeds and consistent connectivity.
How to set up an appointment with a RCN
Setting up an installation appointment with RCN is easy, thanks to its 24/7 customer service. To reach the department, call 1-800-746-4726. Questions specific to your installation should be directed to 1-866-832-4726.
You did it! You received your RCN modem or purchased a compatible one. Now all you have to do is follow the self-installation directions, and you’ll be connected to the internet in no time at all.
Suddenlink Communications provides cable, TV, and telephone service throughout the United States. This Internet Service Provider (ISP) delivers internet service to homes through cable lines, which usually provide faster speeds than DSL. You can find Suddenlink in sixteen states, including rural areas of Arkansas, Missouri, and New Mexico. Despite its rural underpinnings, the ISP offers speeds starting at 50 Mbps and up to 1 Gbps in select locations. If you choose as your ISP, know that you will receive 24/7 customer support and a money-back guarantee. You will also benefit from access to reliable service technicians and unlimited data plans.
Jump to: How to self-install Suddenlink internet | How to activate Suddenlink account | Common installation issues | Self-install vs. Pro-install | Modems and routers | Contact Suddenlink
Haven’t signed up for Suddenlink service yet? Check to make sure it’s available in your area before you research installation.
Step by step guide to Suddenlink self-installation
When you place your initial order with Suddenlink Communications, you can choose to either have a technician come to your home to set up the equipment or to install it yourself. If you choose to install it yourself, follow the directions below.
1. Note your activation date
Even if your box of Suddenlink equipment arrives twenty-four hours after placing an order, you should wait until your activation date to connect the equipment. You won’t be able to test the service or set up your account before your activation date.
2. Check the Suddenlink equipment
Your box of Suddenlink equipment should contain six items: cable modem, power adapter, coaxial cable, Ethernet cable, two-way cable splitter, and instructions. If anything’s missing from your box, contact Suddenlink Customer Support at 1-877-794-2724.
Looking for a good modem or router?
We’ve got you covered. If you don’t want to use Suddenlink’s provided equipment, here are our recommendations of what to use instead. Before you buy any of these, check to make sure they’re compatible with Suddenlink. The equipment’s tech specs are usually the best place to check:
3. Choose a location
Scout your home for a centralized location with access to both cable and power outlets. Finding a good spot will help transmit the internet signal throughout your home.
4. Turn off the computer
Whether you’re using a desktop or laptop, power it down before continuing. Doing this can help prevent signal confusion and interference during the installation and activation phases.
5. Connect the modem
Connect the coaxial cable to the cable wall outlet and the port labeled “Cable In” on the back of the modem. Plug the power cord into a wall outlet and connect it to the modem.
6. Plug in the Ethernet cable
With the modem connected to the cable line and receiving power, plug in the Ethernet cable and connect it to either your computer or router.

7. Look for the LED light
If all the connections are secure and working properly, the “Online” LED light on the front of the modem will turn a solid color.
8. Turn on the computer
Once you turn on the computer, you will need to run through either the Internet Connection Wizard (Windows) or System Preferences (Mac OS).
9a. Run the internet connection wizard (Windows only)
- Click the “Start” button. It’s usually in the lower left-hand area of the screen.
- Click “Run.”
- When the window opens, type “INETWIZ” and click “OK.”
- The Internet Connection Wizard will open. When it does, select “Connect using my local area network (LAN)” and click “Next.”
- On the next screen, uncheck any checked boxes before clicking “Next.”
- The following screen asks if you would like to set up your email. You can skip this step if you plan to set up your email through the Suddenlink web portal or another email client such as Outlook or Mail. Click “Next” to continue forward.
- Click “Finish” to save your settings and to close out the wizard.
9b. Set your system preferences (Mac OS only)
- Click the Apple icon (upper left-hand corner) and navigate to “System Preferences.”
- Select the “Network” icon.
- When it opens, click on “Advanced.”
- A new pane opens. When it does, click on “TCP/IP.”
- Look at the “Configure” dropdown and choose “Using DHCP.” Click “OK.”
- You will return to the basic “Networks” pane. If “Apply” lights up, click it to save your settings.
- Close “System Preferences.”
Once you complete the steps above, you are ready to activate your account.
How to activate your Suddenlink account
With the LED light on the modem turned on and the computer powered up, you can now activate your Suddenlink account. The setup shouldn’t take more than thirty minutes.

- Open your web browser.
- This will automatically direct you to the Suddenlink welcome page, which will prompt you for your sixteen-digit account number.
- Enter your account number and click “Continue.”
- Confirm your other contact information. If correct, click “Yes.”
- Suddenlink will run a test on your cable lines to assess signal strength.
- Once it finishes, a “Terms of Service” page appears. Click “Agree” to continue.
- The next screen shows a transaction number. Save it for your records.
- Wait five minutes, then restart the computer, the modem, and the router. You may hear this process referred to as “powercycling.” Its purpose is to make sure the internet connection is steady and to clean up any rogue signals.
How to change your Suddenlink modem’s settings
Suddenlink makes it easy to update your modem’s settings. To change them, log in to the modem.
- Open a web browser.
- Type 192.168.0.1 in the address bar. Hit “Enter.”
- A login screen will appear. If accessing the modem for the first time, use your default login information.
- Username: cusadmin
- Password: password
- Click “Apply” to enter the modem’s interface.
- The home screen summarizes a number of settings. Look at them carefully to ensure they’re correct.
- Your SSID is “suddenlink.net-xxxx,” with the four x’s being the last four digits of the RF Cable Mac address (found on modem’s label).
- The channel should be set to “Auto.”
- The security mode should be WPA/WPA2-PSK.
- The encryption algorithm should show TKIP/AES.
- The pre-shared key generates automatically. You can also find the information below the SSID name on the modem’s label.
- Click on “Change Password.”
- Enter your old password.
- Enter your new password twice, once to set it and once to confirm it.
- Click “Set” to store your settings.
- Confirm any changed settings and close out the browser.
How to solve common self-installation issues
Before you call Suddenlink Communications about an issue, try some basic troubleshooting. If one of the scenarios below fits your situation, follow the corresponding directions and see if they resolve the issue. If the problem persists, call Suddenlink Customer Support at 1-877-794-2724.
Problem: The “online” LED light never turned on.
- A power cord could be loose.
- If the cord seems secure, try a different outlet.
- Check the coaxial cable—the connector can sometimes get bent.
- If the cable is bent, replace it with a new one.
- If none of those steps work, contact Suddenlink Customer Support.
Problem: The internet speed is really slow.
- Assess the number of wireless devices accessing the internet. They could be dragging down your speed. You can solve this problem by hardwiring certain devices, such as a DVR or TV.
- Run a speed test from a hardwired computer. The hardwiring is essential; Suddenlink bases its download and upload speeds on wired equipment.
- Check the age of your devices—it could be time for an upgrade. An older modem, computer, or laptop sometimes runs at slower speeds. Suddenlink recommends using a DOCSIS 3.0 modem for speeds of 20 Mbps or higher.
- Consider traffic congestion. Speeds will slow depending on the time of day or number of people in your home.
- If none of those options solve the problem, it could indicate a network problem or the need for more speed. Contact Customer Support to troubleshoot your account and to discuss options.
Problem: The internet connection seems choppy.
- Signal interference is likely to blame.
- Reboot the modem and computer. The reboot shuffles the devices through their settings and clears out the gunk signals.
- If the reboot doesn’t fulfill your expectations, check the cable and see if internet and TV share the cable connection.
- If they do, you should install the two-way cable splitter provided by Suddenlink. The cable splitter separates the frequencies in order to avoid mixed signals.
Self-installation vs. professional installation
While you can let the Suddenlink professionals install the modem and set up your internet service, it’s not too much work to do it yourself. However, deciding between the two options involves a few considerations.
Professional installation
Pros
- Expertise: Suddenlink’s technicians install and troubleshoot internet service, day in and day out. They know what they’re doing.
- Reliability: When the professionals set up your modem and home network, you know the work will be right the first time.
Cons
- Extra Fee: Suddenlink charges a fee close to $30 for its installation service.
- Time Commitment: Working with a technician takes a large chunk of time out of your day. Suddenlink somewhat eases the disadvantage of this with its “Where’s My Tech?” feature that you can use to track your technician’s status and arrival time.
Self-installation
Pros
- Free: The only things you expend with a self-installation are time and elbow grease.
- Convenience: You self-install the Suddenlink modem and activate your account whenever it fits your schedule.
Cons
- No Physical Support: If you elect to self-install, you’re on your own when internet connectivity issues arise.
- Uncertainty: If the thought of connecting several cables and cords causes the slightest sliver of anxiety to run down your spine, you may want to set up an appointment for professional installation.
It might be time for a new modem…here are our top picks
Suddenlink provides the ARRIS/Motorola model, which is a powerful modem. However, you shouldn’t feel obligated to use it. You can use a different modem as long as it meets Suddenlink’s compatibility requirements. The two modems below are not only compatible with the ISP, but also crowd-pleasers on Amazon.
The ARRIS pairs well with high-speed internet service, including 1 Gbps. Even if you start with a slower speed initially, you can ramp up to higher ones with this modem.
Notable Features: This modem delivers on its promise for speed. It can go up to 1.4 Gbps download and 262 Mbps upload. It also features thirty-two download and eight upload channels and four Ethernet ports.
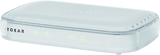
NETGEAR’s modem is an Amazon Best Seller, earning almost five stars from over 3,000 reviews. It won’t provide the same speeds and feeds as the ARRIS, but it complements Suddenlink’s mid-tier internet service packages.
Notable Features: This modem offers download speeds of 343 Mbps and upload speeds of 131 Mbps. It also claims eight downstream and four upstream channels.
How to contact Suddenlink Communications
Suddenlink Communications offers multiple avenues to get in touch with its support team. You can participate in an online chat, email, visit a local office, or call 1-877-794-2724 to speak with an agent. You also can use its online tool to track your technician’s status and estimated time of arrival.
Congratulations! You successfully set up your Cox High Speed Internet and it didn’t even require walking across glass or climbing down an elevator shaft. Go celebrate.
If you live in the Midwest, you’ve likely heard of the Internet Service Provider (ISP) Windstream. It stands as one of the better-known internet providers, connecting more than eighteen million people to the internet. This ISP provides internet service via DSL, which makes the self-installation process relatively easy. DSL service runs on existing phone lines, meaning all you need to do to get internet service is sign up with Windstream and connect a modem or modem-router to a phone jack. Once you run through the installation steps, you’ll be ready in no time to pin, purchase, and tweet to your heart’s content.
How to self-install Windstream internet
Installing your Windstream internet is nothing like building IKEA furniture—the process won’t take hours, nor will it leave you with a bruised thumb and sore calf muscles. Windstream estimates that a self-installation should take between thirty minutes and an hour.
1. Wait for your activation date
Even if your modem and equipment arrive in the mail prior to the activation date, wait to install everything until that day. Your service won’t be available until the specified date, making it impossible to check connections and connectivity until then.
2. Check the equipment
While you wait for your activation date, check the equipment you’ve received. You should have received a Windstream wireless modem, cables, power cords, DSL filters, and instructions.
3. Choose a location
On your activation date, choose a spot to set up the modem. You’ll want a centralized location, free from obstructions. The open, central space will help “spread” wireless coverage throughout the home.
4. Connect the DSL filter
If you don’t have home phone service, skip this step. Using the DSL filter will prevent signal interference, an issue that commonly occurs when installing DSL internet in a home with home phone service. If you do have home phone service, plug the filter (sometimes called a splitter) into the phone jack. Next, connect the gray phone line to the DSL port on the filter. Finish the work in this step by connecting the home phone cord to the other port on the filter.
5. Connect the phone line
Windstream includes a gray phone cord in the box of equipment. Once your activation date has arrived, connect the cord to the labeled DSL port on the modem.
6. Power up the modem
Next, connect the power adapter to the modem. When that’s done, connect the adapter to an electrical outlet.
7. Connect the Ethernet cable
While you can use your Windstream internet to create a wireless network, this initial hardwired setup will ensure a reliable connection during your account activation. To get started, plug the yellow Ethernet cable into the modem’s Ethernet port. Then connect the other end of the cable to your computer.
8. Watch the lights
The DSL and internet lights will flash green. Wait one to two minutes for them to turn a solid green before continuing in the setup process. Note that the internet light will flash intermittently while you’re using the internet.

If both lights turn a solid green, you can move on to activating your account. If the lights still flash after three minutes or so, revisit the directions and make sure you followed them exactly. You can also check the connections; cables sometimes wiggle loose. If none of those steps correct the problem, call technical support at 1-800-347-1991.
Don’t want to rent a modem or router?
If you’d rather purchase equipment than rent from Windstream, these are the equipment recommendations from our internet experts:
How to activate your Windstream internet service
Once all of the lights turn a solid green, you can begin activating your Windstream account. These final steps should take you about fifteen minutes to complete.
1. Open your internet browser
When you open your internet browser, the window will automatically redirect you to the Windstream Internet Service Setup page.
2. Accept the Terms of Service
The initial screen will ask you to accept Windstream’s terms and conditions. You must accept them to continue onward with the installation process.
3. Enter your information
The next page will ask for your account information. You should have received this information in a mailed letter or other form of communication.
4. Finish setting up your Windstream account
If you’re planning to connect wirelessly, enter your wireless information, which is the SSID and key. You can find that information either in your service agreement or on the bottom of the modem provided by Windstream.
.1")
5. Finalize your setup
Once you complete the first four steps, finish by clicking the button to finalize your setup. It saves the data entered and enables internet access.
6. Connect your wireless devices
Wireless devices, such as a phone, tablet, or laptop, will still need to be connected to the wireless network. Use the default SSID and key provided with the modem, unless you changed them during the setup phase. You’re finished! To test your work, close the browser, reopen it, and connect to one of your favorite websites.
How to upgrade your modem’s settings
Your modem comes with default login settings, which should be changed to protect your home network’s privacy and security. The steps are slightly different depending on the modem in use, but the process will generally follow a similar pathway.
1. Open a browser
The first step is the easiest: simply open your favorite web browser from home. Being home is necessary; Windstream explicitly states you can’t update your wireless network and key remotely.
2. Access the modem’s settings panel
Things can get tricky with this step, particularly if you’re using a preferred modem rather than the one provided by Windstream. With a Windstream modem, you type in http://192.168.254.254/wlcfg.html to change the name of your network, or SSID. To change the default password, or key, head to http://192.168.254.254/wlsecurity.html. Other modems use different addresses, but they usually always contain http:// and a series of numbers.
3. Update your wireless network name
With the network settings panel open, scroll down to “Wireless – Guest/Virtual Access Points.” Select the default SSID name by checking “enabled,” and type in a new name in lieu of the default one. Click “Apply/Save” to finalize the new settings.
4. Change your wireless network password
Next, visit http://192.168.254.254/wlsecurity.html to change your password. Scroll down to the section “Manual Setup AP” and select your SSID from the drop-down menu. Enter your preferred password in the “WPA/WAPI Passphrase” box. You can click “Click here to display” so that you can see the letters, numbers, and symbols being inputted. Finally, click “Apply/Save” to store your settings.
5. Reconnect your wireless devices
If you initially connected your wireless devices to the internet via the default SSID and key, you will need to update their settings in order to access the internet again.
How to resolve common self-installation challenges
The self-installation process sometimes proves challenging, but you can usually resolve the issues yourself. If you can’t seem to figure out what’s wrong, Windstream is standing by to help. The company offers a plethora of support options, from its virtual assistant “Wendy” to remote-desktop troubleshooting. You can also take the easiest route by calling tech support directly at 1-800-347-1991.
Problem: I can’t connect to the internet.
- Before you call tech support, try rebooting the modem. The problem could be that the modem experienced some interference and is a little confused. Rebooting it will purge the modem of bad connections and interference sources.
Problem: The internet goes in and out.
- You could have interference on the line—the likely culprit is a missing or rogue DSL filter.
- If you have home phone service, you’ll want to use DSL filters. They sort out signals, preventing interference and dropped calls.
- If you don’t have home phone service, but installed a DSL filter, uninstall it. An unnecessary DSL filter sometimes causes signal interference.
Problem: The indicator lights never came on.
- The problem could be loose cords or a dead outlet. Check all the cords and cables and make sure they’re securely connected to the modem, wall, and computer. Also double-check that the cords and cables connect to the appropriate ports and wall connections.
- If the cables and cords are secure, try using a different phone jack or power outlet before calling Windstream.
Problem: I don’t know what’s wrong.
- No problem! With Windstream, you have access to 24/7 tech support. Give the support team a call at 1-800-347-1991.
- If you can connect to the internet, consider visiting the support center. You can take part in an online chat, ask Wendy for help, or avail yourself of remote-desktop assistance.
When to self-installation or work with a pro
When it comes to internet service, you can either work with a pro or go at it alone. Both options work, but each offer different advantages and disadvantages.
Professional installation
 Pros:
Pros:
- Expertise: A Windstream technician walks you through the activation process, showing you how to set up and change your username and email address.
- Quality Assurance: Before leaving your home, the Windstream technician will confirm you can connect to the internet. They also check all the connections outside the home, ensuring a reliable internet connection and quality service.
 Cons:
Cons:
- Expense: Windstream charges a one-time $35 fee for its professional installation service.
- Time: Generally a Windstream pro will be in and out of the home within an hour—but the timeframe isn’t guaranteed. If additional work is required, such as installing a new phone jack, the time could increase to two hours or more.
Self-installation
Pros:
- Convenience: With self-installation, you can set up your modem and internet service whenever it’s most convenient for you. You can go through the process over the weekend or at two in the morning; it’s up to you.
- Ease of Use: Windstream ships directions with your modem, making it easy to set up your home network. It also provide instructions for connecting wirelessly from a variety of devices.
Cons:
- Responsibility: Self-installation makes you the only person responsible for setting up the modem and activating your Windstream account. It also turns you into the primary troubleshooter.
- Limitations: Self-installation only works for basic installs and you’ll be limited by where the phone jack is located.
How to purchase the best Windstream modem
If you elect to self-install Windstream internet, the company will send you one of their modems. However, you don’t have to stick with what Windstream sends. You can use other modems, too, as long as they’re compatible with Windstream’s DSL service. Below are our top two picks for Windstream compatible modems.
The ARRIS SURFboard modem also claims an average of four stars on Amazon, but it reigns as a bestseller and it’s easy to see why: this modem offers a number of download speeds, making it perfect for anyone seeking a DSL-based modem. The company also offers an integrated modem-router product for consumers who want to extend wireless connectivity throughout their home.
Notable Features: The ARRIS SURFboard supports the latest internet standards and is certified as a DOCSIS 3.0 Cable Modem, guaranteeing compatibility with most ISPs. It also comes with a two-year limited warranty.
Simple, cost-effective, and efficient, Netgear’s modem pulls in an average of four stars on Amazon. Google’s search results nudge it closer to five, as based on 930 product reviews.
Notable Features: Netgear’s modem features a small, compact design that’s both pleasing to the eye and easy to position discretely within the living room or home office.
How to set up an appointment with a Windstream home technician
If you opt for professional installation when signing up for Windstream, an appointment is automatically scheduled on the date of your activation. If, however, you originally choose to self-install and then change your mind later on, you can call Windstream customer service at 1-866-445-5880 to set up an in-home visit.
Congratulations! If you’ve made it this far, you’ve likely successfully installed your internet service. Welcome to the web with Windstream.
Hiring a professional to install your Time Warner Cable® Internet service can make the process fast and easy, but there are also plenty of advantages to setting it up on your own. Self-installation can be pretty simple if you’re comfortable with technology and know your way around a computer, and TWC offers a streamlined Easy Connect Kit that makes the process even faster.
If you’re trying to decide whether to hire a professional or install your Internet yourself, read through this guide to get a better idea of what to expect from each option.
Professional Installation
If your residence already has an accessible, working cable line, the process of a professional installation will be quick and straightforward.
1. Set up an appointment
You’ll need to contact TWC to make an appointment with a professional installation technician.
2. Allow the technician to set up your Internet equipment.
The technician will arrive in the predetermined time window, set up the modem and even offer to do a more involved activation. You will have to confirm the appointment when the technician calls, and you should also ensure that either you or another adult with valid photo ID can be present for the entire installation. Renters may also be asked to provide proof of landlord approval before the technician will run any new cables or wires.
Pros
- Simplicity: If you don’t want to deal with the hassle of figuring out a cable modem’s firmware or moving your furniture around to get to those wall outlets, a professional installation will simplify that process significantly.
- Troubleshooting Assistance: A professional will be able to solve any potential problems and will ensure that your Internet service is running effectively. You won’t have to worry about any technical issues or other problems. A technician can also help with more complex networking needs, including connection configuration and software installation.
Cons
- Installation Fee: TWC charges a one-time installation fee. Because this cost differs depending on your region and the equipment being installed, you’ll need to contact TWC directly for a specific quote for professional installation.
- Scheduling: A professional installation requires that you set a specific time for the installation. Because the appointment is usually scheduled in a certain window of time, it may be inconvenient to remain available for the duration of the projected time.
Self-Installation
If you’re considering doing a self-installation, the process will be more involved than with a professional installation.
1. Order your Easy Connect Kit
When ordering online, eligible plans automatically opt in for an Easy Connect Kit. You should make sure that the option is selected before confirming your order.
2. Receive your equipment package
You can pick up your Easy Connect Kit at a local TWC store or opt to have it shipped to you by mail. If you choose the mail option, the package should arrive 2–5 business days after the order is placed.
3. Set up your equipment
Every kit should contain your cable modem, connection cables, an Easy Connect Guide, and some additional accessories. Follow these steps to ensure a smooth installation:
- Locate your cable wall outlet, and run your coaxial cable from the outlet to your modem’s “In” socket. If you have a cable set top box, use the included cable splitter to run a separate cable to both your modem and your set top box.
- Connect your computer to your cable modem with an Ethernet cable. Most desktops should have an Ethernet port on the back of the case, and many laptops will have an Ethernet port on the side of the body. If you’re using a wireless modem and have subscribed to TWC Home WiFi, you won’t need to connect anything with an Ethernet cable.
- Plug your modem’s power cord into the back side of the modem and connect it to a wall outlet.
- Make sure that the light on your modem has turned on before proceeding. You will need to activate your modem before you can connect to the internet.
4. Activate your equipment
There are two ways to activate your TWC Internet service.
- Online: In order to activate your modem online, you’ll need to log in to TWC’s Easy Connect website and select “Manage and Troubleshoot Services.” Navigate to the “Troubleshooting” tab and select “Internet.” Under the “Activate/Connect Modem” option, click “Reset My Modem.” Your cable modem should now be activated.
- By Phone: Call TWC’s automated phone line at 1-877-309-5869 in order to activate your modem by phone. After verifying your account with your phone number, say “Activate my Modem” when prompted. Follow the instructions given and the phone system will walk you through the activation process.
After activation, your Internet service should be up and running. You can now connect to the Internet and configure your WiFi network.
5. Configure your home wireless network
Configuring your TCW WiFi™ will ensure that each of your devices can connect to the Internet.
- Open your Web browser and connect to 192.168.0.1 from your address bar. This will navigate to your modem’s firmware.
- Log in with the default username and password. While these can differ between manufacturers, the default username and password are usually “admin” and “password,” respectively. The username and password may also be written on the bottom of some modems. Contact your modem’s manufacturer if you have difficulty finding the correct default login information.
- Click the “Wireless” tab to configure your WiFi settings. You can rename your WiFi by changing the value in the Network Name (SSID) field. You should also change your password, which is located in the WPA Pre-Shared Key field.
- Try to connect to your WiFi with any of your wireless devices to make sure the connection is up and running.
If you run into any problems at any point during the setup, consult the troubleshooting section of the included instruction guide or contact TWC directly.
Pros
- Speed: Self-installing means you can skip the hassle of setting up an appointment with TWC. You can get online as soon as you finish installing your cable modem, and you can do it on your own time and according to your own schedule.
- Cost: By self-installing, you can avoid the one-time installation fee and save yourself a few dollars. While it does cost some of your own time to install the service, the time investment is negligible.
- Setup Flexibility: You can install your cable modem wherever you feel is best. You’ll also be able to take your time configuring things in your home to make sure you get a strong signal in every room.
Cons
- Limited Guidance: If you run into any networking problems beyond those covered in the installation guide, it can be difficult or impossible to fix the issues without the help of a professional.
- Kit Accessibility: The TWC Easy Connect Kit can be picked up from any TWC Store location that has kits in stock, but availability may be limited depending on demand. If you don’t have a store close by, the kit will be shipped to your address. It can take up to five business days for your cable modem to arrive, which may be longer than you want to wait.
The Verdict
Self-installation isn’t for everyone — if you are a technophobe or dislike dealing with the ins and outs of cable modems, you’ll be better off footing the installation fee to hire a professional. If, on the other hand, you have some basic experience with technology and an inclination towards DIY projects, opting for the self-installation option will save you both time and money.
If you’re ready to go forward with self-installation, order a Time Warner Cable plan and pick up your Easy Connect Kit today.
