How to Set Up Your Internet
A step-by-step guide to setting up a new internet service
Oct 20, 2025 | Share
How-To
Setting up a new internet connection isn’t the hassle it used to be, as most internet service providers (ISPs) offer quick self-installations you can complete in as little as 30 minutes. This saves you from having to schedule and attend a technician appointment and is often cheaper than a professional installation. But not every home is a good candidate for a self-install.
This guide covers how to determine if a self-installation is a good option for you, then gives the basic steps to installing a new service and setting up your home network.
Looking for a new internet provider?
Enter your zip code to see what internet providers are available in your area.
Steps to installing a new internet service
To set up your home internet, you need:
- An active internet connection
- A compatible modem, fiber optical network terminal (ONT), or gateway
- A standalone router or mesh system if no gateway is provided.
Let’s walk through everything, step-by-step.
Step 1: Verify your current internet setup.
Step 2: Get internet service at your address.
Step 3: Install your equipment.
Step 4: Create your Wi-Fi network.
Step 5: Connect your devices.
Step 6: Test your speeds.
 Verify your current internet setup
Either your home has a physical internet connection or it doesn’t. You can’t use a self-install kit if there’s no line coming into your home.
If you just built a new home, for example, then a technician needs to come out and connect your home to the provider’s local network. If you just moved into an older home and you notice coaxial cable jacks mounted on the wall, chances are you can grab a self-install kit for cable internet and get online in a snap.
The only exception is fixed-wireless internet like T-Mobile 5G Home Internet, which usually doesn’t require anything but a gateway you place near a window. Easy peasy lemon squeezy.
For homeowners, there are a few ways to make a reasonable guess if you have an internet connection. Here are some examples of what you may see connected to the side of your home.
How to tell if you have an existing fiber internet connection
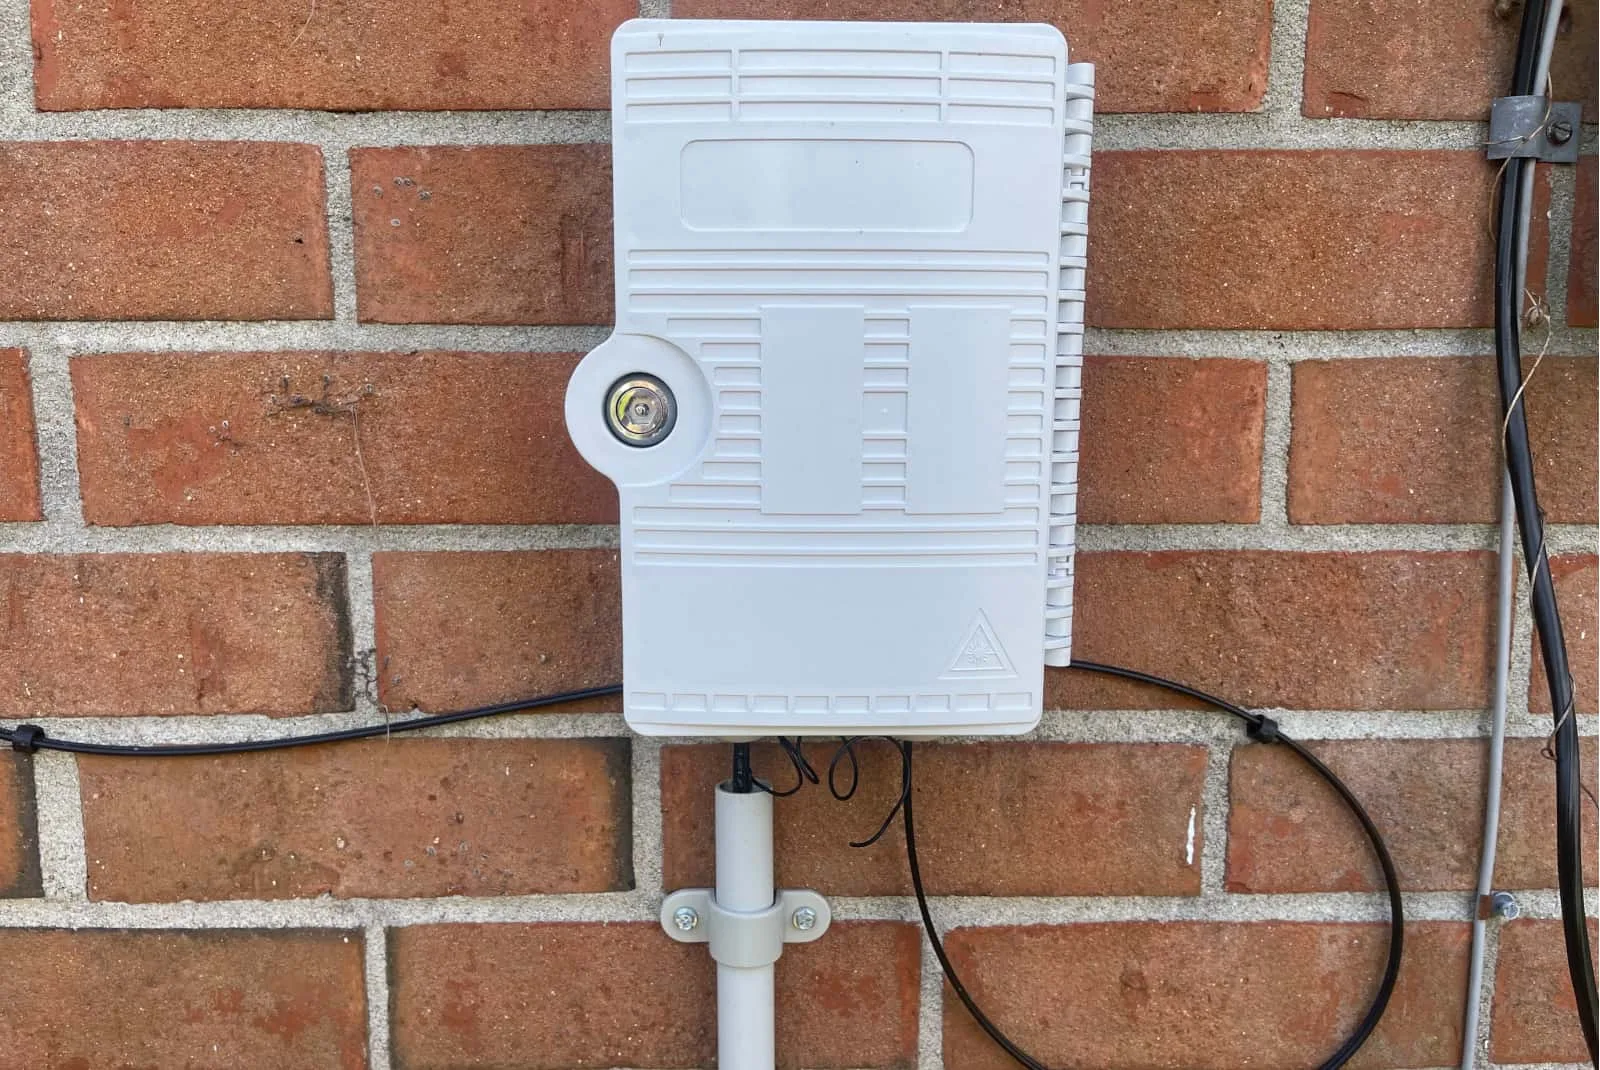
Metronet’s fiber install has the drop line come up into the service box, and a second fiber line coming out and entering the home. Kevin Parrish | HighSpeedInternet.com
Here’s an example of a fiber ISP’s buried drop line connecting to a service box mounted on the home’s exterior wall. Another fiber line leaves the box and goes into the home, where it terminates at another box called an optical network terminal (ONT). Some setups may have the ONT’s Ethernet output connected to an Ethernet jack mounted on a wall, so you can place the gateway or router elsewhere (in homes wired for Ethernet).
As shown above, glass fiber lines always have wide loops because you can’t bend them like copper-based cable and telephone lines.
How to tell if you have an existing cable internet connection
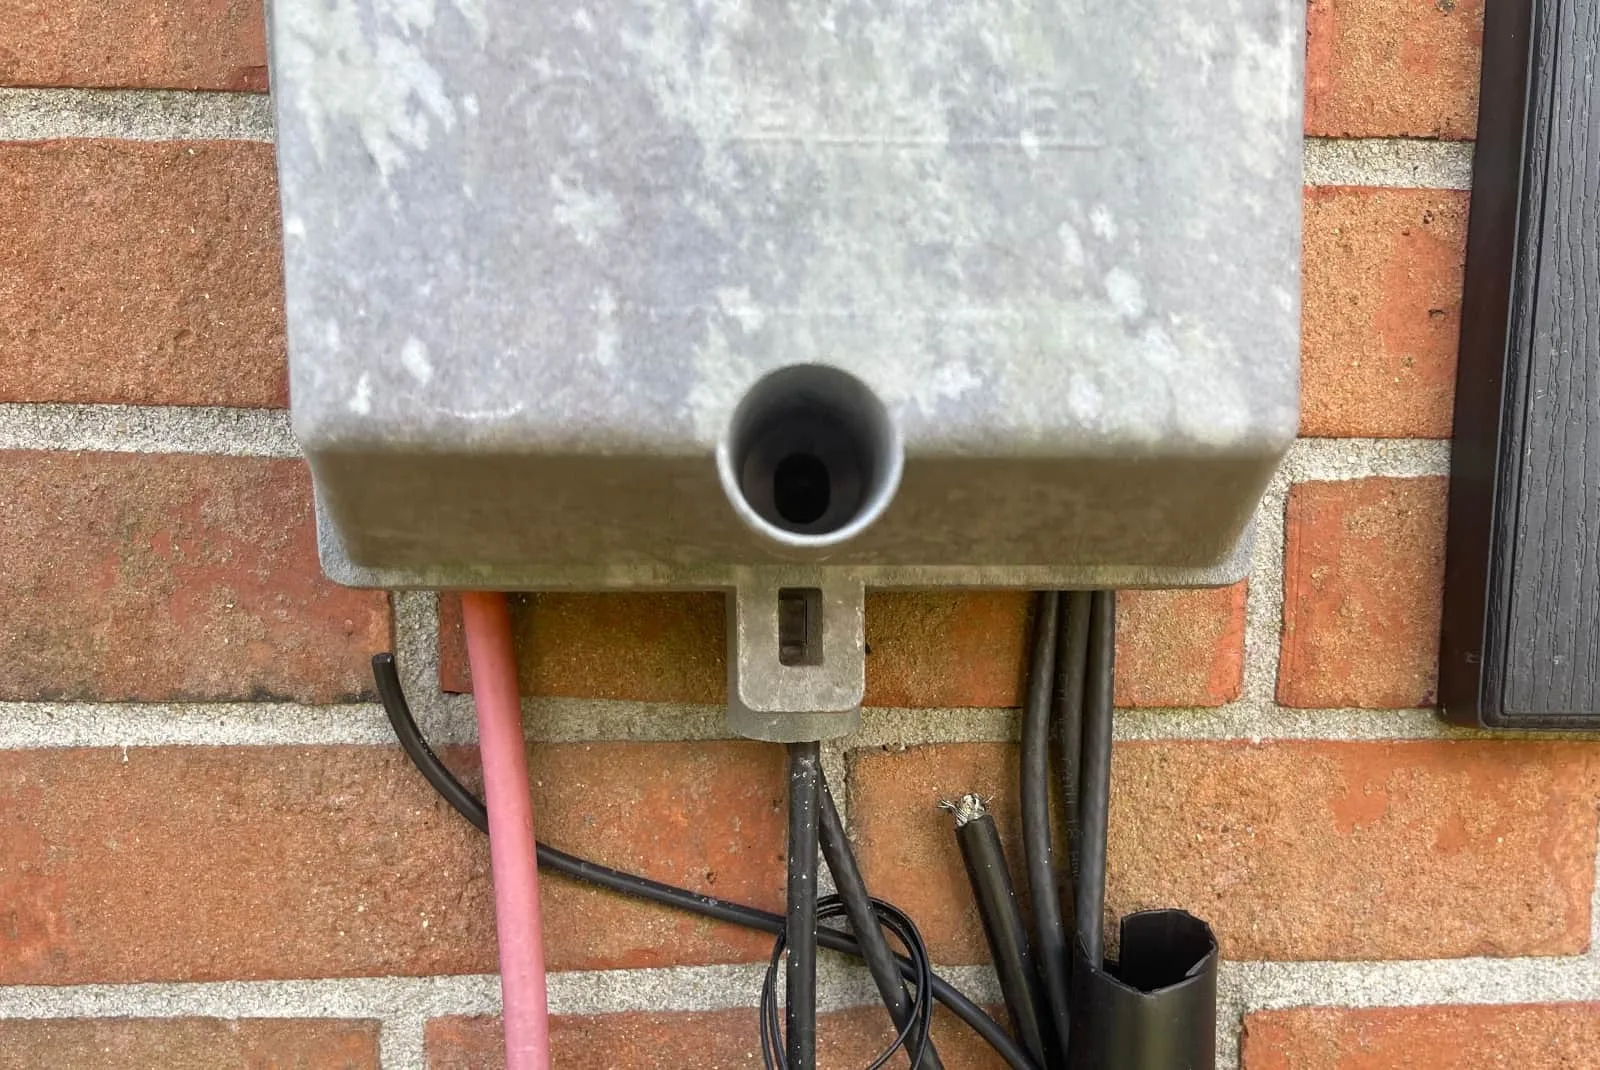
Spectrum’s setup has the orange drop line enter the service box, while the black line(s) enter the home. Kevin Parrish | HighSpeedInternet.com
Here’s an example of a cable ISP’s buried drop line (orange in this example) connecting to a service box mounted on the home’s exterior wall. Another coaxial cable line (black) leaves the box and goes into the home, where it’s terminated at a coaxial connector mounted on a wall or screwed directly onto the cable modem.
How to tell if you have an existing DSL internet connection
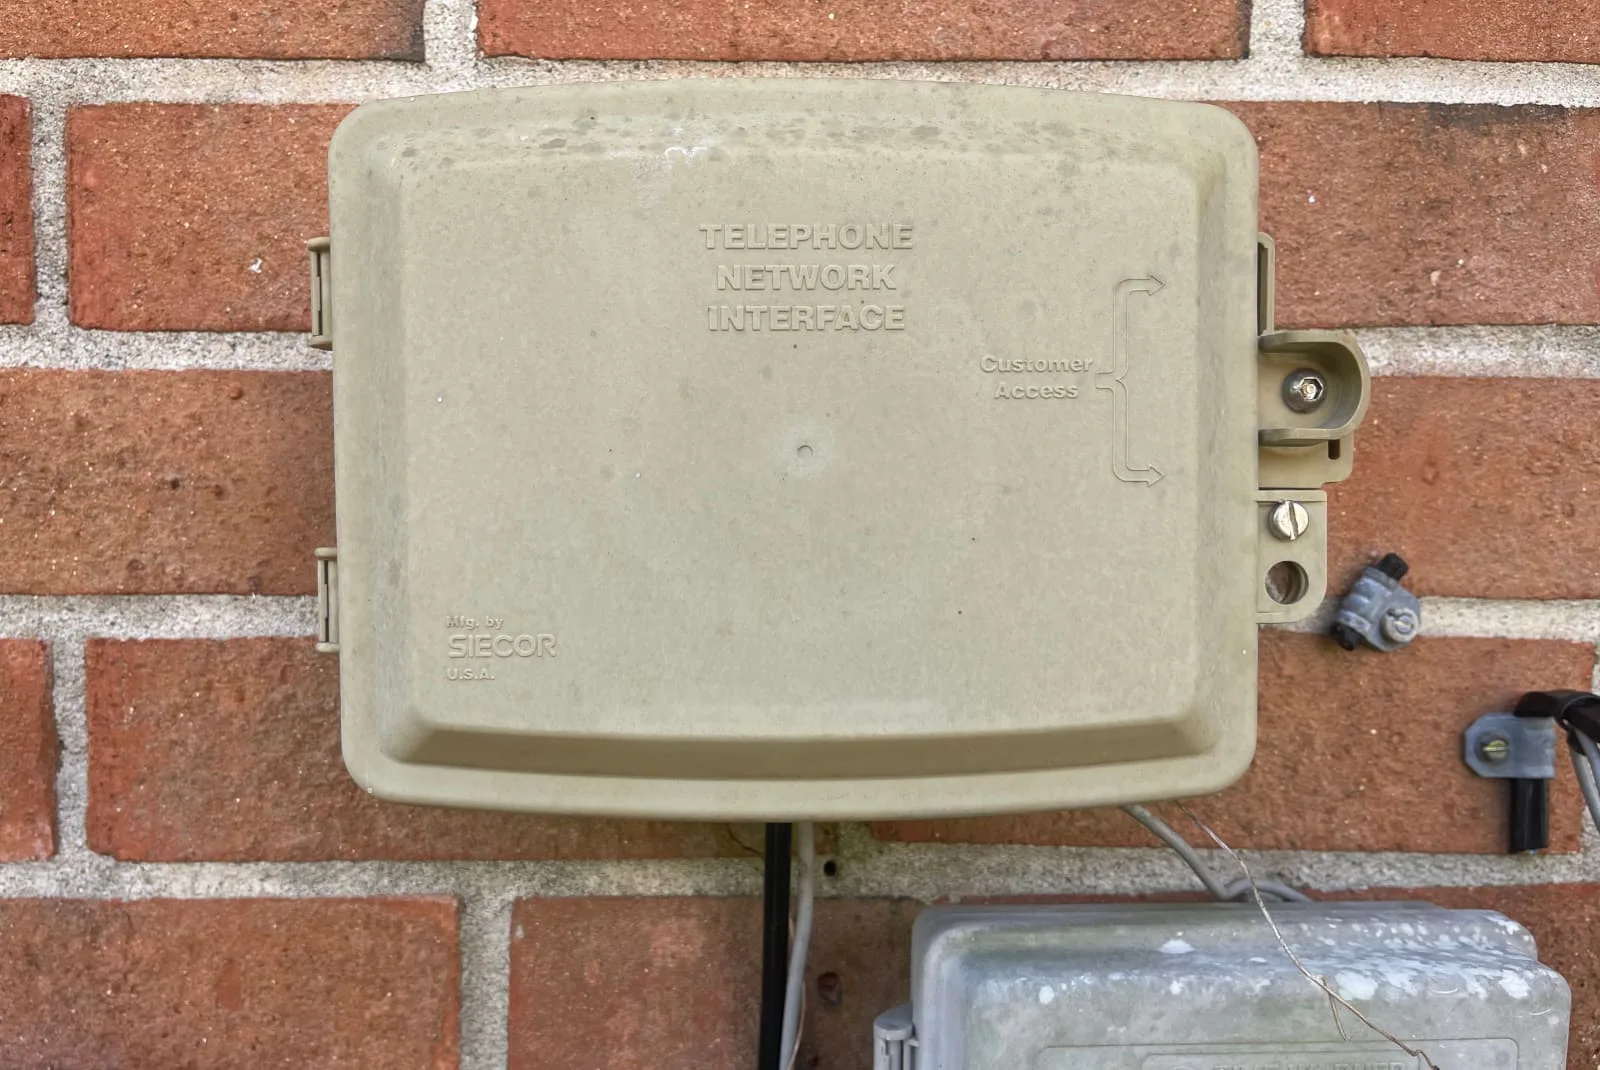
AT&T’s phone setup has a thicker black telephone line coming into the service box, and a thinner, more traditional phone line coming out and entering the home. Kevin Parrish | HighSpeedInternet.com
Here’s an example of a DSL ISP’s buried drop line (black in this example) connecting to a service box mounted on the home’s exterior wall. Another telephone line (gray) leaves the box and goes into the home, where it’s terminated at a phone jack mounted on the wall or connected directly to the DSL modem.
But wait: Existing connections may not be “active”
The only way to know 100% if an internet line is active and healthy is with a professional inspection by an internet technician.
Generally, ISPs already know if your connection is ready for a self-install kit. Modems and ONTs will shine green if a connection is successful—red if they are not. A technician will come out and inspect the installation should any issues arise.
 Get internet service
Now that you’ve determined whether you need a self-install kit or a professional installation, you can order internet service. Enter your zip code below to get started. Once you’re done, come back to see how to set up your equipment.
Enter your zip code to see what’s available to you!
 Install your equipment
Now that you have internet service and the equipment you need, you can get your devices connected to the internet.
How to set up your fiber ONT
Normally, setting up your fiber ONT isn’t something you’d do. A technician must come in and mount it somewhere within your home. The fiber drop line enters your home and connects to the PON port on the ONT using an SPF module. Given the delicate nature of fiber’s design, self-install kits will either have a gateway or a router and an Ethernet cable.
Step 1: Connect the ONT to power if it isn’t already.
Step 2: Wait for the ONT to boot. The Power and PON lights should glow a steady green when it’s ready to use.
Step 3: Connect an Ethernet cable to the Data port on the ONT. This line goes to the WAN port on a gateway, standalone router, or the first unit of a mesh system.
How to set up your DSL or cable modem
Every home wired for DSL or cable internet needs a modem or gateway. A modem translates the internet signals from your ISP so they can be used by your devices. An internet gateway is one device that serves as both a modem and a router.
Step 1: Connect an active telephone or coaxial cable line to the port on the back of the modem. The telephone connector should snap into place, while the coax cable should be screwed on hand-tight.
Step 2: Connect the modem to power. Most modems don’t have an on/off button, so the modem should begin to boot up as soon as you plug it in.
Step 3: Wait while the modem boots. It usually takes several minutes. You can tell when the modem is online by checking the status lights. Most modems have a light labeled “WAN” or “Internet” that indicates a successful network connection. Refer to your product documentation for information on interpreting your specific modem’s LED light indicators.
If you have a standalone router, it’s time to set that up as well. If you have a modem/router combo unit (also called a gateway), you can skip this next step and move on to setting up your Wi-Fi network.
Note: Mesh router setup is a very similar process with the added task of setting up mesh satellites.
How to register your DSL or cable modem
Your modem or gateway must be registered with your ISP for your internet connection to work.
If you get your internet equipment from your ISP, it may or may not be registered already, depending on the provider.
If you supply your own modem or want to double-check, registering your equipment is usually just a matter of using your ISP’s app or calling your ISP and supplying two labeled numbers on the back of your modem: the serial number and the CMAC address.
Once you register the modem or gateway, you should have access to the internet. The next step is to connect a standalone router to your modem or create your Wi-Fi network on your gateway.
Fiber internet customers normally don’t need to register the ONT, as it’s done by the technician during the installation.
How to set up a router or mesh system
With the modem or ONT ready to roll, you can create your home network. The router is what distributes the modem’s translated internet signal to all your devices through wired and wireless connections. You must have a router in order to connect multiple devices to the internet.
Step 1: Connect an Ethernet cable from your modem or ONT to the Ethernet port labeled “WAN” on your router or mesh system unit.
Most routers have several Ethernet ports for connecting to devices like laptops, but only one is designated to connect to the modem or ONT. Some mesh system units don’t have a specific port for WAN—they automatically detect the internet connection from any Ethernet port you use.
Step 2: Connect the router or mesh unit’s power cable to a power outlet and wait while the device boots. Just like with your modem, your router or mesh unit likely has indicator lights telling you when the equipment is online and ready.
Once the router or mesh system is online, you’re ready to set up your Wi-Fi and get your devices online.
Note: Setting up a mesh Wi-Fi system is a little different, as you need to set up mesh satellites in addition to the router.
 Create your Wi-Fi network
Your router, gateway, or mesh system has a default network name and password you can use to set up the device or system—that info is attached to the back or bottom of the device. Once you’re connected, use an app or web browser to follow the steps in creating new administration login credentials, setting up your Wi-Fi network(s), and updating the firmware. After that, you can get online.
Be sure to consult our guide on how to set up a router or mesh system for detailed instructions.
App versus web browser: Which should you use?
We recommend defaulting to the app as it’s usually the easiest and quickest way to manage your home network. Unfortunately, manufacturers don’t offer apps for desktops and laptops, so the web browser interface is your only means of managing your home network on these devices. However, the web interface is where you’ll find all the settings made available to you, not the app, so power users may defer to it instead.
Typically you change the network name(s) and password(s) during the initial setup process. If you didn’t, you can return to the settings at any time and switch to custom names and passwords.
How to use an app to change your Wi-Fi network name and password
Step 1: Connect to your router, gateway, or mesh system using the default name and password.
Step 2: Go into the Wi-Fi settings and manually change the network name(s) and password(s).
Step 3: Wait for the router, gateway, or mesh system to reboot.
How to use a web browser to change your Wi-Fi network name and password
Step 1: Connect to your router, gateway, or mesh system using the default login credentials.
Step 2: Enter your router, gateway, or mesh system’s IP address or login URL web address into a web browser. You can find this information on a sticker attached to the back or bottom of the unit.
Step 3: Enter the login credentials you created when you first set up the router, gateway, or mesh system. If you can’t remember the login credentials, perform a factory reset to create a new password.
NOTE: Some routers have you create security questions when you first set them up, so you may be able to retrieve your forgotten password (or create a new one) if you answer them correctly.
Step 4: Navigate to your wireless settings. Most interfaces look a little different, but you can usually find your wireless network settings under a tab or page labeled “Wireless” or “Wi-Fi.”
Step 5: Name your network(s) and choose your password(s).
Step 6: Wait for your router, gateway, or mesh system to reboot.
After setting up your Wi-Fi, you’re finished. You can now connect your devices via Wi-Fi or Ethernet. If you still need some help with this step, see our complete guide to changing your Wi-Fi password.
 Connect your devices
Once your Wi-Fi is humming along, it’s time to connect your devices.
Connecting computers, phones, tablets, and streaming boxes is straightforward, as these devices have easily navigated displays and networking menus. Some IoT smart devices rely on other methods, like WPS. We’ll walk you through the basics of both.
Expert’s tip: Ethernet vs. Wi-Fi
Desktop computers, many laptops, and gaming consoles provide two ways to connect to your home network: Ethernet and Wi-Fi. Ethernet cables provide a direct connection to the router, often resulting in faster speeds and a more stable connection. Wi-Fi is a wireless signal broadcast from your router or gateway, making it much more convenient than Ethernet: No cables required.
Find out more in our guide about Ethernet vs. Wi-Fi to determine the best connections for your devices and applications.
How to connect via Ethernet
Step 1: Plug one end of an Ethernet cable into your router, gateway, or mesh system.
Step 2: Plug the other end into the Ethernet port on your device.
And presto, you’re already done. You don’t need to adjust any settings on the device.
Note: Some devices, like MacBooks, are compatible with Ethernet but require an Ethernet adapter.
How to connect via Wi-Fi
Step 1: Navigate to your device’s networking settings.
Step 2: Locate a list of available Wi-Fi networks, often found in a menu labeled wireless or Wi-Fi.
Step 3: In the list of networks, choose your home network.
Step 4: Enter your password.
Keep in mind, when using Wi-Fi, you need to stay within range of your router.
Author - Kevin Parrish
Kevin Parrish has more than a decade of experience working as a writer, editor, and product tester. He began writing about computer hardware and soon branched out to other devices and services such as networking equipment, phones and tablets, game consoles, and other internet-connected devices. His work has appeared in Tom’s Hardware, Tom's Guide, Maximum PC, Digital Trends, Android Authority, How-To Geek, Lifewire, and others. At HighSpeedInternet.com, he focuses on network equipment testing and review.
Editor - Jessica Brooksby
Jessica loves bringing her passion for the written word and her love of tech into one space at HighSpeedInternet.com. She works with the team’s writers to revise strong, user-focused content so every reader can find the tech that works for them. Jessica has a bachelor’s degree in English from Utah Valley University and seven years of creative and editorial experience. Outside of work, she spends her time gaming, reading, painting, and buying an excessive amount of Legend of Zelda merchandise.
 Test your speeds


