Kinetic Internet Self-Installation Guide

Feb 18, 2025 | Share 


Brand Guides, Equipment Guides
If you live in the Midwest, you’ve likely heard of provider Kinetic. It stands as one of the better-known internet providers, connecting more than eighteen million people to the internet. This ISP provides internet service via DSL, which makes the self-installation process relatively easy. DSL service runs on existing phone lines, meaning all you need to do to get internet service is sign up with Kinetic and connect a modem or modem-router to a phone jack. Once you run through the installation steps, you’ll be ready in no time to pin, purchase, and tweet to your heart’s content.
How to self-install Kinetic internet
Installing your Kinetic internet is nothing like building IKEA furniture—the process won’t take hours, nor will it leave you with a bruised thumb and sore calf muscles. Kinetic estimates that a self-installation should take between thirty minutes and an hour.
1. Wait for your activation date
Even if your modem and equipment arrive in the mail prior to the activation date, wait to install everything until that day. Your service won’t be available until the specified date, making it impossible to check connections and connectivity until then.
2. Check the equipment
While you wait for your activation date, check the equipment you’ve received. You should have received a Kinetic wireless modem, cables, power cords, DSL filters, and instructions.
3. Choose a location
On your activation date, choose a spot to set up the modem. You’ll want a centralized location, free from obstructions. The open, central space will help “spread” wireless coverage throughout the home.
4. Connect the DSL filter
If you don’t have home phone service, skip this step. Using the DSL filter will prevent signal interference, an issue that commonly occurs when installing DSL internet in a home with home phone service. If you do have home phone service, plug the filter (sometimes called a splitter) into the phone jack. Next, connect the gray phone line to the DSL port on the filter. Finish the work in this step by connecting the home phone cord to the other port on the filter.
5. Connect the phone line
Kinetic includes a gray phone cord in the box of equipment. Once your activation date has arrived, connect the cord to the labeled DSL port on the modem.
6. Power up the modem
Next, connect the power adapter to the modem. When that’s done, connect the adapter to an electrical outlet.
7. Connect the Ethernet cable
While you can use your Kinetic internet to create a wireless network, this initial hardwired setup will ensure a reliable connection during your account activation. To get started, plug the yellow Ethernet cable into the modem’s Ethernet port. Then connect the other end of the cable to your computer.
8. Watch the lights
The DSL and internet lights will flash green. Wait one to two minutes for them to turn a solid green before continuing in the setup process. Note that the internet light will flash intermittently while you’re using the internet.
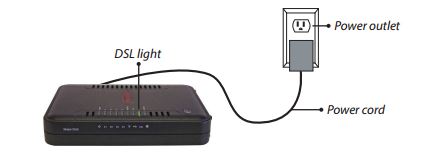
If both lights turn a solid green, you can move on to activating your account. If the lights still flash after three minutes or so, revisit the directions and make sure you followed them exactly. You can also check the connections; cables sometimes wiggle loose. If none of those steps correct the problem, call technical support at 1-800-347-1991.
Don’t want to rent a modem or router?
If you’d rather purchase equipment than rent from Kinetic, these are the equipment recommendations from our internet experts:
How to activate your Kinetic internet service
Once all of the lights turn a solid green, you can begin activating your Kinetic account. These final steps should take you about fifteen minutes to complete.
1. Open your internet browser
When you open your internet browser, the window will automatically redirect you to the Kinetic Internet Service Setup page.
2. Accept the Terms of Service
The initial screen will ask you to accept Kinetic’s terms and conditions. You must accept them to continue onward with the installation process.
3. Enter your information
The next page will ask for your account information. You should have received this information in a mailed letter or other form of communication.
4. Finish setting up your Kinetic account
If you’re planning to connect wirelessly, enter your wireless information, which is the SSID and key. You can find that information either in your service agreement or on the bottom of the modem provided by Kinetic.
5. Finalize your setup
Once you complete the first four steps, finish by clicking the button to finalize your setup. It saves the data entered and enables internet access.
6. Connect your wireless devices
Wireless devices, such as a phone, tablet, or laptop, will still need to be connected to the wireless network. Use the default SSID and key provided with the modem, unless you changed them during the setup phase. You’re finished! To test your work, close the browser, reopen it, and connect to one of your favorite websites.
How to upgrade your modem’s settings
Your modem comes with default login settings, which should be changed to protect your home network’s privacy and security. The steps are slightly different depending on the modem in use, but the process will generally follow a similar pathway.
1. Open a browser
The first step is the easiest: simply open your favorite web browser from home. Being home is necessary; Kinetic explicitly states you can’t update your wireless network and key remotely.
2. Access the modem’s settings panel
Things can get tricky with this step, particularly if you’re using a preferred modem rather than the one provided by Kinetic. With a Kinetic modem, you type in http://192.168.254.254/wlcfg.html to change the name of your network, or SSID. To change the default password, or key, head to http://192.168.254.254/wlsecurity.html. Other modems use different addresses, but they usually always contain http:// and a series of numbers.
3. Update your wireless network name
With the network settings panel open, scroll down to “Wireless – Guest/Virtual Access Points.” Select the default SSID name by checking “enabled,” and type in a new name in lieu of the default one. Click “Apply/Save” to finalize the new settings.
4. Change your wireless network password
Next, visit http://192.168.254.254/wlsecurity.html to change your password. Scroll down to the section “Manual Setup AP” and select your SSID from the drop-down menu. Enter your preferred password in the “WPA/WAPI Passphrase” box. You can click “Click here to display” so that you can see the letters, numbers, and symbols being inputted. Finally, click “Apply/Save” to store your settings.
5. Reconnect your wireless devices
If you initially connected your wireless devices to the internet via the default SSID and key, you will need to update their settings in order to access the internet again.
How to resolve common self-installation challenges
The self-installation process sometimes proves challenging, but you can usually resolve the issues yourself. If you can’t seem to figure out what’s wrong, Kinetic is standing by to help. The company offers a plethora of support options, from its virtual assistant “Wendy” to remote-desktop troubleshooting. You can also take the easiest route by calling tech support directly at 1-800-347-1991.
Problem: I can’t connect to the internet.
- Before you call tech support, try rebooting the modem. The problem could be that the modem experienced some interference and is a little confused. Rebooting it will purge the modem of bad connections and interference sources.
Problem: The internet goes in and out.
- You could have interference on the line—the likely culprit is a missing or rogue DSL filter.
- If you have home phone service, you’ll want to use DSL filters. They sort out signals, preventing interference and dropped calls.
- If you don’t have home phone service, but installed a DSL filter, uninstall it. An unnecessary DSL filter sometimes causes signal interference.
Problem: The indicator lights never came on.
- The problem could be loose cords or a dead outlet. Check all the cords and cables and make sure they’re securely connected to the modem, wall, and computer. Also double-check that the cords and cables connect to the appropriate ports and wall connections.
- If the cables and cords are secure, try using a different phone jack or power outlet before calling Kinetic.
Problem: I don’t know what’s wrong.
- No problem! With Kinetic, you have access to 24/7 tech support. Give the support team a call at 1-800-347-1991.
- If you can connect to the internet, consider visiting the support center. You can take part in an online chat, ask Wendy for help, or avail yourself of remote-desktop assistance.
When to self-installation or work with a pro
When it comes to internet service, you can either work with a pro or go at it alone. Both options work, but each offer different advantages and disadvantages.
Professional installation
 Pros:
Pros:
- Expertise: A Kinetic technician walks you through the activation process, showing you how to set up and change your username and email address.
- Quality Assurance: Before leaving your home, the Kinetic technician will confirm you can connect to the internet. They also check all the connections outside the home, ensuring a reliable internet connection and quality service.
 Cons:
Cons:
- Expense: Kinetic charges a one-time $35 fee for its professional installation service.
- Time: Generally a Kinetic pro will be in and out of the home within an hour—but the timeframe isn’t guaranteed. If additional work is required, such as installing a new phone jack, the time could increase to two hours or more.
Self-installation
Pros:
- Convenience: With self-installation, you can set up your modem and internet service whenever it’s most convenient for you. You can go through the process over the weekend or at two in the morning; it’s up to you.
- Ease of Use: Kinetic ships directions with your modem, making it easy to set up your home network. It also provide instructions for connecting wirelessly from a variety of devices.
Cons:
- Responsibility: Self-installation makes you the only person responsible for setting up the modem and activating your Kinetic account. It also turns you into the primary troubleshooter.
- Limitations: Self-installation only works for basic installs and you’ll be limited by where the phone jack is located.
How to purchase the best Kinetic modem
If you elect to self-install Kinetic internet, the company will send you one of their modems. However, you don’t have to stick with what Kinetic sends. You can use other modems, too, as long as they’re compatible with Kinetic’s DSL service. Below are our top two picks for Kinetic compatible modems.
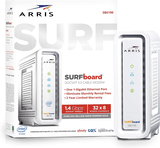
The ARRIS SURFboard modem also claims an average of four stars on Amazon, but it reigns as a bestseller and it’s easy to see why: this modem offers a number of download speeds, making it perfect for anyone seeking a DSL-based modem. The company also offers an integrated modem-router product for consumers who want to extend wireless connectivity throughout their home.
Notable Features: The ARRIS SURFboard supports the latest internet standards and is certified as a DOCSIS 3.0 Cable Modem, guaranteeing compatibility with most ISPs. It also comes with a two-year limited warranty.
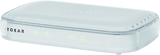
Simple, cost-effective, and efficient, Netgear’s modem pulls in an average of four stars on Amazon. Google’s search results nudge it closer to five, as based on 930 product reviews.
Notable Features: Netgear’s modem features a small, compact design that’s both pleasing to the eye and easy to position discretely within the living room or home office.
How to set up an appointment with a Kinetic home technician
If you opt for professional installation when signing up for Kinetic, an appointment is automatically scheduled on the date of your activation. If, however, you originally choose to self-install and then change your mind later on, you can call Kinetic customer service at 1-866-445-5880 to set up an in-home visit.
Congratulations! If you’ve made it this far, you’ve likely successfully installed your internet service. Welcome to the web with Kinetic.
Author - Erin Feldman
Erin is a freelance writer based in Austin, Texas. She has over ten years of experience, with a background in marketing and creative writing
Related Posts