How to Enable or Disable a Firewall on Windows and Mac
May 22, 2025 | Share
How-To, Technology
I will never, ever tell you to disable the firewall on your computer. That’s just crazy talk right there. Doing so opens the door to hackers and malware, all eager to seize your computer and steal your data. Not fun.
But there may come a time when you need to disable the firewall on Windows or Mac temporarily to troubleshoot issues—and that’s my only exception. For this reason, I’ll show you where to disable and enable the firewall on Windows PCs, desktop Macs, and MacBooks.
A note before going in
The firewall on your Windows PC, Mac desktop, and MacBook is enabled by default. If you dig in and find that it’s been unknowingly turned off for some reason, chances are you already have some form of malware installed. I’d run a third-party virus scanner to clean out the malicious trash or perhaps even reset the device to its out-of-the-box state if the pesky bugs persist. Malware can slow your computer to a crawl and severely reduce your internet speeds, among other things.
How to enable or disable the firewall on Windows 11
You can take two paths to access the Microsoft Defender Firewall toggle. I will first give you Microsoft’s official instructions, followed by a shorter route using the hidden icons menu.
The Start button route
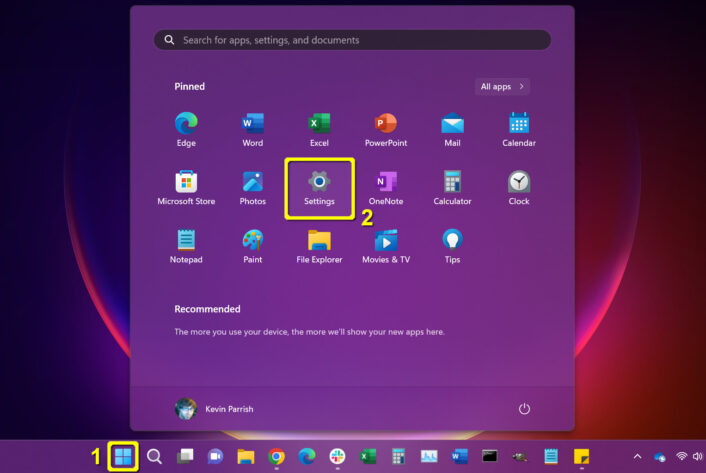
Step 1: Select the Start button.
Step 2: Select Settings on the Start Menu.
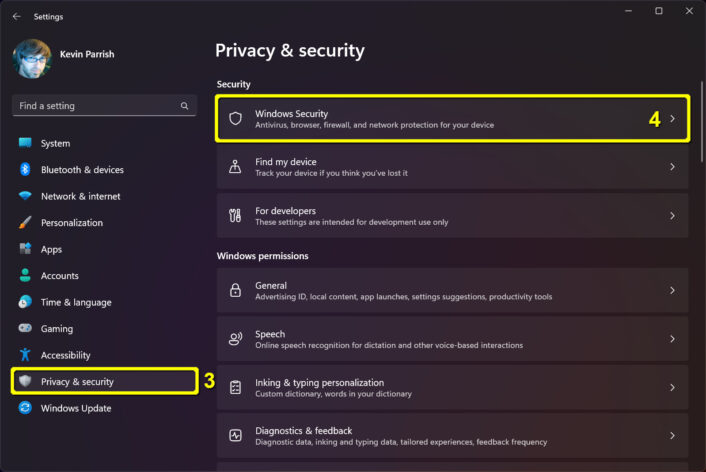
Step 3: The Settings panel appears on your screen. Select Privacy & Security on the left.
Step 4: Select Windows Security on the right.
Step 5: Select Firewall & network protection from the following list appearing on the right.
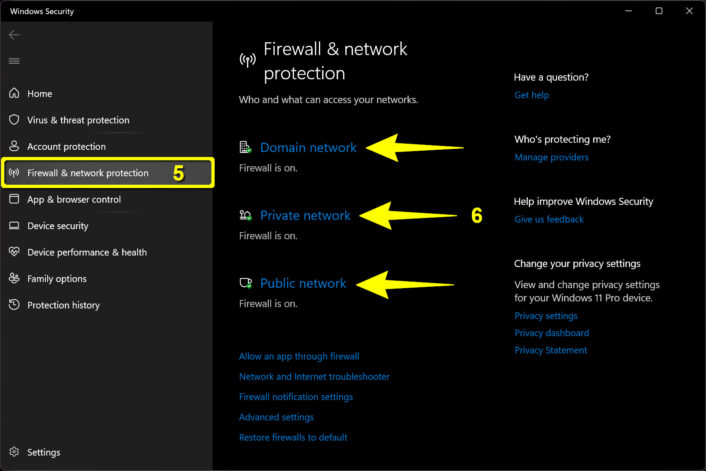
Step 6: The Windows Security panel appears on your screen with the Firewall & network protection category already selected. Choose Domain network, Private network, or Public network (see FAQ).
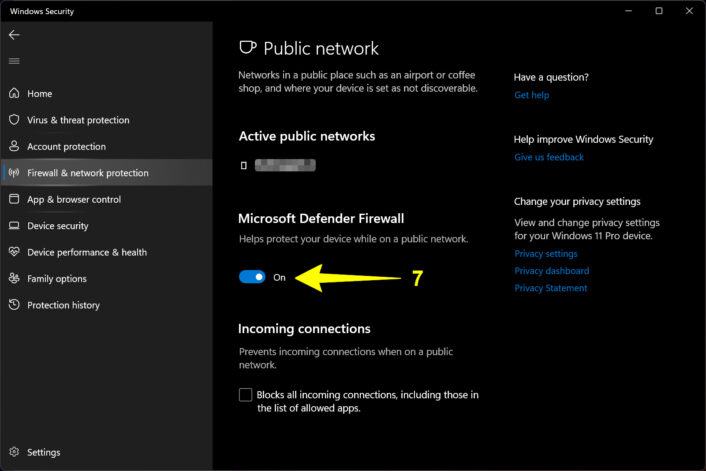
Step 7: Under Microsoft Defender Firewall, click on the toggle to set it to On or Off.
The hidden icons route
Here’s the shorter route to accessing the Microsoft Defender Firewall toggle. In my case, the Windows Defender icon resides in the hidden icons pop-up balloon. However, you may see the icon seated on the Taskbar instead.
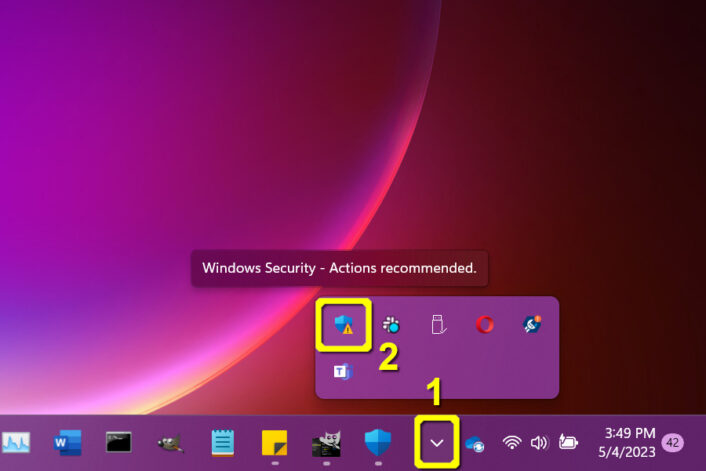
Step 1: Select the Show hidden icons button (up arrow) on the Taskbar.
Step 2: Select the Windows Security icon.
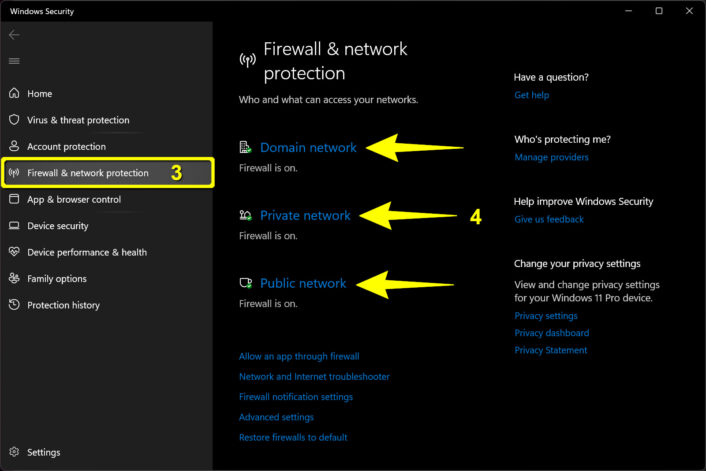
Step 3: The Windows Security panel appears on your screen. Select Firewall & network protection on the left.
Step 4: Select Domain network, Private network, or Public network (see FAQ) on the right.
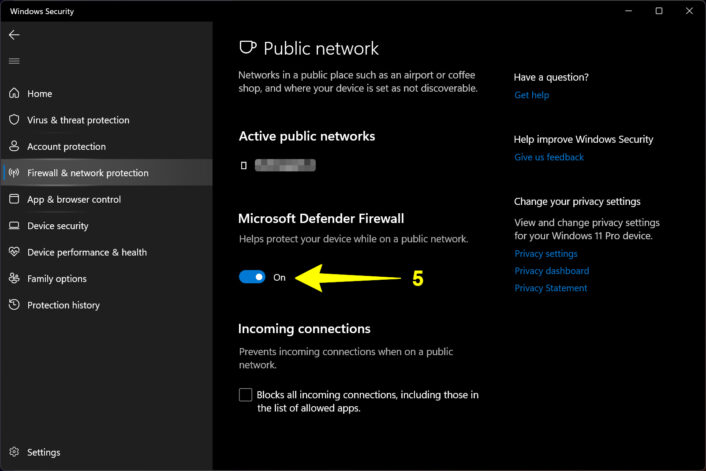
Step 5: Under Microsoft Defender Firewall, click on the toggle to set it to the On or Off position.
How to enable or disable the firewall on Windows 10
The instructions to reach the firewall toggle are different on Windows 10 than on Windows 11. But like Windows 11, you have two ways to reach the firewall toggle: using the traditional Start button method or the (faster) hidden icons route.
The Start button route
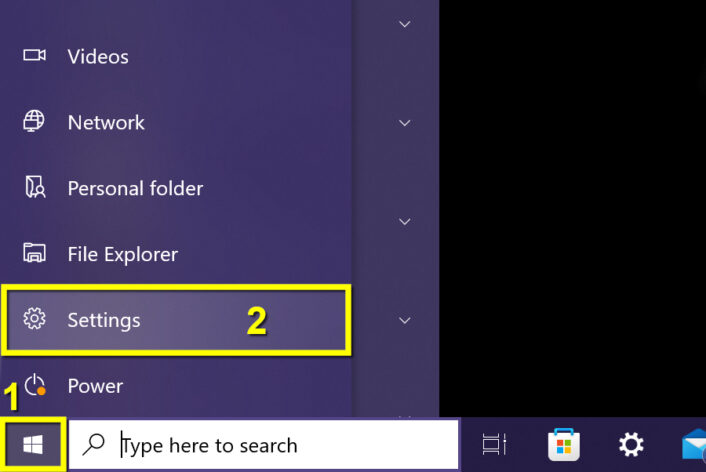
Step 1: Select the Start button.
Step 2: Select the Settings icon.
Step 3: The Settings panel appears on your screen. Select the Update & Security tile.
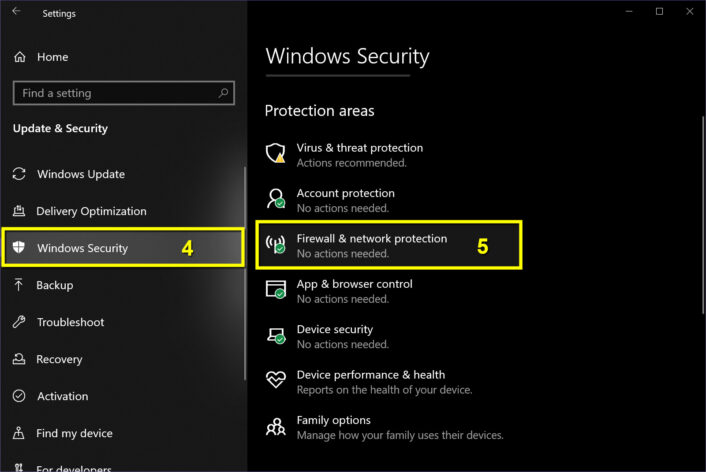
Step 4: Select Windows Security on the left.
Step 5: Select Firewall & network protection on the right.
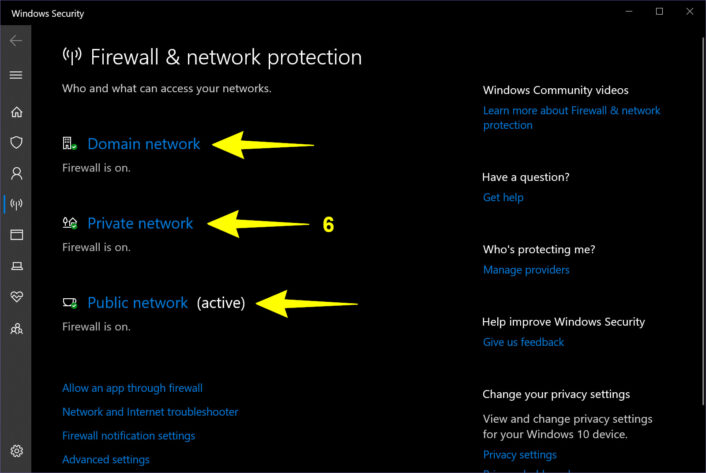
Step 6: The Windows Security panel appears on your screen. Select Domain network, Private network, or Public network (see FAQ).
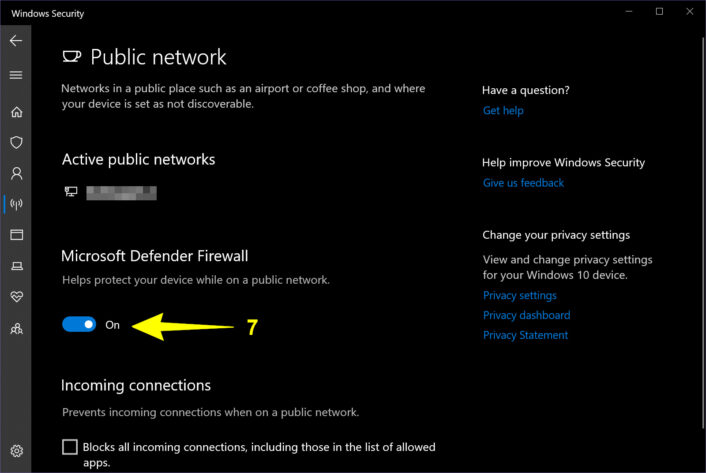
Step 7: Under Microsoft Defender Firewall, click on the toggle to set it to the On or Off position.
The hidden icons route
You can bypass the Settings window altogether and go directly to the Windows Security screen using these instructions.
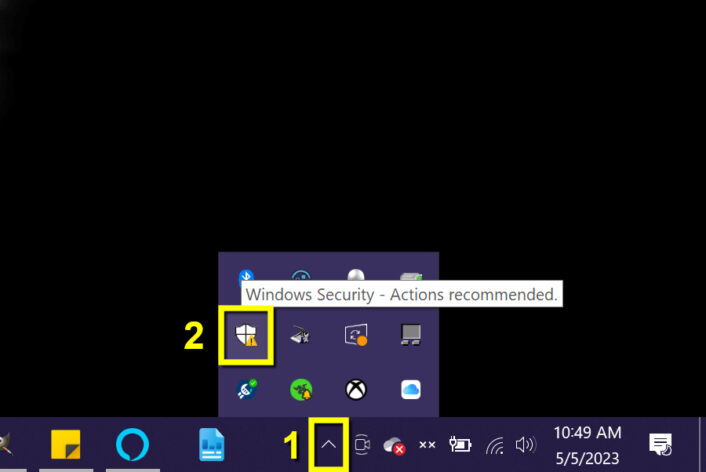
Step 1: Select the Show hidden icons button (up arrow) on the Taskbar.
Step 2: Select the Windows Security icon in the pop-up menu.
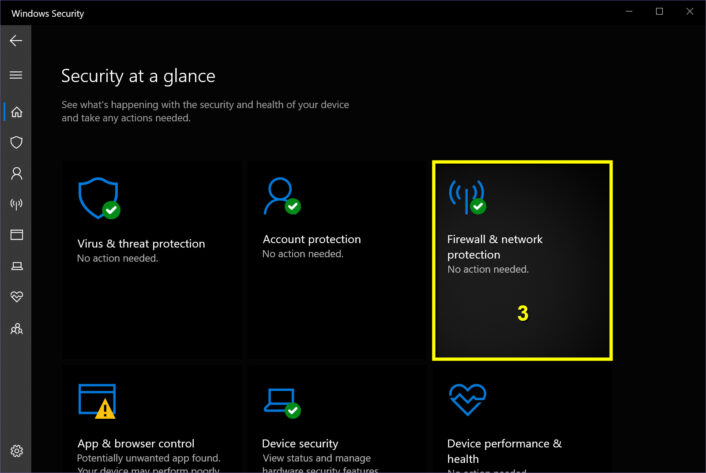
Step 3: The Windows Security panel appears on the screen. Select the Firewall & network protection tile.
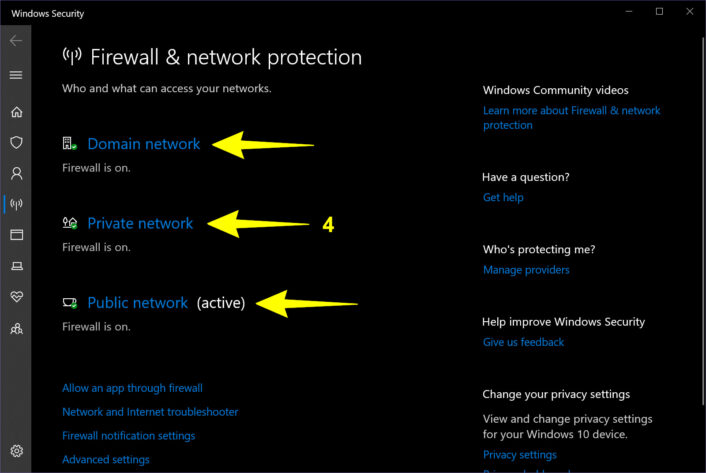
Step 4: Select Domain network, Private network, or Public network (see FAQ).
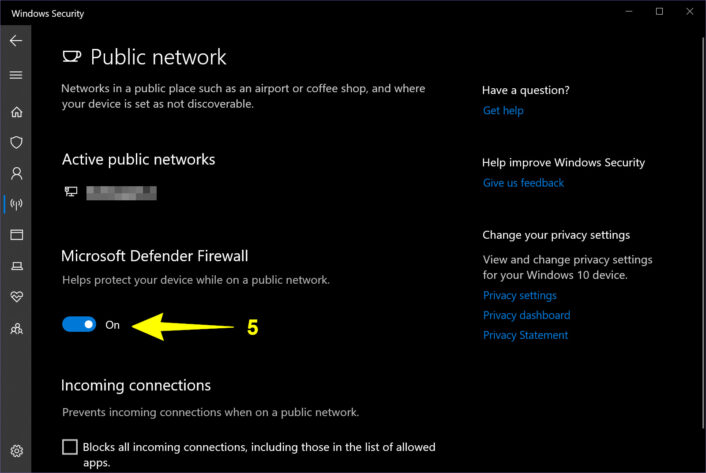
Step 5: Under Microsoft Defender Firewall, click on the toggle to set it to the On or Off position.
How to enable or disable the firewall on Mac
Apple keeps your route to the firewall toggle pretty simple, although you’ll have a faster trip if the System Settings icon is on the Dock. These instructions are based on macOS Ventura.
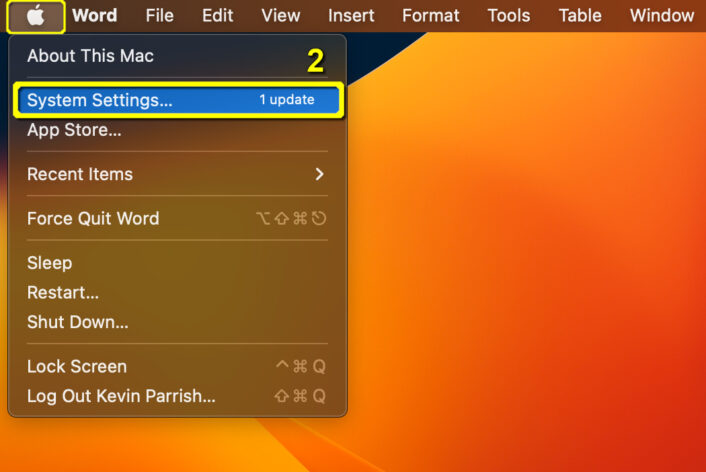
Step 1: Select the Apple menu icon in your screen’s top left corner.
Step 2: Select System Settings on the drop-down menu.
Alternative method: Select the System Settings icon if it appears on the Dock.
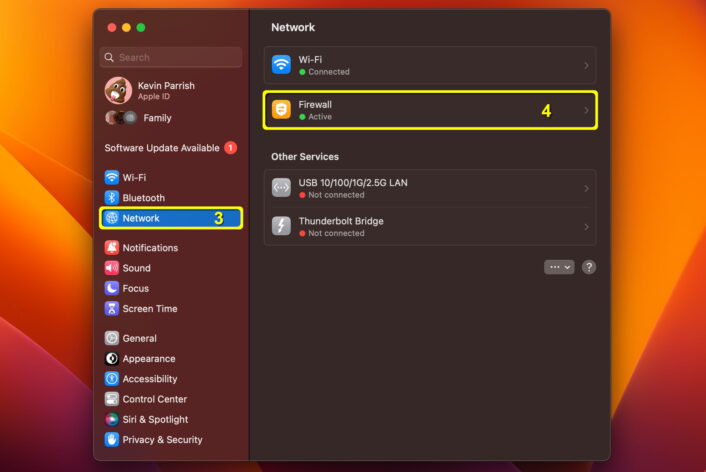
Step 3: The System Settings panel appears on your screen. Select Network on the left.
Step 4: Select Firewall on the right.
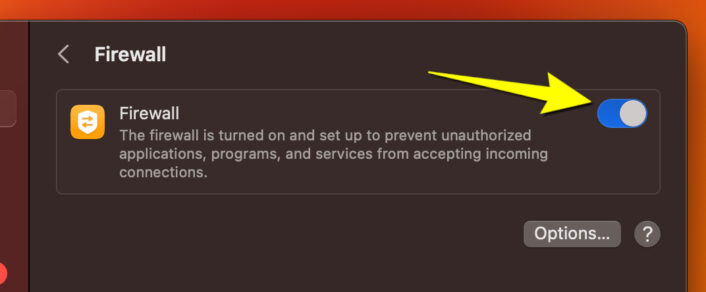
Step 5: Select the toggle to enable or disable the firewall.
FAQ about enabling and disabling a firewall
What is a firewall?
Should I turn off my firewall?
Can I temporarily disable my firewall?
When can I temporarily disable my firewall?
What are the Domain, Private, and Public profiles in Windows Defender Firewall?
Do smartphones and tablets have firewalls?
Author - Kevin Parrish
Kevin Parrish has more than a decade of experience working as a writer, editor, and product tester. He began writing about computer hardware and soon branched out to other devices and services such as networking equipment, phones and tablets, game consoles, and other internet-connected devices. His work has appeared in Tom’s Hardware, Tom's Guide, Maximum PC, Digital Trends, Android Authority, How-To Geek, Lifewire, and others. At HighSpeedInternet.com, he focuses on network equipment testing and review.


