RCN Self-Installation Guide
Jul 10, 2020 | Share ![]()
![]()
![]()
Brand Guides
This is how to self install RCN internet in your home.
You will need an RCN modem, a computer, and the connection and power cables included in your RCN self-installation kit.
To install RCN internet yourself, you’ll need to connect the RCN modem to the computer, plug in the modem, and turn it on. Once your modem is connected, the second part of the installation process is activating your RCN internet service. To activate internet service, open a browser and follow the directions that appear.
See below for more detailed RCN internet self-installation instructions.
Jump to: How to self-install RCN internet | How to activate RCN account | Common installation issues | Self-install vs. Pro-install | Modems and routers | Contact RCN
Still need to sign up for RCN? Enter your ZIP code to make sure it’s available in your area.
How to self-install RCN internet
When you first purchase RCN, you elect to either self-install or have a technician visit your home. If you choose the former, the equipment will be sent to your home, or you can pick it up at a local payment center.
1. Check the equipment
When you receive your RCN equipment, you should double-check it—just as you would when receiving your food at the Arby’s drive-through window. Make sure the RCN package contains all the requested items, including a modem, a router (or modem and router Wi-Fi gateway), a self-installation guide, and all the necessary cords and adapters. Also, find the packing slip and never let it go—you’ll need it while activating your account for the first time.
Looking to purchase your own modem and router?
If you’d rather purchase your own equipment than rent RCN’s provided modem and router, our experts put together some recommendations for you. But before you buy one, just be sure it’s compatible with RCN by checking the tech specs:
2. Find the sweet spot
Before you pull everything out of the box, figure out where you want to plug in the modem. You should look for a centralized location; it will help transmit the Wi-Fi signal throughout the home.
3. Connect the power cord
Connect the power cord to the modem and plug the power cord into a wall socket.
4. Turn off the computer
Turn off the computer or laptop you’ll be using to set up the internet. This is simply a precaution to avoid complications with the initial installation and account activation.
5. Connect the Ethernet cable

With the computer still off, plug the Ethernet cable into the modem’s Ethernet port. The port will either be labeled “Ethernet” or color-coded to match the cable. Now connect the other end of the Ethernet cable to the computer’s Ethernet port.
6. Turn on the computer
Turn on the computer to initiate the modem’s search for the RCN network. Be patient as the search can take a few minutes.
7. Wait for the lights
Before attempting to activate your RCN account, you should wait for the lights to turn a steady color. This will prevent hiccups in the activation process later on.
How to activate your RCN account
If the lights on the modem or router turn on, you can now activate RCN internet service. Follow these steps to successfully activate your account.
- Open your favorite web browser. The browser will automatically redirect you to the RCN setup page.
- Follow the on-screen instructions and prompts. Most of the information you’ll need to enter can be found on the RCN packing slip.
- Save your changes. If you make any changes to the network name or password, save them before closing out of the browser.
- Reboot the modem. To reboot it, turn off the computer and unplug the modem’s power supply. Next, reconnect the power cord and turn on the computer.
- Open a browser to confirm the internet works as promised and expected.
How to change your modem’s settings
The RCN-supplied modem or router is typically a Linksys model, so RCN has provided its own instructions for updating the router’s settings. If you use your own modem, you will want to find its instruction manual. While the steps usually follow a similar pattern, the starting point often differs. Some modems use a web interface while others, like the Linksys, recommend using the Cisco Connect software to simplify setup and management.
- Install the Cisco Connect software provided with your RCN modem or router.
- Open Cisco Connect.
- Click “change” underneath Router Settings.
- Next, click “change” in the Personalize section.
- A warning appears on the screen. Accept it to continue onward.
- Enter the new router name (SSID) and password.
- Click “change” to save the new settings.
- Update devices with the new router name and password.
In some instances, you will want to use the browser interface. It houses a couple of advanced features not available in Cisco Connect. You also can use the interface to make simple changes, but the Linksys manual warns that using it might interfere with running Cisco Connect later on. To use the web interface, follow these seven steps.
- Open a web browser.
- Input 192.168.1.1.
- If the numerical address doesn’t go anywhere, try myrouter.local.
- You will be asked to enter a username and password. If you didn’t change these when first using Cisco Connect, the username and password are “admin.”
- The main menu opens. Once here, you can change the username, password, and other settings, including guest networks and security protocols.
- Save any changes you make and close out the browser.
- If you change the username and password, update your wireless devices with the new information.
How to solve common self-installation challenges
Self-installing internet service can fell even the mightiest of technophiles. Fortunately, help is available with this short list of common issues and solutions. If these solutions fail to solve your problem, contact RCN Customer Support at 1-800-746-4726 or use the online chat. The ISP is relatively good about answering customer questions on social media, too.
Problem: The modem’s indicator lights never turned on.
- You likely have a loose cable or power issue.
- Check the wall outlet. It could be one with an “on/off” switch. If it is, confirm the switch is “on.” If the power still doesn’t kick in, try plugging the cord into a different electrical socket.
- Check the Ethernet cable. It could have jiggled loose during setup or during a cat’s jaunt behind the desk or shelf.
Problem: The internet is sluggish.
- You should first run a speed test. You’ll want to hardwire the internet connection in for this step because RCN’s demonstrated speeds are based on wired connections, not wireless.
- If you pass the speed test, the issue could be the modem’s location or the number of devices connected to the network.
- Try moving the modem or router to a more centralized location, such as one where the majority of your devices live.
- Hardwire a couple of your devices to reduce the load on the Wi-Fi. Some options include a DVR or gaming system, which typically run better when plugged into a dedicated Ethernet port anyway. And as they perform better, so will your other devices.
Problem: My streaming videos are choppy.
- Your problem could be the equipment or bandwidth.
- Check your computers and devices to see if they can handle the internet speeds provided by RCN.
- Check the modem or router. If it isn’t using DOCSIS 3.0 or higher, you will experience latency and other performance issues.
- If you own the latest equipment, the issue likely is bandwidth related. You should find the device that’s hogging the internet and hardwire it in. This should deliver a clear, smooth stream.
Problem: I can’t connect to the internet.
- Your best bet is to power-cycle the modem or router. Rebooting it flushes out the system and resets connection settings.
- If the reboot doesn’t work, contact Customer Support.
Self-installation vs. professional installation
You face a tough decision when deciding whether to self-install or to let the professionals do the work. RCN often offers a free installation service via a promo code. Setting that factor aside, self-installation could still prove to be the more efficient and convenient choice.
Professional installation
Pros
- Licensed Professionals: Before RCN technicians go into the field, they must first earn their certification from the Society of Cable Telecommunications Engineers (SCTE).
- Financial Credits: If a technician arrives late to an appointment, you receive a $20 credit.
Cons
- Time Commitment: RCN employs a shorter service time window (two hours), but it’s long enough to still require taking a chunk out of your day to wait for a technician to arrive.
- Inconvenient Scheduling: Depending on your schedule, professional installation could be hugely inconvenient, interrupting either your work or someone’s naptime.
Self-installation
Pros
- Flexibility: You decide when to install the internet.
- No Extra Fees: If you miss out on the RCN promo code, you’ll have to pay for the installation service. But if you opt to self-install, the money stays in your pocket.
Cons
- Troubleshooting Responsibility: Setting up a home network poses some potential challenges. If you want to avoid them, you should call in the RCN professionals.
- Possible Frustration: When self-installation takes longer than originally predicted or becomes problematic, blood pressure may rise to new heights.
Choosing the best RCN-compatible modem
If you want to save money on rental fees, you will want to “bring your own modem.” The challenge, however, arises in selecting one that’s compatible. RCN’s 1 Gigabit internet requires the use of its DOCSIS 3.1 modem alone. RCN’s other internet packages demonstrate more leeway. They only demand that the modem or router be DOCSIS 3.0 certified and feature at least twenty-four downstream channels and eight upstream channels.

The ARRIS SURFboard beats RCN’s recommendations, featuring thirty-two download channels and eight upload channels. It also supports today’s internet standards, including both IPv4 and IPv6.
Notable Feature: ARRIS excels when it comes to aesthetics and power. Its slim profile and black or white options conceal four Gigabit Ethernet ports and built-in AC1750 Wi-Fi.
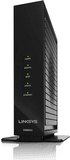
This modem benefits from an easy plug-and-play setup. If you want to be up and running with RCN quickly, the Linksys modem is the ticket.
Notable Feature: The Linksys modem also packs a punch, using an Intel Puma 6 chipset to deliver high speeds and consistent connectivity.
How to set up an appointment with a RCN
Setting up an installation appointment with RCN is easy, thanks to its 24/7 customer service. To reach the department, call 1-800-746-4726. Questions specific to your installation should be directed to 1-866-832-4726.
You did it! You received your RCN modem or purchased a compatible one. Now all you have to do is follow the self-installation directions, and you’ll be connected to the internet in no time at all.
Author - Erin Feldman
Erin is a freelance writer based in Austin, Texas. She has over ten years of experience, with a background in marketing and creative writing
Related Posts