How to Encrypt Email on Gmail, Outlook, iOS, and More
Easily encrypt your emails to keep sensitive information out of prying eyes.
Dec 19, 2022 | Share ![]()
![]()
![]()
FAQ, Technology
Email encryption isn’t a mainstream feature. Corporate environments primarily use encryption for exchanging sensitive data. But what if you need to email tax documents and you don’t feel comfortable merely locking the files behind a password?
The good news is that you don’t need a corporate account to encrypt emails. Full email encryption on a consumer level is possible and not overly complicated.
This guide will show you how to set up your email client to use an S/MIME certificate so your email will be encrypted. We will also show you how to use free services like Mailvelope and OpenKeychain. If you’d rather use a paid third-party email service, we list a few examples of those as well.
Start with a secure internet connection.
Security isn’t the only important thing about your internet connection. Enter your zip code below to see if there’s a better provider (and plan) in your area.
Get an S/MIME certificate
The bottom line with end-to-end encryption outside a corporate environment is that you must install an S/MIME certificate. Think of it as a plug-in for your email client. Some just guarantee who you are, while others provide both digital signing and encryption.
While you can create a self-signed S/MIME certificate, the process is long and overly technical. The easy way to get an S/MIME certificate is to pay an annual fee. Here are five examples:
| Company | Plan | Cost | Get it |
|---|---|---|---|
| Entrust | S/MIME Personal | $50.00/yr. | View Plan |
| IdenTrust | Secure Email (S/MIME) | $18.00–$91.00/yr. | View Plan |
| GlobalSign | PersonalSign | $59.00–$79.00/yr. | View Plans |
| Sectigo | Personal S/MIME | $15.00-$49.00/yr. | View Plan |
| SSL | Personal Basic Email | $30.00/yr. | View Plan |
How to encrypt email on Outlook for Windows 10
Outlook for desktop encrypts messages using an S/MIME certificate only if you have an active Microsoft 365 subscription.
We provide additional information about S/MIME in the email encryption FAQ below, which lists the caveats of using this method. The bottom line is that both parties need a digital signature for this method to work from end to end.
If you don’t have a Microsoft 365 subscription, Microsoft provides Personal and Family plans. Otherwise, your next best method is to use a browser extension.
How to install and select your certificate in Outlook
These instructions assume that you already obtained an S/MIME certificate, downloaded the file to your Windows PC, and have the required password handy.
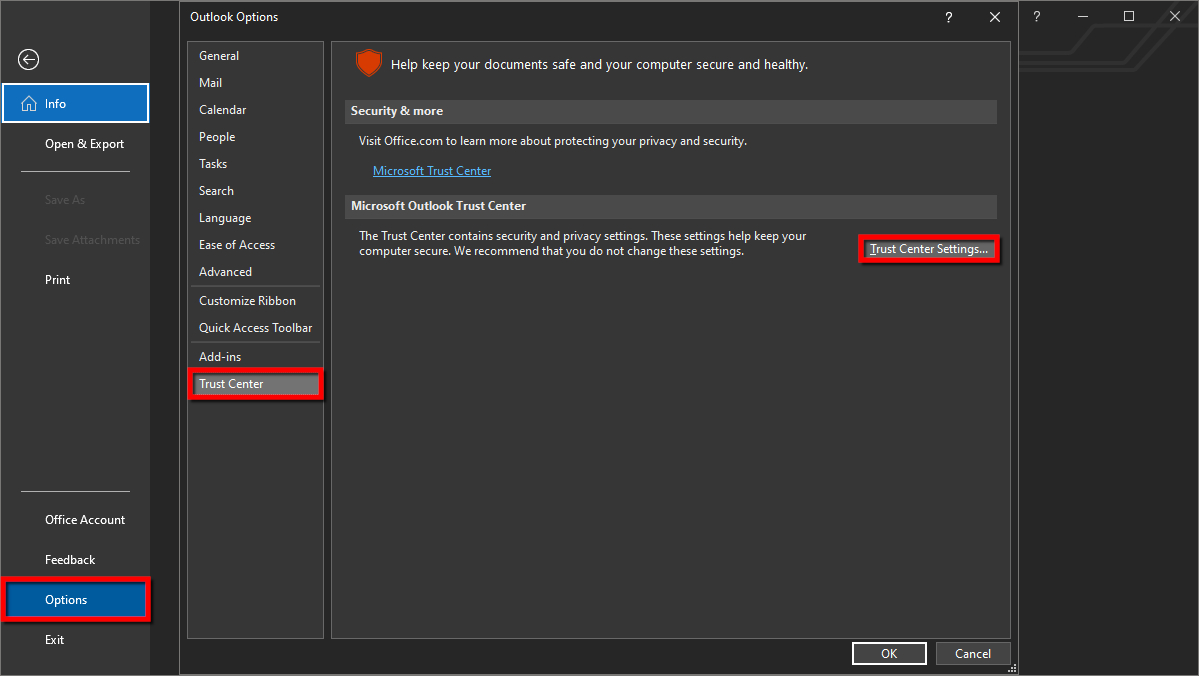
Step 1: With the Outlook desktop client open, click File located in the top left corner.
Step 2: Select Options on the next panel.
Step 3: On the Outlook Options window, select Trust Center listed on the left.
Step 4: Click on the Trust Center Settings button displayed on the right.
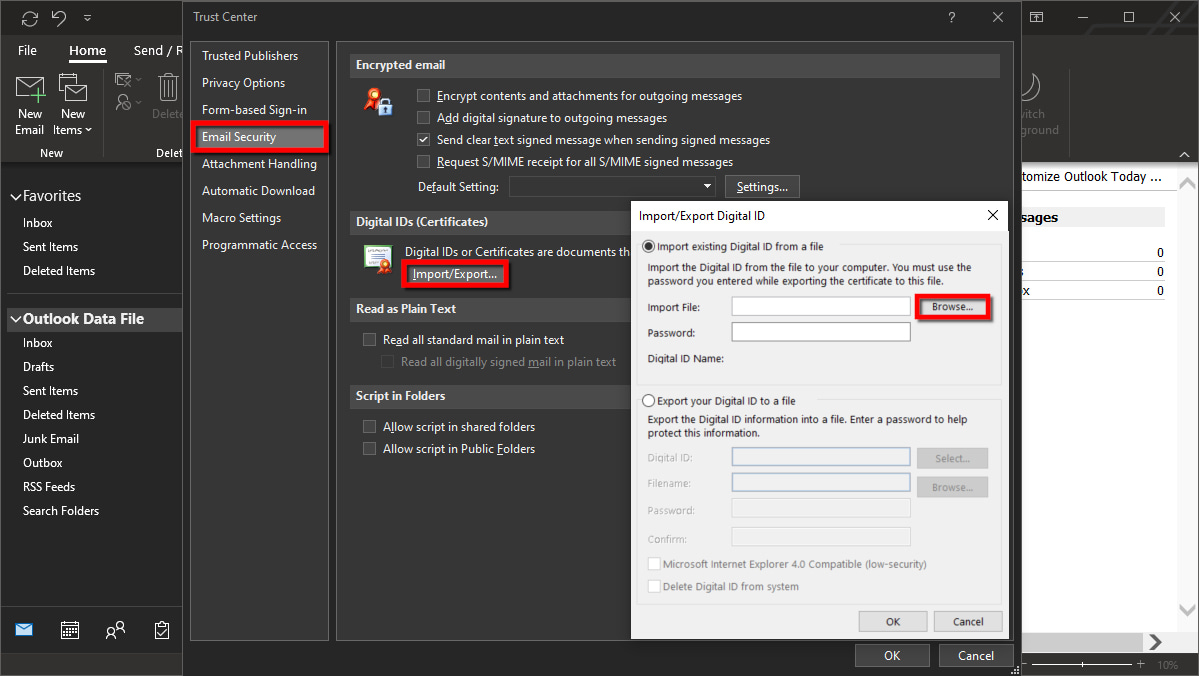
Step 5: Select Email Security listed on the left.
Step 6: Under Digital IDs (Certificates), click on the Import/Export button.
Step 7: Check the box next to Import Existing Digital ID from a File if it’s not already.
Step 8: Click the Browse button displayed next to Import File.
Step 9: Find and select the downloaded file. Then click Open.
Step 10: Enter the password associated with the certificate file and then click OK.
Step 11: Click the OK button displayed in the security dialog box.
At this point, you return to the Email Security panel in the Trust Center window. Your certificate should already be selected for signing and encryption by default. To verify, continue to the next step.
Step 12: Under Encrypted Email, click the Settings button.
Step 13: Create a unique security settings name or leave it as the default.
Under Certificates and Algorithms, you should see the certificates appearing next to Signing Certificate and Encryption Certificate.
How to encrypt a single message and attachment in Outlook
Step 1: Start a new message.
Step 2: Select File in the top left corner.
Step 3: Select Properties on the next panel.
Step 4: Click on the Security Settings button in the pop-up window.
Step 5: Click on the box next to Encrypt Message Contents and Attachments.
Step 6: Click the OK button to continue.
Step 7: Compose your email and send it as usual.
How to always send encrypted emails in Outlook
Step 1: With the Outlook client open, click on File located in the top left corner.
Step 2: Select Options on the next panel.
Step 3: Select Trust Center listed on the left in the Outlook Options screen.
Step 4: Click on the Trust Center Settings button.
Step 5: Select Email Security listed on the left.
Step 6: Under Encrypted Email, check the box next to Encrypt Contents and Attachments for Outgoing Messages.
Step 7: Click on the OK button to finish.
How to encrypt email on Outlook for macOS
With macOS, you import the S/MIME certificate to Keychain Access and then link to it inside Outlook. For this method, you need a Microsoft 365 subscription to enable encryption. If you don’t have a subscription, the next best method is to use a browser extension.
How to install a certificate in Outlook for macOS
These instructions assume that you already generated the certificate, assigned a password, and downloaded the file to your Mac. The following steps are based on instructions provided by Entrust.1
Step 1: Locate and double-click on the downloaded file and enter the certificate’s required password, not your Mac password.
Step 2: The Keychain Access app should open by default. On the left under Category, select Certificates.
Step 3: Click on the certificate displayed on the right. You will see an error noting that an “unknown authority” signed the certificate.
Step 4: Hold down on the Command key while clicking on the certificate.
Step 5: Select Get Info on the pop-up list.
Step 6: On the following pop-up window, click on the URL listed under Method #2. A secondary certificate downloads to your Mac.
Step 7: Locate and open the file you just downloaded (*.cer).
Step 8: Select Add in the pop-up window.
How to link certificates to Outlook on macOS
With the certificates now installed, you can link them within Outlook.
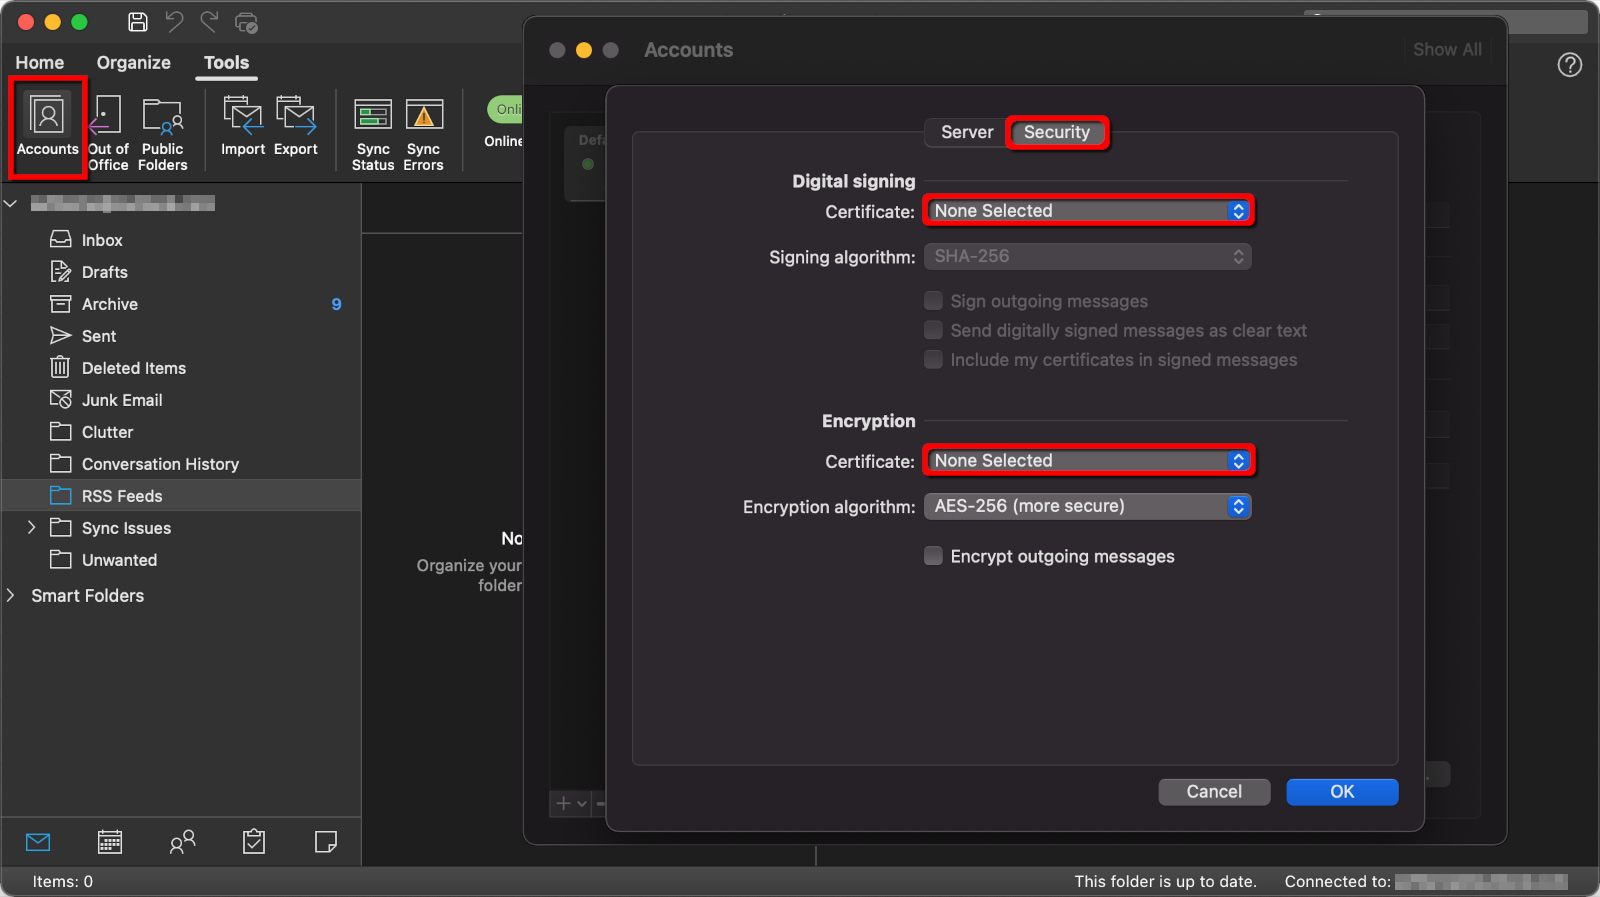
Step 1: With the Outlook desktop client open, select Tools on the menu bar.
Step 2: Select Accounts on the drop-down menu.
Step 3: Select Advanced.
Step 4: Click on the Security tab.
Step 5: Under Digital Signing, click the arrows next to Certificate and select the certificate you just installed.
Step 6: Check all three options listed in the Digital Signing section.
Step 7: Under Encryption, click the arrows next to Certificate and select the certificate you just installed.
Step 8: Select OK to finish.
How to encrypt Gmail
For the general user, Gmail handles encryption in two ways.
First, Google encrypts all files stored on its servers by default, including emails. If a hacker breaks into Google’s cloud, they can’t read your messages. This is called “encryption at rest.”
Second, Google automatically employs “encryption in transit” by using Transport Layer Security (TLS). This method doesn’t encrypt the actual message but instead encrypts the transport from sender to server. Think of this as sending an unencrypted message in a corked bottle that only the server can pop open.
To send a fully encrypted message from end to end, you need a Google Workspace Business or Enterprise account (formerly GSuite) or a third-party service. Even if you have an S/MIME certificate, there’s no way to “install” it in Google’s Gmail client without Google Workspace—it requires a Google Admin console.
How to use Confidential Mode in Gmail
One way to “lock” your emails away from prying eyes without using S/MIME encryption is to use Google’s Confidential Mode. This mode requires a passcode to unlock and will delete the message after a duration specified by you. Here’s how to use it:
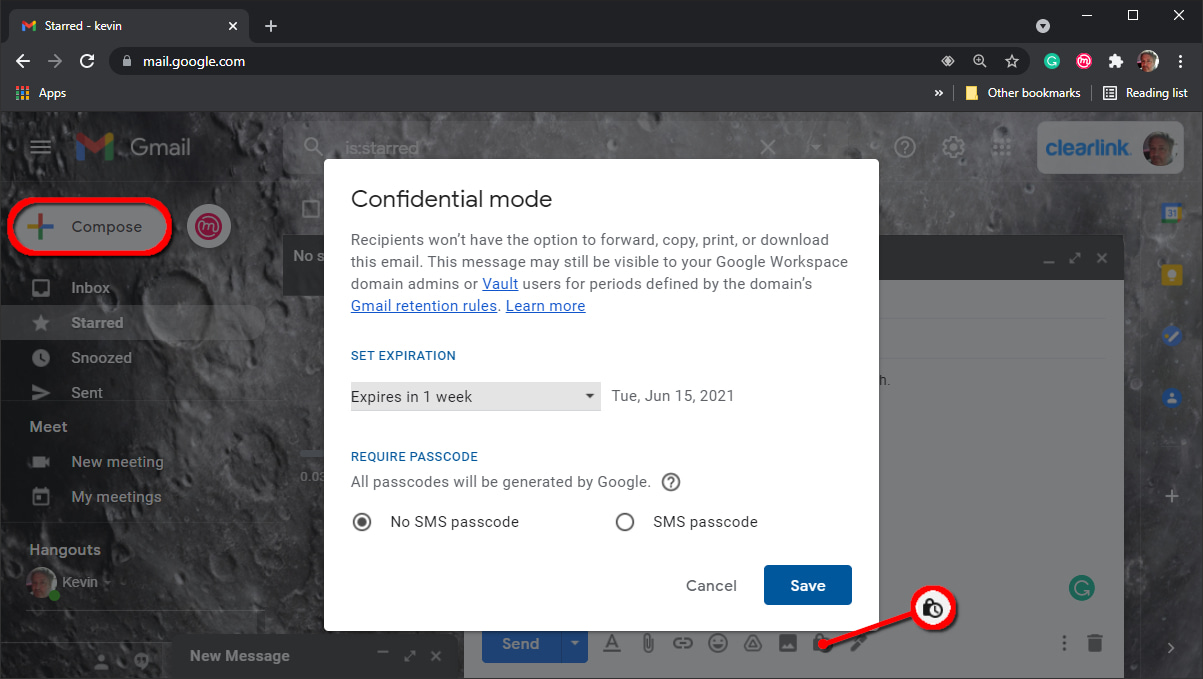
Step 1: With Gmail open in a browser, click on the Compose button to start your message.
Step 2: Write your message.
Step 3: Click on the lock/clock icon on the toolbar at the bottom.
Step 4: Click the Down arrow under Set Expiration and select one of five durations.
Step 5: Under Require Passcode, select one of two options:
- No SMS Passcode: Recipients using Gmail will not need a passcode to open the messages. For all other email clients, Google will send an emailed passcode.
- SMS Passcode: Recipients will receive a passcode in a text message.
Step 6: Click on the Save button.
Step 7: Click the Send button. If you chose the SMS Passcode option, move on to the next step.
Step 8: A pop-up window appears on your screen. Enter the recipient’s phone number and then click on the Send button.
Use a Chrome extension
You can install third-party Chrome extensions that provide end-to-end encryption for webmail clients like Gmail. Move on to the next section for more information.
How to use a browser extension for Gmail, Outlook.com, Yahoo! Mail, and more
As we previously pointed out, webmail clients encrypt the transport only while the email is in transit, not the actual message. For end-to-end encryption, you will need a browser extension.
In this example, we use Mailvelope. It supports Chrome, Firefox, and Chromium-based browsers, including Microsoft Edge.
How to use Mailvelope
Before you use this free service, keep in mind that the recipient must also use Mailvelope to decrypt your messages.
Step 1: Install the browser extension.
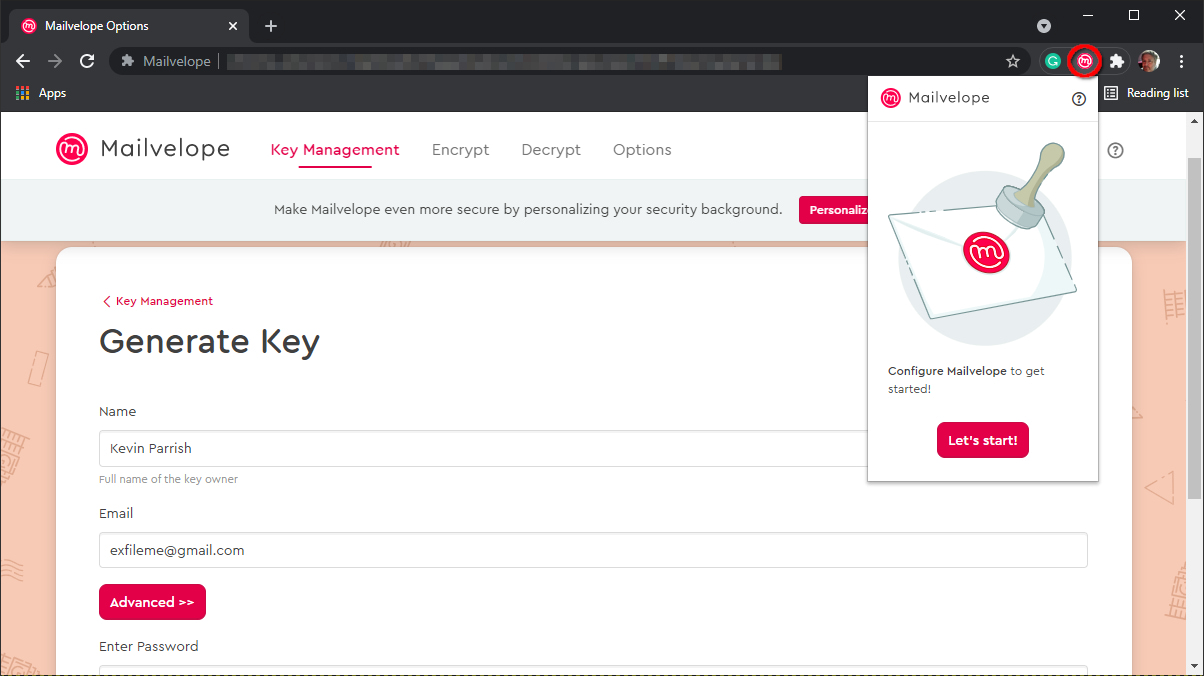
Step 2: Click the Mailvelope icon and then click on the red Let’s Start button.
Step 3: Click on the Generate Key button to create your key pair set.
Step 4: On the following screen, enter your name, email address, and password. You cannot reset the password, so be sure to store it somewhere like a password manager.
Step 5: Click on the Generate button.
Step 6: Launch your webmail client and then open the message sent to you by Mailvelope.
Step 7: Click on the encryption symbol and enter the password to read the email.
Step 8: Click on the link to verify your email address.
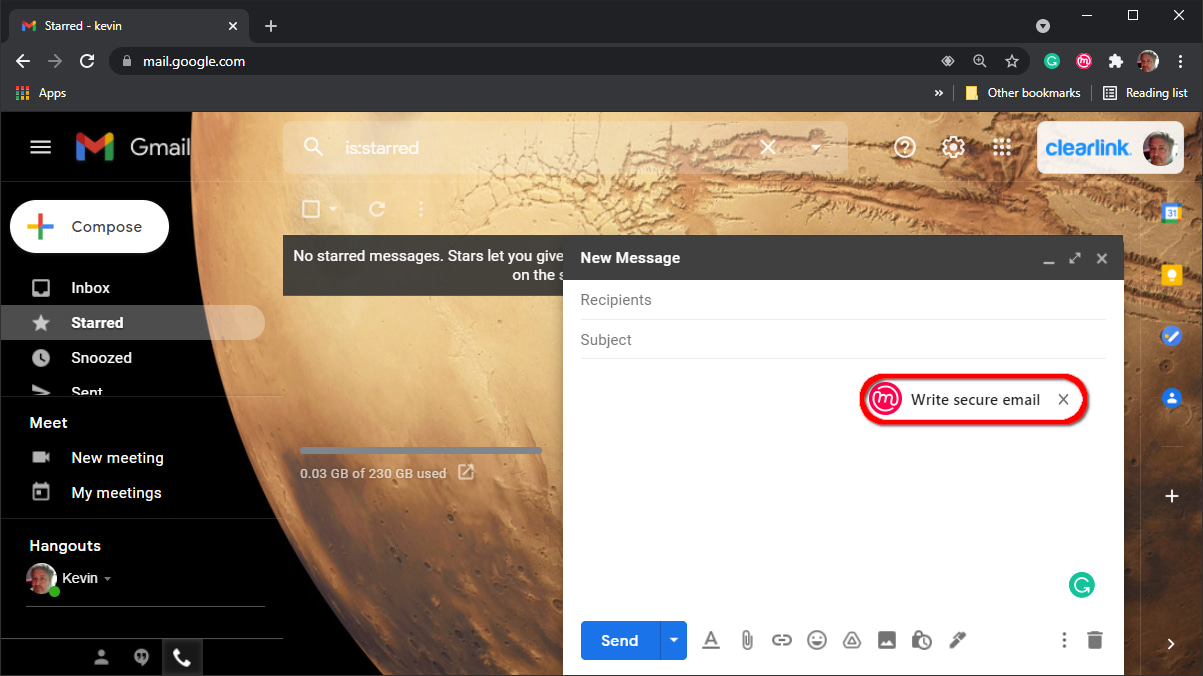
Step 9: Start a new email as usual, and then click on the Mailvelope icon if you want to send an encrypted message. The Mailvelope editor opens.
Step 10: Compose your message and then click the red Encrypt button.
Step 11: The Mailvelope editor closes, and you return to the webmail’s message editor.
Step 12: Add a subject and then click the Send button.
How to encrypt email on iPhone and iPad
Apple’s iOS and iPadOS platforms support S/MIME, but you must install the certificate first before enabling S/MIME. The recipient must also support S/MIME and send you a digitally signed email first.
How to install an S/MIME certificate on iPhone and iPad
The method may be different across S/MIME certificate providers. Typically, you must generate the certificate, create a password for that certificate, and then download the configuration profile, similar to how you switch to Apple’s beta program. After that, you must install the profile.
Step 1: Tap to open the Settings app.
Step 2: Tap on the “Profile downloaded” message.
Step 3: Tap Install.
Step 4: Enter your iOS or iPadOS passcode to confirm, not the certificate password.
Step 5: Tap Install twice.
Step 6: Enter your certificate password and then tap Next.
Step 7: Tap Done to complete.
How to enable an S/MIME certificate on iPhone and iPad
With the file installed, you can now select an email account and enable the S/MIME certificate.
Step 1: Tap to open the Settings app.
Step 2: Tap Mail.
Step 3: Tap Accounts.
Step 4: Tap the email account you want to use to send and receive encrypted email.
Step 5: Tap Account.
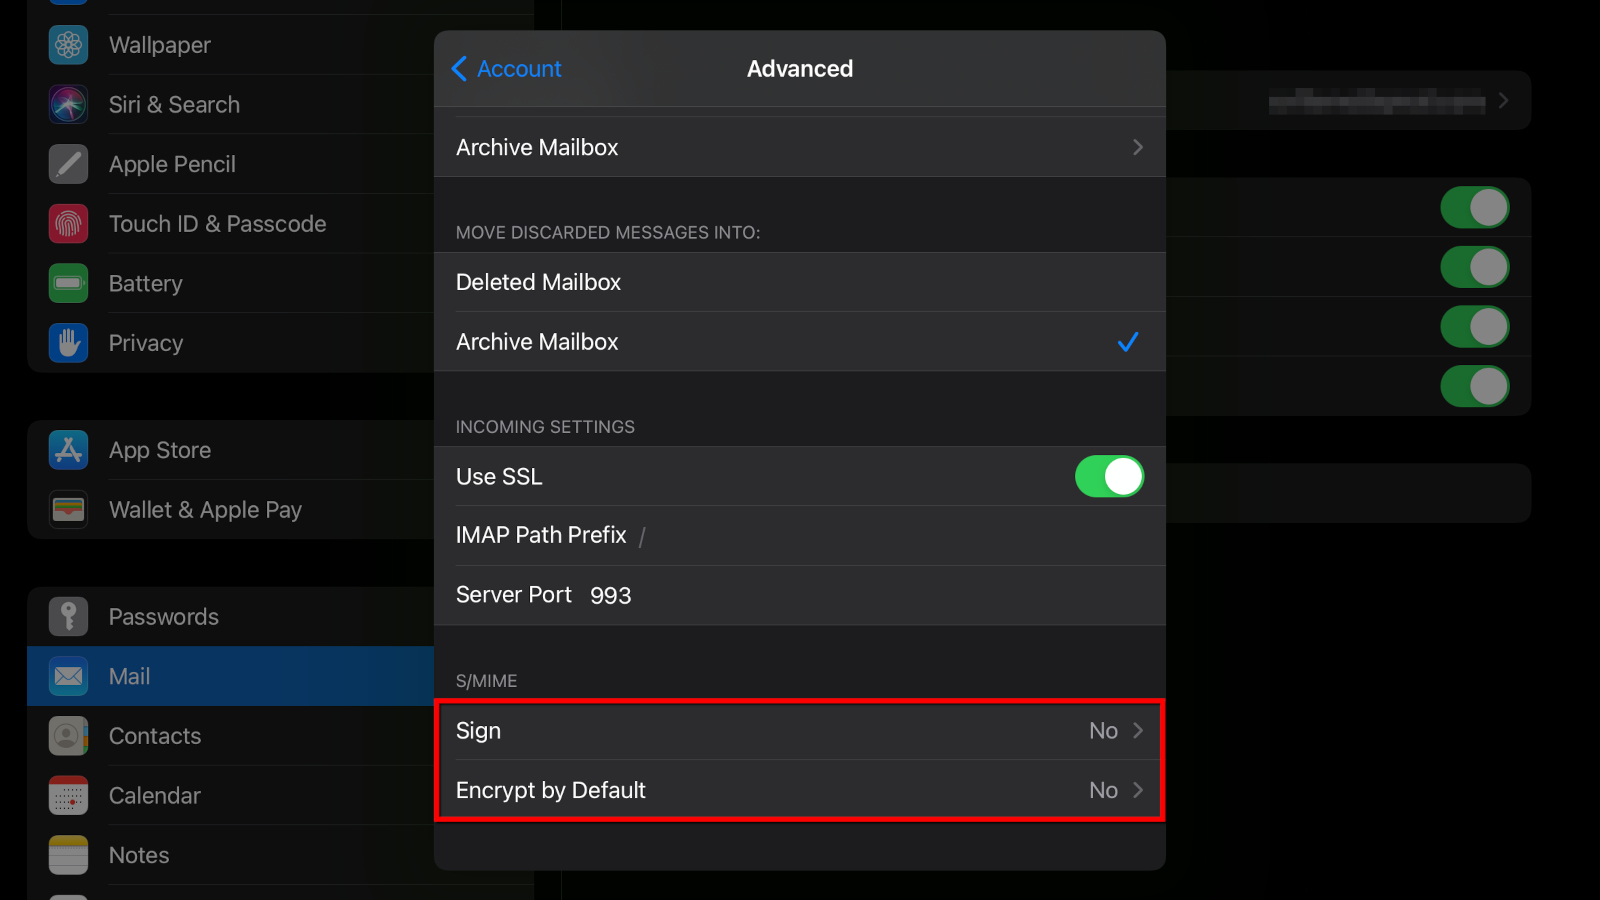
Step 6: Tap Advanced.
Step 7: Under S/MIME, tap one or both options—Sign by Default and Encrypt by Default—and then select Yes.
If the Mail app doesn’t recognize the sender’s signing certificate, you may need to install it first before sending encrypted emails. Refer to Apple’s instructions on how to send an encrypted message outside an Exchange environment.
How to encrypt email on Android and Chrome OS
In this section, we use two Android apps: OpenKeychain and K-9 Mail. Both apps are open source and free to use, although donations are accepted. OpenKeychain manages public and private keys, whereas K-9 is an email client that supports OpenKeychain natively.
As with other methods, you will need to exchange public keys for end-to-end encryption to work. The recipient doesn’t need OpenKeychain specifically to decrypt your emails, but the person needs an encryption key management app.
For more information about public and private keys, see our email encryption FAQ.
How to install OpenKeychain
You need to install and configure this app first before K-9 Mail. Later, when you configure the K-9 Mail app, you will select OpenKeychain for cryptography.
Step 1: After installing OpenKeychain, tap Create My Key.
Step 2: Enter a full name or nickname and then tap Next.
Step 3: Enter your email address and then tap Next.
Step 4: Verify the information and then tap Create Key.
How to share your OpenKeychain public key
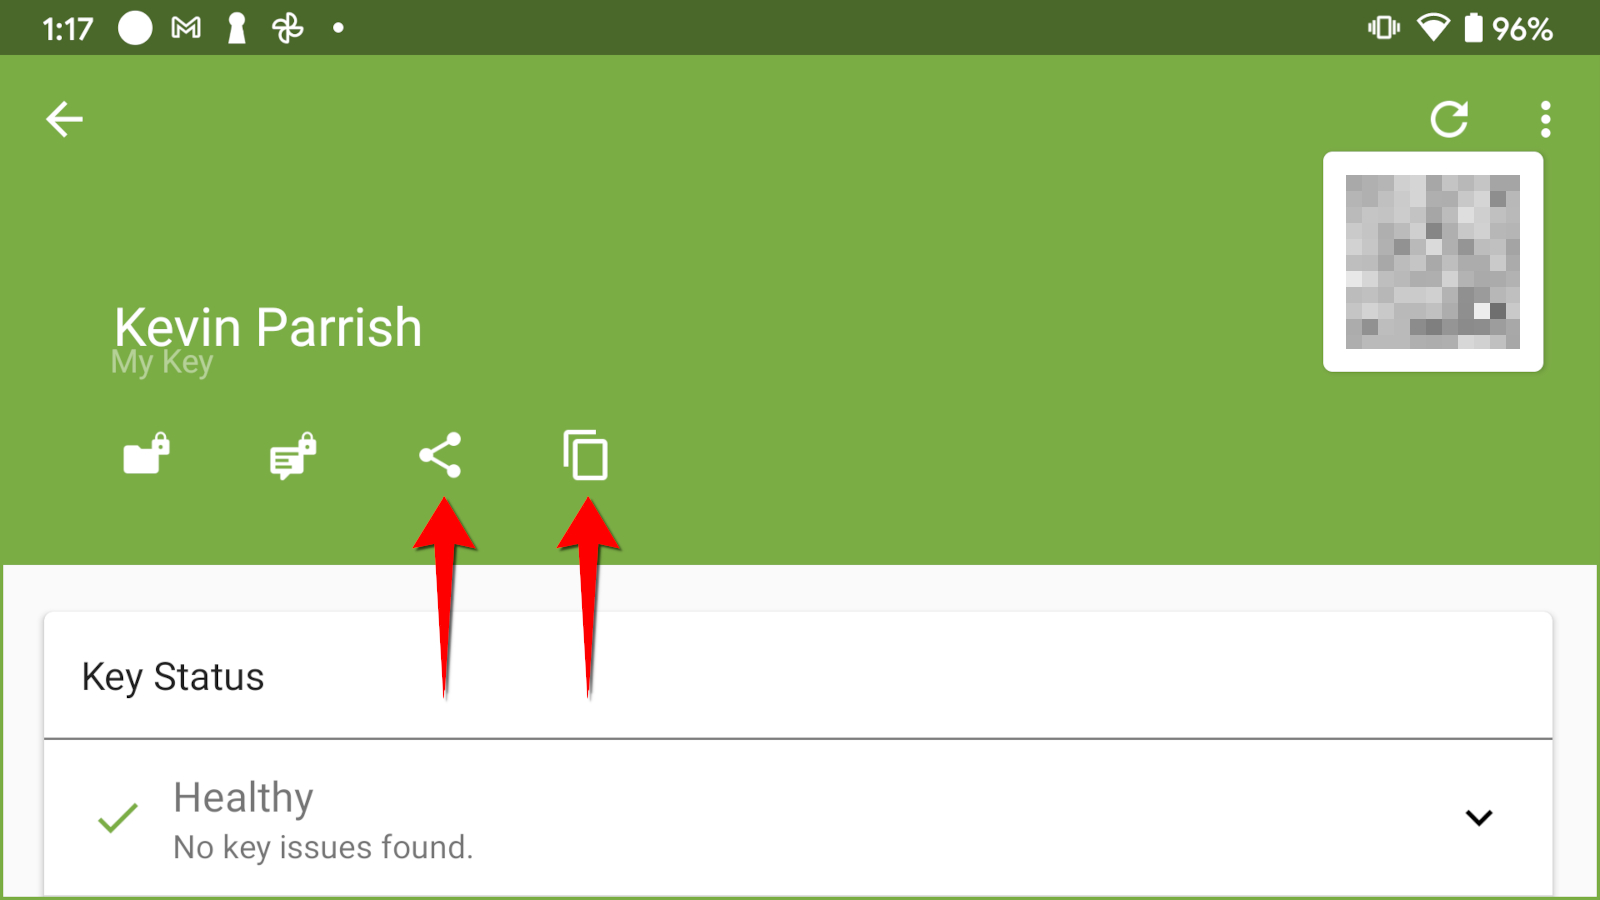
Step 1: Tap on the public key you just created.
Step 2: If the recipient is in the room, the person can scan the QR code. If not, move on to Step 3.
Step 3: If the recipient is not in the room, use one of the following methods:
- Tap the Share icon to share your key using Gmail, Google Drive, Nearby Share, and more.
- Tap the clipboard icon to copy your key to the clipboard. You can then paste your key in a message, email, document, and more.
How to send an encrypted message in K-9 Mail
Here we will use the K-9 Mail Android app because it supports OpenKeychain natively.
Step 1: Install and configure K-9 Mail.
Step 2: Tap the three-dot ellipsis icon located in the bottom right corner.
Step 3: Tap on Settings listed on the pop-up menu.
Step 4: Tap Account Settings.
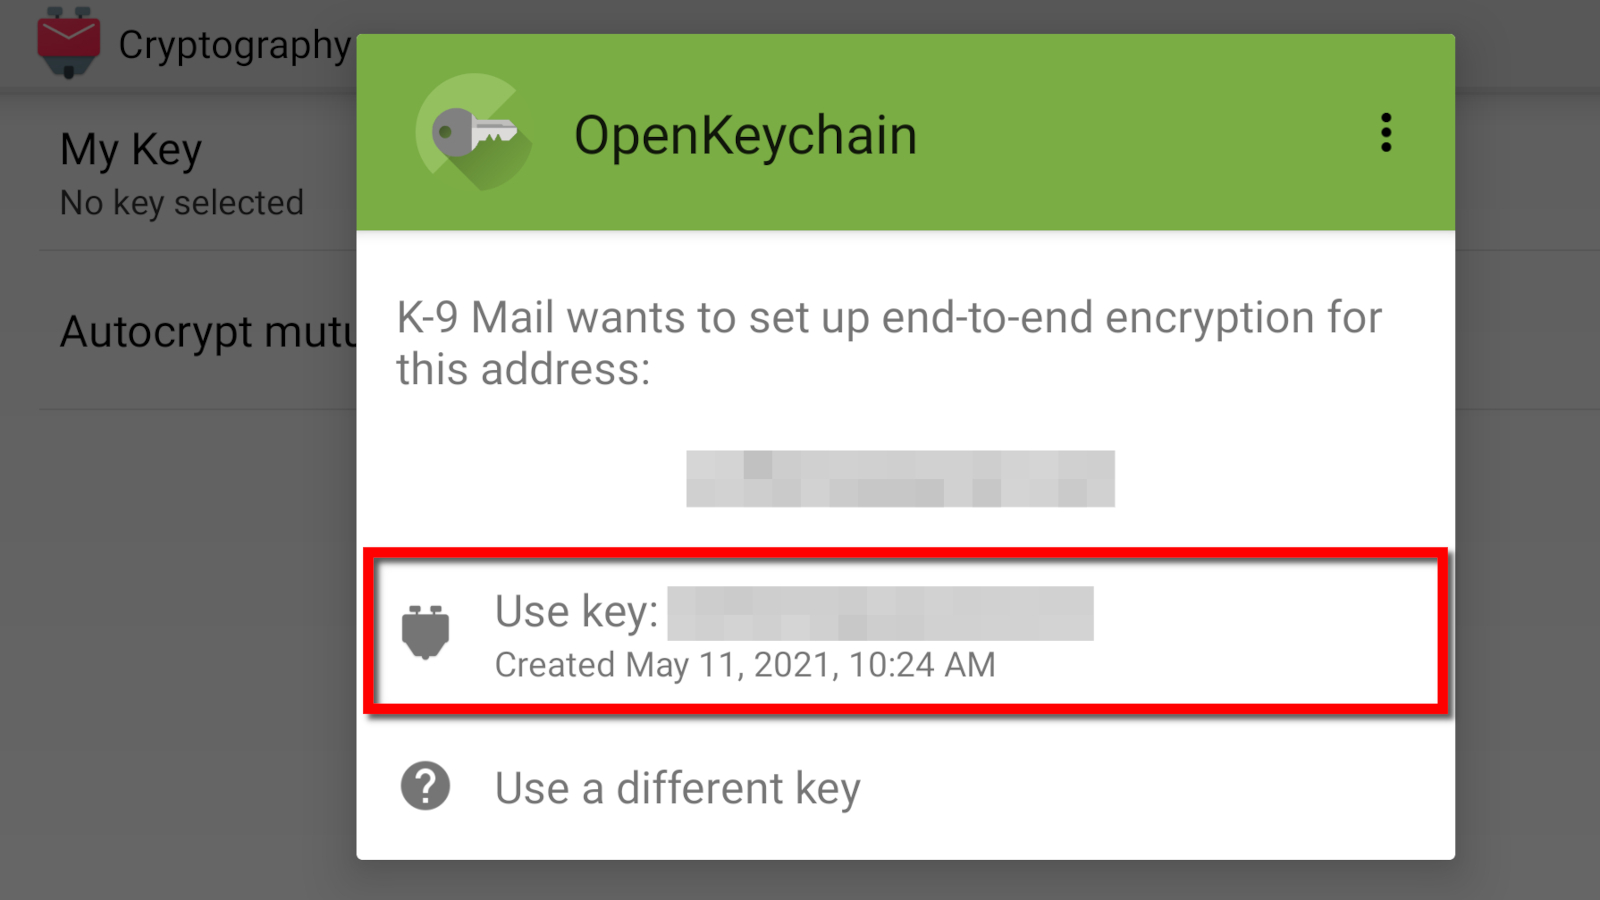
Step 5: Tap the Cryptography option on the following screen.
Step 6: Tap My Key.
Step 7: Tap OpenKeychain on the pop-up window.
Step 8: Tap Use Key.
Step 9: Compose and send your email.
Use third-party email encryption services
While paying an annual fee for an S/MIME certificate may be an unwanted expense, consider that some third-party services will cost you more. PreVeil is probably your best choice because it not only offers a free service but also doesn’t require users to create a new email address.
Here are a few examples:
| Provider | Free version? | Price | New email address required? | Get it |
|---|---|---|---|---|
| PreVeil | Yes | No | View Plans | |
| Private-Mail | No | Yes | View Plans | |
| ProtonMail | Yes | Yes | View Plans | |
| Tutanota | Yes | $1.06/mo. for Premium* | Yes | View Plans |
| Virtru | No | No | View Plans | |
| Zoho Mail | No | Yes | View Plans |
*Prices based on 12 month agreement
Asymmetric vs. symmetric encryption: What’s the difference?
Here we will explain the difference between these two encryption types.
Symmetric encryption
This method is less secure than asymmetric encryption because both parties share an identical key. Think of this method as using the same key to lock and unlock a door. If someone other than the intended individuals gains access to this key, they can unlock the door too.
Here’s a brief rundown on how symmetric encryption works:
Step 1: You and the recipient agree on a secret key and share it in a private channel. This key can be letters, numbers, a combination of both, or it can be created using the Diffie-Hellman Key Exchange.
Step 2: You encrypt the email using the shared key and send it to the recipient.
Step 3: The recipient decrypts your message using the shared key.
Asymmetric encryption
With this method, the private key is used only for decryption and cannot be shared. The public key is sharable and handles both identity and encryption. Both keys are mathematically linked.
This method is slower than symmetric encryption, but the keys are usually 2,048 bits or larger. You can also store public keys on public servers.
Here’s a brief rundown on how asymmetric encryption works:
Step 1: You create a public and private key pair.
Step 2: You share the “public” key with the sender or publish it to a public key server.
Step 3: The sender shares their “public” key with you to verify the sender’s identity.
Step 4: The sender encrypts their email with your “public” key and sends the message to you.
Step 5: Your email client decrypts the email using your “private” key.
Step 6: You respond to the email by encrypting the message with the sender’s “public” key.
Step 7: The sender decrypts the message using their “private” key.
What is Transport Layer Security (TLS)?
Webmail clients (Gmail, Outlook.com, Yahoo! Mail, and AOL Mail) support Transport Layer Security (TLS). It’s a security protocol that encrypts the communications—the transport—between the client and the server, not the email itself. This method uses asymmetric encryption.
Here’s a brief rundown on how TLS works:
Step 1: The transaction starts with a “hello” handshake between the email client and the server. Here, the server sends its public key to the client.
Step 2: The client verifies the server’s authenticity and then sends a tiny bit of data—encrypted using the server’s public key—for the server to decode.
Step 3: The server decrypts the data using its private key.
Step 4: The client and server exchange session keys.
Step 5: The client and server exchange “thank you” messages for verification.
Step 6: The client and server establish a secure connection.
Step 7: The client sends the plaintext email. This message is not encrypted.
Step 8: Upon receipt, the server verifies that the email wasn’t altered along the way and delivers the message.
TLS is not end-to-end encryption, meaning messages are protected only when they’re in transit. Since the email itself is not encrypted, Google’s bots can scan its contents. Moreover, this method works only if the recipient’s email client also supports TLS.
FAQ about email encryption
What is encryption at rest?
A good example of encryption at rest is Google Drive or Apple’s iCloud. These companies encrypt all data that you store on their servers. Your Gmail messages are encrypted until you load the app or website to read those messages.
You can also encrypt stored data on computers and mobile devices by turning on the encryption feature within the operating system. Apple and Samsung encrypt data by default.
What is encryption in transit?
Encryption in transit encrypts the communication between point A and point B. For example, Google establishes a secure connection between the Gmail web app and its webmail server. This method applies to public and private network communications.
What is a public key?
A public key is part of the asymmetric encryption process used to encrypt data. It is generated along with a paired private key using a mathematical algorithm. This key is made public (shared) and must be obtained from the recipient before the sender can transmit an encrypted message or attachment.
What is a private key?
A private key is part of the asymmetric encryption process used to decrypt data. It is generated along with a paired public key using a mathematical algorithm and is never shared. The recipient uses their private key to decode an encrypted message or attachment transmitted by the sender, who has the recipient’s public key.
A private key is also used in symmetric encryption to encrypt and decrypt data—there is no second public key.
What is Secure/Multipurpose Internet Mail Extensions (S/MIME)?
Secure/Multipurpose Internet Mail Extensions (S/MIME) is a standard (protocol) based on asymmetric encryption. The MIME aspect is essentially the raw email data you want to secure regardless of the transportation method.
While TLS secures the transport, a Man-in-the-Middle attack can intercept and expose your plaintext email. With S/MIME, even if your email falls into the wrong hands, it cannot be decrypted without the recipient’s private key. On that note, if hackers gain access to your email client, they can read your email encrypted with S/MIME.
Sources
1. Entrust, “How Do I Install My Secure Email (S/MIME) Certificate on Outlook (Mac OS X).” Accessed May 27, 2021.
Author - Kevin Parrish
Kevin Parrish has more than a decade of experience working as a writer, editor, and product tester. He began writing about computer hardware and soon branched out to other devices and services such as networking equipment, phones and tablets, game consoles, and other internet-connected devices. His work has appeared in Tom’s Hardware, Tom's Guide, Maximum PC, Digital Trends, Android Authority, How-To Geek, Lifewire, and others. At HighSpeedInternet.com, he focuses on network equipment testing and review.
Editor - Cara Haynes
Cara Haynes has been editing and writing in the digital space for seven years, and she's edited all things internet for HighSpeedInternet.com for five years. She graduated with a BA in English and a minor in editing from Brigham Young University. When she's not editing, she makes tech accessible through her freelance writing for brands like Pluralsight. She believes no one should feel lost in internet land and that a good internet connection significantly extends your life span.
Related Posts