How To Use Microsoft’s Parental Controls for Windows and Xbox
Manage your children's activities on Windows and Xbox at no extra cost
Sep 3, 2024 | Share
Equipment Guides, Gaming, How-To, Parental Controls, Security
From one parent to another: Don’t leave your kids unchecked online. The internet can be far more unsafe than the neighborhood they play in. Inappropriate content. Malicious software. Unsavory strangers. All of it makes me want to trash their devices and kick ’em outdoors (go get some sun, dangit).
The good news is that Microsoft Family Safety has your back if you own Windows, Xbox, and Android devices. This free service packs a slew of parental tools for keeping your kids’ content consumption and activities in check. Find out how to set up Microsoft’s parental controls and put restrictions in place.
In this guide:
What do you need? | Supporting platforms | Features | Create the parent account | Create a family group | Add a child | Settings and spending | Devices and Microsoft apps | Third-party apps | Block unwanted installs | Bottom line
In this guide:
What do you need to use Microsoft Family Safety?
You need the following two things to get started:
- A free Microsoft Account for the parent
- A free Microsoft Account for the child
You also need a browser or Microsoft’s app to manage and use the parental controls.
| Browser | Windows | Android | iPhone/iPad |
|---|---|---|---|
| Online dashboard | Microsoft Store | Google Play | App Store |
What platforms support Microsoft Family Safety?
You can use Microsoft Family Safety to manage the following platforms:
- Windows
- Xbox (which is really Windows with a controller-friendly interface)
You can also use Microsoft Family Safety to view activities on the following platforms:
- Android phones
- iPhone
- iPad
What can you do with Microsoft Family Safety?
Here’s what you can do with Microsoft Family Safety at no extra cost to you:
- Set device screen time limits on Windows and Xbox
- Set Microsoft app and game screen time limits on Windows, Xbox, and Android
- Filter out inappropriate apps and games
- Filter out inappropriate websites and content search in Microsoft Edge (blocks all other browsers)
- Allow/deny screen time requests (Windows, Xbox)
- Allow/deny content filter requests (Windows, Xbox, Android)
- Manage spending through a Microsoft Account
If you have a Microsoft 365 subscription, the following features are also available to you:
- See location alerts (iPhone, Android phones)
- View a teen’s driving habits (iPhone, Android phones)
- View a teen’s driving history (iPhone, Android phones)
Now, let’s get started!
Create the parent’s Microsoft Account
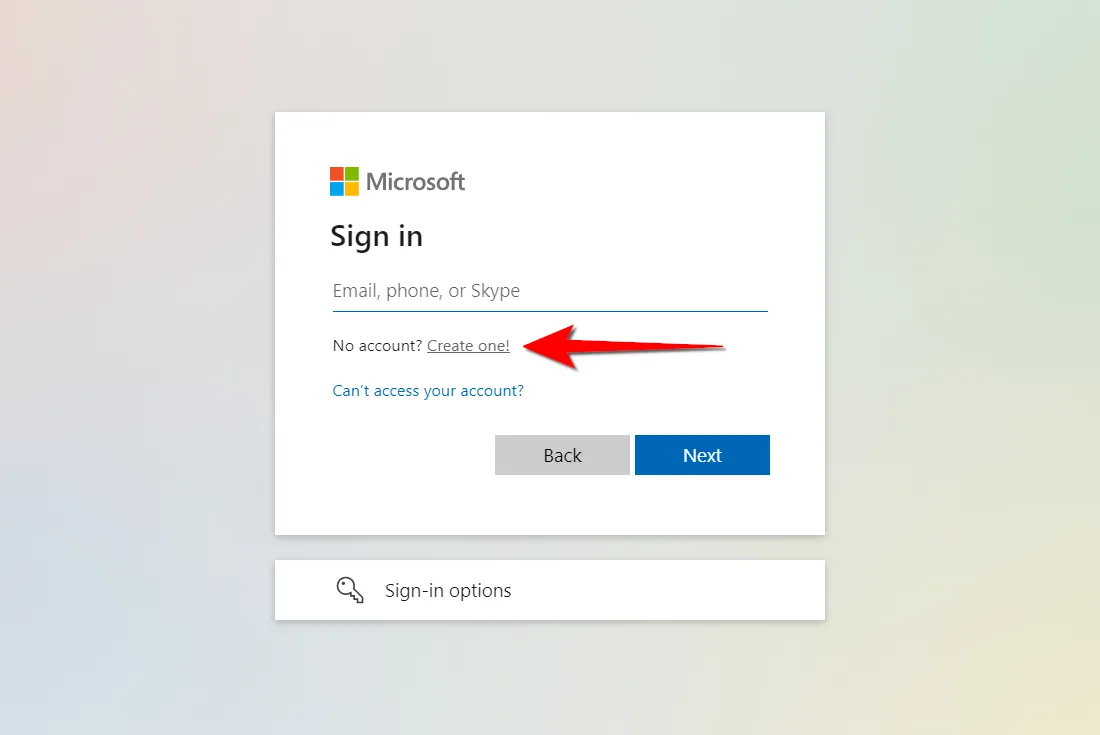
You need a Microsoft Account to use Windows and Xbox anyway, so skip this section if you already use these platforms and see how to create a family group.
If you’re new to the Microsoft family, you must have a Microsoft Account to activate and use Windows and Xbox.
The following instructions apply to everyone who will be managing the family group once it’s created. These are also web browser directions.
Step 1: Go to account.microsoft.com.
Step 2: Select the Sign in button in the top right corner.
Step 3: Select the Create one link on the following screen (shown above).
Step 4: Enter a valid email address, and then select Next (or create a new [email protected] address).
Step 5: Set your password and then select Next.
Step 6: Retrieve the security code sent to you, enter it into the required field on your screen, and then select Next.
Step 7: Solve the CAPTCHA to prove you’re not a robot, and then select Next.
Create a family group
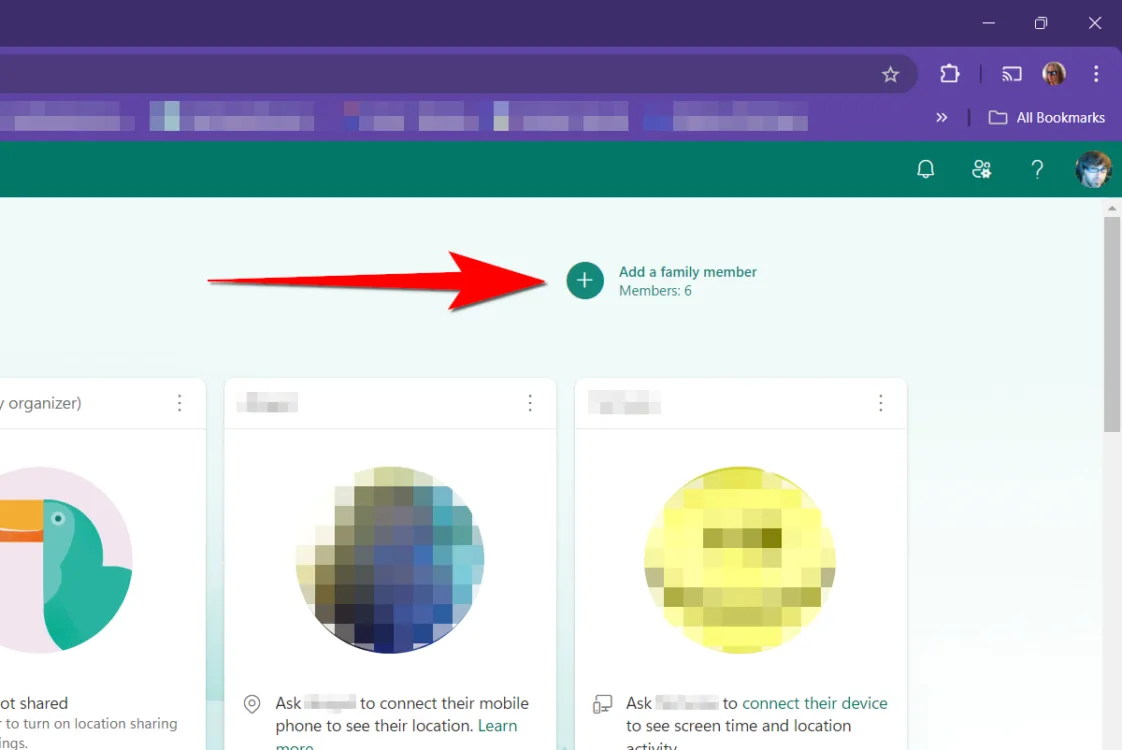
Now that you have a Microsoft Account, it’s time to create the family group and add your child.
Step 1: Sign in to the Family Safety dashboard.
Step 2: Select the plus icon next to Add a family member in the top right corner (shown above).
Step 3: Select Organizer and then select Next.
Step 4: Enter your email address and then select Next.
Step 5: Solve the CAPTCHA and then select Invite.
Step 6: Open the Microsoft Family Safety email sent to you and select Join Now.
Add a child to the family
With the family group organizer set, you can now add a family member. For this set of instructions, let’s assume you need a new email address for your child.
Step 1: With the Family Safety dashboard open, select the Add a family member tile.
Step 2: Select Get a new email address on the following screen.
Step 3: Enter a username and select @outlook.com or @hotmail.com and then select Next.
Step 4: Create a password for the new account and then select Next.
Step 5: Enter the first and last name of your child and then select Next.
Step 6: Select the country/region and the child’s birthdate, and then select Next.
Step 7: Solve the puzzle and then select Next.
Step 8: Give consent for your child’s new Microsoft Account by entering your signature and selecting Yes, I agree.
Step 9: Give your child permission to use non-Microsoft apps with the account you created, and then select Continue.
Step 10: Set the age limits on apps and games, enable/disable activity reporting, enable/disable web and search filters, and enable/disable Ask to buy.
Step 11: To finish, select the Family Safety button.
Manage your child: Part 1
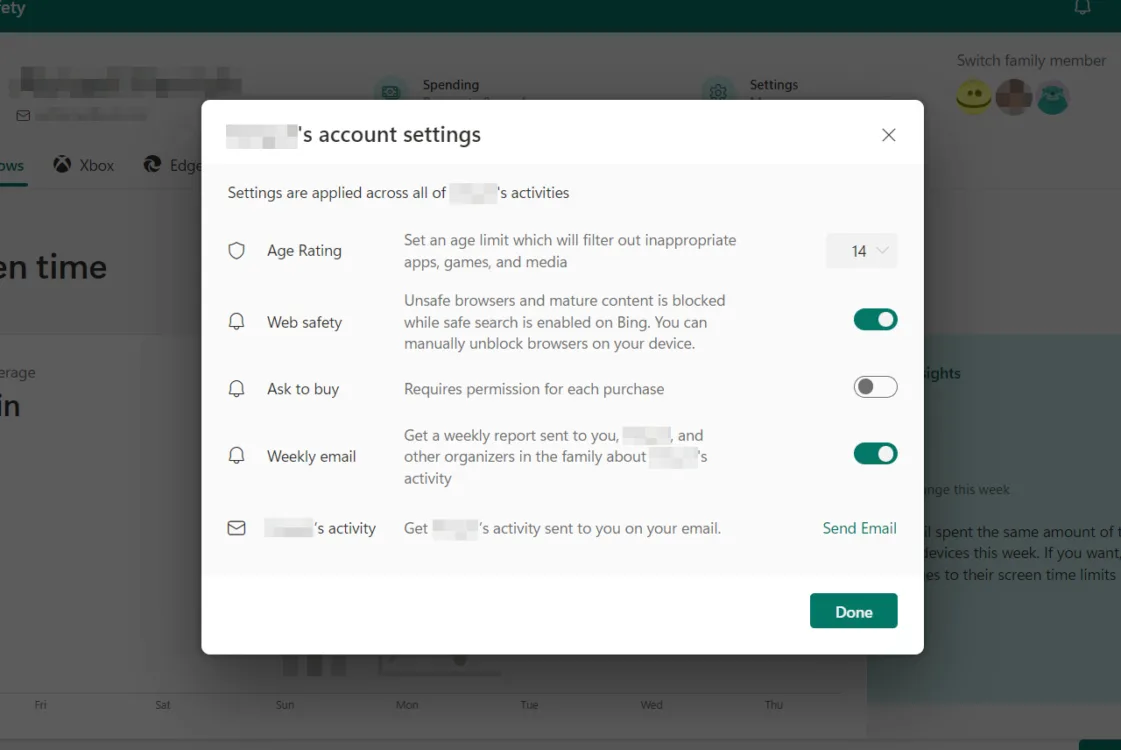
So, you have an organizer managing the family group, and your first child has been added. Everyone in the family group is displayed in tiles under Your family. As seen in the previous section, you already set restrictions. Now, you can go in and tweak the settings.
When you click on a child’s tile, you’re presented with two options and four tabs. First, I’ll cover the two options from left to right. I cover the tabs in the next section.
Spending
This section speaks for itself: Your child’s spending through Microsoft. At the top is a toggle for getting notifications about spending—I suggest you turn that on.
Here’s a brief rundown of what to expect on this screen:
Microsoft account balance: You can see what’s available and add money as needed.
Credit cards: Add a card for the child to use. Be sure to toggle on Require approval for every purchase to prevent an unwanted spending spree (it will happen).
Spending activity: This is a summary of all spending activity in the family group, not just the child’s activity.
Account settings
Although you already set the restrictions when you added the child, here is where you can modify them as they get older. Trust me: Your 14-year-old will complain if they’re still locked to Y7 content. (Stop all that growin’, dangit.)
Age Rating: Select an age from 3 to 20, or choose Any Age.
Web safety (on or off): Unsafe browsers and mature content are blocked. Safe search is enabled in Bing.
Ask to buy (on or off): Turn this on to prevent unwanted spending sprees.
Weekly email (on or off): Get a weekly report about the child’s activity for the week.
Child’s activity: Get a report about the child’s current activities. Select the Send Email link to get the report.
Now, let’s talk about the tabs.
Manage your child: Part 2
Windows and Xbox
The Windows and Xbox tabs have identical parental controls, so let’s take a look.
Screen time
Here, you’ll see a chart showing your child’s screen time on Windows 10 and Windows 11 (or Xbox).
At the bottom of the page, you’ll also see an Activity reporting toggle under Windows Settings (or Xbox Settings). Switch it on if you want to see your child’s app and game-related activities on every Windows device (or Xbox) they use.
Devices: Setting the time limits
At the top of this section is Lock Devices. Select it to lock and unlock each Windows-based device your child uses.
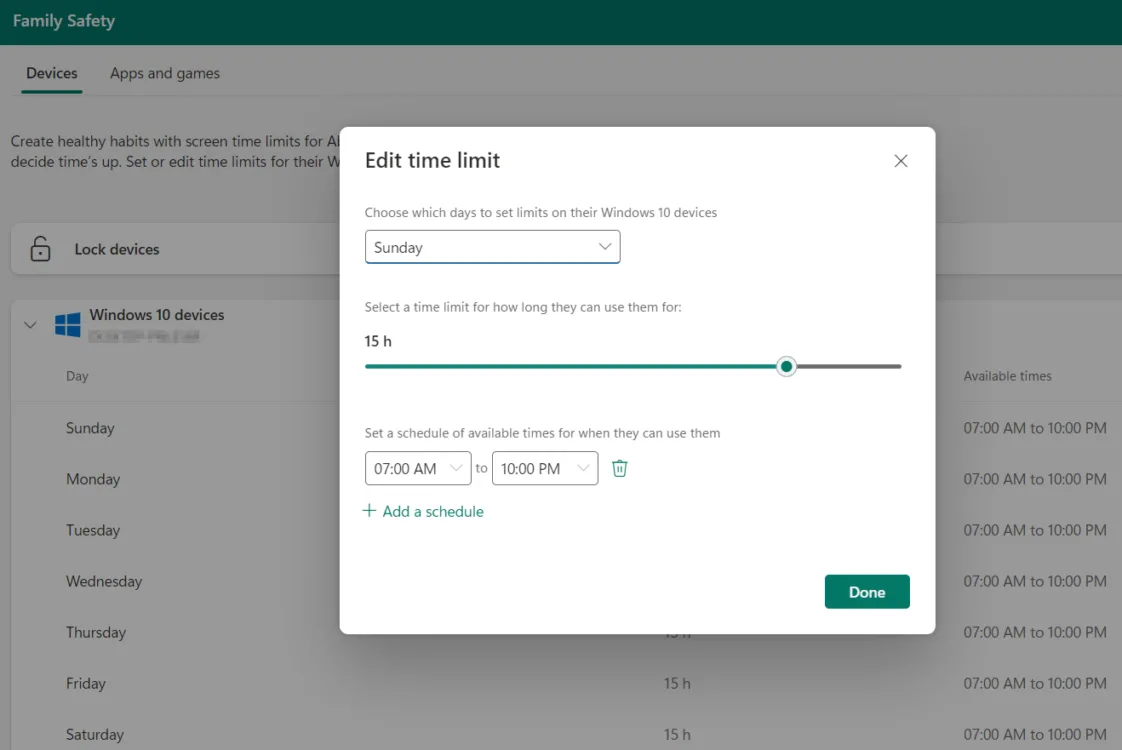
Below the Lock Devices setting is a chart that shows the daily time limits set for each Windows device (or Xbox) your child uses, as shown above. This is where you can set different or identical time limits throughout the week. For example, you may want to limit time during the week and give more time for the weekend. Here’s how:
Step 1: Select any day on the chart to edit the time limit.
Step 2: In the first field on the pop-up window, select up to six days you wish to enforce time limits or select Every Day.
Step 3: Move the slider to select up to 23 hours or choose No limit.
Step 4: Set the time when your child can use Windows. Select Add a schedule if you want to allow multiple time allowances during the day. A good example would be allowing screen time after school and later in the evening.
Step 5: Select Done.
Apps and Games: Setting the limits
At the top of this tab, you’ll find the App and Game limits toggle—turn it on. You’ll see a list of Microsoft apps and games installed on your child’s Windows device (or Xbox). Select one to see the user stats, block it, or set a time limit (similar to the instructions above).
To block third-party apps and games, refer to my instructions further down the page about managing consent.
Microsoft Edge
At the top of this tab you’ll see your child’s recent search queries and website activity. Everything you need to control what your child does through Microsoft’s browser is located under Filter Settings:
- Filter inappropriate websites and searches (on or off)
- Only use allowed websites (on or off)
- Add a blocked website
- Add an allowed website
- Activity reporting (on or off)
Mobile
iPhone/iPad and Android are managed by Apple and Google, respectively, so there’s very little you can do using Microsoft Family Safety on these devices. However, you can install the Microsoft Family Safety app (App Store, Google Play) and sign in with your child’s account on Apple devices and Android phones to see some activities.
| Android | iPhone/iPad | |
|---|---|---|
| Screen time | Yes | No |
| Apps and games activity | Yes | Yes |
| Location sharing | Yes | iPhone only |
Block third-party apps and games—the hidden setting
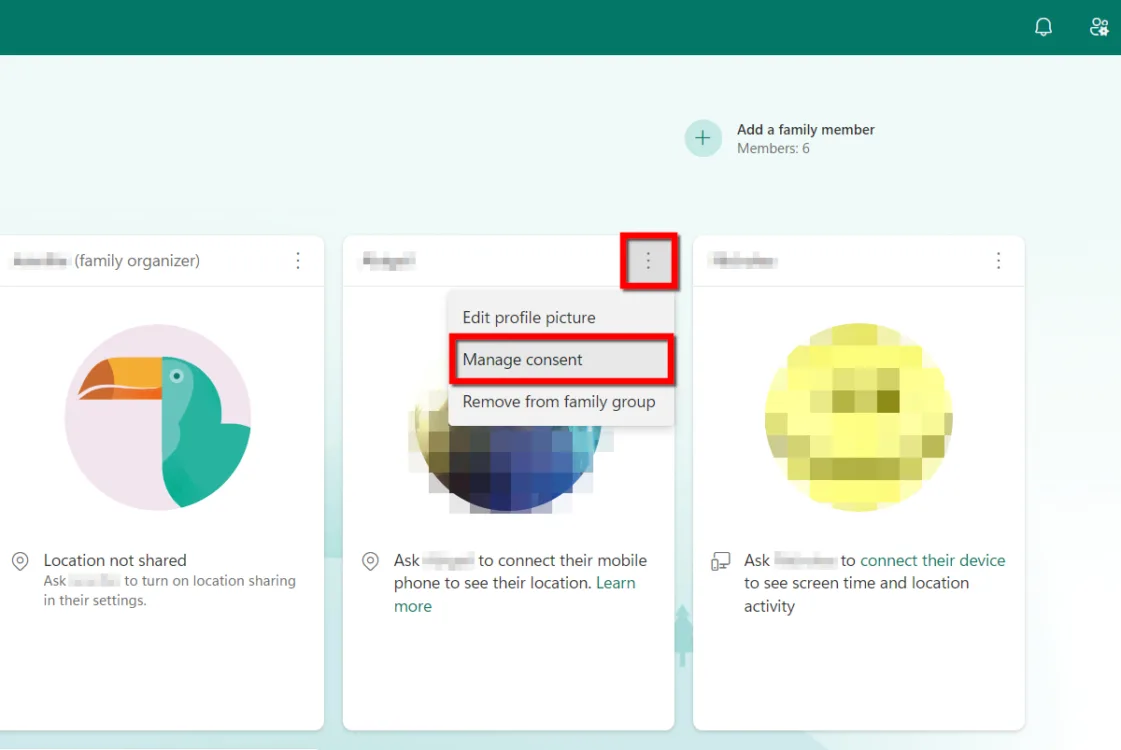
Once upon a time, you could just block apps and games no matter where they originated, but now it seems Microsoft has chosen to let you block individual Microsoft apps and games in your child’s family group profile.Third-party app and game permission settings are buried elsewhere. Here’s how to block third-party software:
Step 1: On the Your Family page, select the three-dot button next to your child’s name on their tile.
Step 2: Select Manage Consent on the drop-down menu (shown above).
Step 3: Select Manage this child’s access to third-party apps.
Step 4: To block third-party apps and games, select Disable Access. Return here and select Enable Access to allow your child to use third-party apps and games later.
Block unwanted installs on Windows
Just in case, make sure your child’s account listed in Windows is set to Child or Member. This setting prevents your child from making changes to Windows, rebooting into Safe Mode, and more.
The following instructions are based on Windows 11, so they may be slightly different from Windows 10.
Step 1: On the child’s PC, select the Start button, followed by the Settings icon on the Start Menu.
Step 2: Select Accounts.
Step 3: Scroll down and select Family.
Step 4: Select the child followed by Change Account Type.
Step 5: Set the account type as Child or Member if it’s not already.
Bottom line: Microsoft Family Safety is but one solution
Look, I’ve been using Microsoft Family Safety to keep my youngins in check for years, but it’s only one piece of my parental control arsenal. My family uses different platforms and different devices, so I need various tools to make sure my kids remain safe from inappropriate content and applications.
However, your approach should start at the router. I’ve tested and reviewed quite a few and compiled the ones with the best parental controls in a list (see below). I go with the free parental controls because I’m cheap, but you may find premium controls are worth the cost. Honestly, you don’t need content filtering at the router level—you really only need the ability to block devices and maybe create profile-based schedules. But if you can get some extra tools for free, the more the merrier, right?
Here are a few guides to get you started:
The second arm in your parental approach should be the operating system, and that’s where Microsoft Family Safety comes in. I’m still working on other guides for Google, Amazon, Nintendo, and PlayStation, but if you own Apple devices, here’s my guide to using parental controls across its three device types:
Author - Kevin Parrish
Kevin Parrish has more than a decade of experience working as a writer, editor, and product tester. He began writing about computer hardware and soon branched out to other devices and services such as networking equipment, phones and tablets, game consoles, and other internet-connected devices. His work has appeared in Tom’s Hardware, Tom's Guide, Maximum PC, Digital Trends, Android Authority, How-To Geek, Lifewire, and others. At HighSpeedInternet.com, he focuses on network equipment testing and review.
Editor - Jessica Brooksby
Jessica loves bringing her passion for the written word and her love of tech into one space at HighSpeedInternet.com. She works with the team’s writers to revise strong, user-focused content so every reader can find the tech that works for them. Jessica has a bachelor’s degree in English from Utah Valley University and seven years of creative and editorial experience. Outside of work, she spends her time gaming, reading, painting, and buying an excessive amount of Legend of Zelda merchandise.

