A router is your first line of defense against all the unsavory things lurking on the internet. Nearly all routers have some form of parental controls you can use to manage a child’s internet usage, regardless if they have a wired or wireless device.
Unfortunately, not all parental control options are the same, so we’re here to help sift through the mud and walk you through a few examples of how some routers handle these controls.
Want a router with the best parental controls?
Be sure to check out our list of the five best standalone routers and mesh systems with built-in parental controls.
An introduction to parental controls
We’ve tested and reviewed dozens of routers, and each has some form of device control, whether they’re labeled as parental controls or not. Some let you create user profiles, add devices to those profiles, and set schedules, which is super convenient. Other routers push you into establishing rules and set schedules on a device-by-device basis, which can be a real time-consuming pain.
Overall, you can generally do the following across any router you use:
- Allow and block devices
- Allow and block websites
- Create offtime schedules
Depending on the router, you may also have the following options:
- Apply content filters (age-specific or general)
- Apply app filters
In many cases, parental controls in a router’s mobile app differ from the ones in the web interface. In some cases, controls are exclusive to mobile apps. That said, we can’t give you one definitive how-to guide that covers every router on the market, but we can illustrate how some parental control suites work.
Before we begin
We’ll assume you already know how to log in to your router using a web interface or app. If not, take a peek at our guide showing you how to log in to routers manufactured by ASUS, Linksys, NETGEAR, and more.
Now let’s dig into how parental controls work on various routers, starting with ASUS.
ASUS AiProtect
ASUS routers include AiProtect Classic or Pro, depending on the model and firmware. Both features are free to use for the lifetime of the router, but the controls are different in the web interface than in the mobile app. Here’s how to use both.
Using the web interface
Since the ASUS web interface doesn’t support user profiles, you have to address each device individually.
Part 1: Content filters
First, select a device and add a content category to filter out specific apps and websites. These filters include:
- Adult
- Instant Message and Communication
- P2P and File Transfer
- Streaming and Entertainment.
Each category has subcategories you can check and uncheck for more customized control over services and content.
Part 2: Time scheduling
Next, select a device and add multiple offtime schedules, like during homework hours and bedtimes. The device can’t access the internet during the hours you set.
Part 3: URL filtering
You can find this setting in the router’s firewall. Here you can prevent access to specific websites by adding them to a blacklist. However, this list applies to all devices connected to the network.
ASUS provides instructions on how to use the parental controls in the web interface.
Using the ASUS Router app
Unlike the web interface, the ASUS Router app has robust parental controls. You can create user profiles and assign specific devices to each profile.
Part 1: Kids-Safe Preset Profiles
Create a user profile and select one of four age range options:
- Preschooler (0–6)
- School-aged child (6–13)
- Teen (13–18)
- Adult (18+)
AiProtect Classic profiles have modifiable time presets—you can set up new ones too. AiProtect Pro adds content filters powered by Trend Micro. You can enable and disable types of content on each device or profile individually, including things like instant messaging and file transfering.
Part 2: Time scheduling
You can set up multiple offtime schedules with the web interface, but doing it on the app applies the schedule to the multiple devices assigned to a profile, which is super convenient.
Models we reviewed with ASUS AiProtect Classic and Pro:
| Model | Wi-Fi version | AiProtect version | Our score | Price* | Order online |
|---|---|---|---|---|---|
| ROG Rapture GT-AX11000 | Wi-Fi 6 | Pro | 4.1/5.0 | $341.99 | View on Amazon |
| RT-AX68U | Wi-Fi 6 | Classic | 4.2/5.0 | $179.39 | View on Amazon |
* Amazon.com prices (as of 4/28/23 17:35 MST). Read full disclaimer.
TP-Link HomeCare
TP-Link provides two security suites across its range of standalone routers and mesh systems. HomeCare is free to use for the life of the router, while HomeShield has free and subscription-locked features. First, let’s look at HomeCare.
Using the web interface
You can find the parental controls under the Basic or Advanced tabs, depending on the model.
Part 1: Profiles
To start making user profiles, click the Add button, name the profile, and add the associated devices.
Part 2: Filters
You can select one of four filters to describe the appropriate age range for each profile:
- Child (0–7)
- School-aged child (8–12)
- Teen (13–17)
- Adult (18+)
After that, you can add or remove categories from the profile, like Adult Content or Games. However, the child, school-aged child, and teen presets have categories you cannot deselect.
Part 3: Time limits
With the filters in place, you can now set four different time limits:
- Daily offtime Monday—Friday
- Daily offtime Saturday—Sunday
- Bedtime Monday—Friday
- Bedtime Saturday—Sunday
TP-Link provides instructions on how to set up family controls using HomeCare in a web interface.
Using the Tether app
Parental controls in the Tether app are mostly the same as the web interface—they’re just displayed differently for the mobile screen.
The only exception is the added ability to block a profile’s access to the apps and websites you choose.
TP-Link provides instructions on how to set up parental controls using HomeCare in the Tether app.
Models we reviewed with TP-Link HomeCare:
| Model | Wi-Fi version | Our score | Price* | Order online |
|---|---|---|---|---|
| Archer AX11000 | Wi-Fi 6 | 4.0/5.0 | $274.99 | View on Amazon |
| Archer AX6000 | Wi-Fi 6 | 3.9/5.0 | $209.99 | View on Amazon |
| Archer A10 | Wi-Fi 5 | 3.6/5.0 | $88.76 | View on Amazon |
| Archer AX20 | Wi-Fi 6 | 3.8/5.0 | $83.99 | View on Amazon |
* Amazon.com prices (as of 4/28/23 17:35 MST). Read full disclaimer.
TP-Link HomeShield
HomeShield is the newer security suite provided on TP-Link standalone routers and mesh systems. Below we list what you can do with HomeShield Free and the premium features offered through a HomeShield Pro subscription.
Using the Tether and Deco apps
HomeShield parental controls are not available on the web interface, so you need to use the Parental Controls tab in the Tether or Deco app to get started.
Part 1: Profiles
HomeShield supports up to 16 profiles. Each time you create a profile, you select a family role:
- Son
- Daughter
- Dad
- Mom
- Grandpa
- Grandma
After that, you add devices and save the profile.
Part 2: Filter Content
Next, you can add up to nine filters per profile to block specific content and services:
- Adult Content
- Gambling
- Sex Education
- Online Communication
- Social Networking
- Pay to Surf
- Media
- Download
- Games
Part 3: Block websites
You can prevent a profile from accessing specific websites by adding the addresses to the Blacklist. This tool is ideal for keeping your kids from “stumbling” onto easily-accessible adult websites.
Part 4: Bedtime
Finally, HomeShield Free allows you to create one bedtime schedule per profile. Multiple bedtime schedules require a HomeShield Pro subscription.
HomeShield Pro features
The HomeShield Pro subscription adds the following features:
- Bedtimes for weekdays & weekends
- Bedtimes for custom days
- Daily time limits
- Offtime schedules
The HomeShield Pro subscription costs $5.99 per month or $54.99 per year.
TP-Link provides instructions on how to set up parental controls using the Tether and Deco apps.
Routers and mesh systems we reviewed with HomeShield:
| Model | Wi-Fi version | Our score | Price* | Order online |
|---|---|---|---|---|
| Archer AX90 | Wi-Fi 6 | 3.8/5.0 | $341.99 | View on Amazon |
| Archer AX5400 Pro | Wi-Fi 6 | 3.8/5.0 | $159.99 | View on Best Buy |
| Deco X55 | Wi-Fi 6 | 3.8/5.0 | $199.99 | View on Amazon |
| Deco X50-PoE | Wi-Fi 6 | 3.9/5.0 | $309.99 | View on Amazon |
* Amazon.com prices (as of 4/28/23 17:35 MST). Read full disclaimer.
NETGEAR Smart Parental Controls
The free version of Smart Parental Controls is minimal—even more so than TP-Link’s HomeShield Free. Plus, the controls are mainly in the mobile apps, although the web interface provides a few additional tools you can use for parental controls.
Using the web interface
As with most other routers, you can do the following:
- Block and allow devices
- Block and allow websites
- Block and allow applications
Using the Nighthawk and Orbi apps
Part 1: Profiles
First, create a profile and add the related devices. After that, you can pause and unpause the profile’s internet access, but that’s it. All other options require a Smart Parental Controls Premium subscription.
Smart Parental Controls Premium
NETGEAR’s subscription adds the following features:
- Age-appropriate content filters
- Automatic daily time limits
- Automatic internet breaks (offtimes)
- Custom daily time limits
- Daily bedtimes
- Rewards
- App and internet usage statistics
- Website history
- Access to the My Time companion app (App Store, Google Play)
NETGEAR Smart Parental Controls Premium costs $7.99 per month or $69.99 per year.
NETGEAR provides instructions on how to set up parental controls using the Nighthawk and Orbi apps.
Routers and mesh systems we reviewed with Smart Family Controls:
| Model | Wi-Fi version | Our score | Price* | Order online |
|---|---|---|---|---|
| Nighthawk RAXE500† | Wi-Fi 6E | 4.2/5.0 | $499.99 | View on Amazon |
| R6700AX† | Wi-Fi 6 | 3.5/5.0 | $89.99 | View on Amazon |
| Orbi RBK752 | Wi-Fi 6 | 3.6/5.0 | $309.00 | View on Amazon |
* Amazon.com prices (as of 4/28/23 17:35 MST). Read full disclaimer.
† NETGEAR lists these models as compatible with Smart Parental Controls, but the feature wasn’t available at the time of their review.
Eero parental controls
Your internet provider may have supplied you with an Eero mesh system if you also received a standard modem—it’s a popular whole-home solution. Eero doesn’t have a web interface, so you manage the parental controls through the Eero mobile app.
Using the Eero app
Step 1: Profiles
First, tap the + button to create a profile. After that, name the profile and add the associated devices.
Step 2: Schedules
Once you create a profile, you can schedule as many pauses as you like. Just enter the schedule’s name (like bedtime) and set the start and end times. Then the schedule takes effect. For example, you can have one bedtime schedule for weekdays and another for weekends.
You can manually pause and unpause internet access as needed, too, like when your child finishes early during homework downtime.
Step 3: Block and allow devices
As with any other router and mesh system, you can manually block and allow devices on your network.
Eero Plus subscription
Here’s a list of added features provided through the Eero Plus subscription:
- Ad blocking
- Content filters
- App blocking
- Block and allow websites
- Daily activity stats (weekly activity is free)
Eero Pro subscription costs $9.99 per month or $99.99 per year.
Mesh systems we reviewed with Eero Plus:
| Model | Wi-Fi version | Our score | Price* | Order online |
|---|---|---|---|---|
| Eero Pro 6 | Wi-Fi 6 | 3.9/5.0 | $399.99 | View on Amazon |
* Amazon.com price (as of 4/28/23 17:35 MST). Read full disclaimer.
Internet provider routers and mesh systems
Internet providers that supply gateways and standalone routers generally offer similar parental controls you find on retail equipment. You can usually access these controls in the web interface and the provider’s app. Below we list instructions for five national internet providers.
- Smart Home Manager (App Store, Google Play)
- Set Content Controls with Smart Home Manager
- Secure by Frontier (App Store, Google Play)
- Set Up Internet Parental Controls To Help Keep Your Kids Safe
- Security Suite (Windows, Mac)
- Security Suite Antivirus: Parental Controls for Windows
- Security Suite Antivirus: Parental Controls for Mac
- Verizon My Fios (App Store, Google Play)
- Parental Controls
- Xfinity App (App Store, Google Play)
- Set Up Parental Controls for the Internet
Looking for an internet provider with better parental controls?
Enter your zip code below to see what’s available in your area.
FAQ about routers with parental controls
What if my router doesn't have parental controls?
You probably have some form of device controls on the router—they’re just not labeled as “parental controls.” For example, on the NETGEAR Nighthawk XR1000, you can do the following:
- Create rules for each device.
- Apply a specific category to block (File Sharing, Chat & Messaging, VPN, and more) and then set the times and days these rules apply.
- Pause and unpause internet access.
- Block and allow devices.
If you need more controls (and don’t want to upgrade), your next best bet is to use the free parental controls provided with Windows, Android, and other operating systems. Here’s the list:
- Windows and Xbox: Microsoft Family Safety
- Android and ChromeOS: Family Link
- MacOS, iOS, and iPadOS: Screen Time
You can also use third-party parental control software if the router and operating systems don’t have what you need. Be sure to check out our guide listing the best parental control apps and software for more information.
Should I use the web interface or the app for parental controls?
Whether it’s better to use the web interface or app depends on the manufacturer. As we show above, some routers provide parental controls in both, while others make parental controls an app exclusive. Some routers don’t have apps at all, like the Gryphon AX, which requires you to use the web interface in a desktop or mobile browser.
How does a router block devices?
All devices have a unique number assigned to them called a MAC address. Unlike an IP address, a MAC address never changes, so routers rely on them for device management. A laptop, for example, has at least two MAC addresses: one for wireless and one for wired.
Offtime vs. time limits: What's the difference?
With time limits, you set the amount of time a child can use the internet each day.
Offtimes are scheduled internet pauses you can set during homework hours, dinner time, and at night.
Disclaimer
Amazon.com Prices as of 4/27/23 9:35 MST. Product prices and availability are accurate as of the date/time indicated and are subject to change. Any price and availability information displayed on Amazon.com at the time of purchase will apply to the purchase of this product. Highspeedinternet.com utilizes paid Amazon links.
CERTAIN CONTENT THAT APPEARS ON THIS SITE COMES FROM AMAZON. THIS CONTENT IS PROVIDED ‘AS IS’ AND IS SUBJECT TO CHANGE OR REMOVAL AT ANY TIME.
We’ll never tell you to disable the firewall on your computer. Oh no. Doing so opens the door to hackers and malware, all eager to seize your computer and steal your data. Not fun.
But there will be times when you may need to disable the firewall on Windows or Mac temporarily to troubleshoot issues. We’ll show you where to disable and enable the firewall on Windows PCs, desktop Macs, and MacBooks.
Are you troubleshooting speed issues?
You may not need to disable your firewall on Windows or Mac if you’re having internet speed issues. Connect a different PC to your router and run our speed test to compare the speeds.

How to enable or disable the firewall on Windows 11
You can take two paths to access the Microsoft Defender Firewall toggle. We’ll first give you Microsoft’s official instructions, followed by a shorter route we like better through the hidden icons menu.
The Start button route

Step 1: Click on the Start button.
Step 2: Select Settings on the Start Menu.

Step 3: The Settings panel appears on your screen. Select Privacy & Security on the left.
Step 4: Select Windows Security on the right.
Step 5: Select Firewall & network protection from the following list appearing on the right.

Step 6: The Windows Security panel appears on your screen with the Firewall & network protection category already selected. Choose Domain network, Private network, or Public network (see FAQ).

Step 7: Under Microsoft Defender Firewall, click on the toggle to set it to On or Off.
The hidden icons route
Here’s the shorter route to accessing the Microsoft Defender Firewall toggle. In our case, the Windows Defender icon resides in the hidden icons pop-up balloon. However, you may see the icon seated on the Taskbar instead.
Step 1: Click on the Show hidden icons button (up arrow) on the Taskbar.
Step 2: Click on the Windows Security icon.

Step 3: The Windows Security panel appears on your screen. Select Firewall & network protection on the left.
Step 4: Select Domain network, Private network, or Public network (see FAQ) on the right.

Step 5: Under Microsoft Defender Firewall, click on the toggle to set it to the On or Off position.
How to enable or disable the firewall on Windows 10
The instructions to reach the firewall toggle are different on Windows 10 than on Windows 11. But like Windows 11, you have two ways to reach the firewall toggle: using the traditional Start button method or the (faster) hidden icons route.
The Start button route
Step 1: Click on the Start button.
Step 2: Click on the Settings icon.
Step 3: The Settings panel appears on your screen. Select the Update & Security tile.

Step 4: Select Windows Security on the left.
Step 5: Select Firewall & network protection on the right.

Step 6: The Windows Security panel appears on your screen. Select Domain network, Private network, or Public network (see FAQ).

Step 7: Under Microsoft Defender Firewall, click on the toggle to set it to the On or Off position.
The hidden icons route
You can bypass the Settings window altogether and go directly to the Windows Security screen using these instructions.
Step 1: Click on the Show hidden icons button (up arrow) on the Taskbar.
Step 2: Click on the Windows Security icon in the pop-up menu.

Step 3: The Windows Security panel appears on the screen. Select the Firewall & network protection tile.

Step 4: Select Domain network, Private network, or Public network (see FAQ).

Step 5: Under Microsoft Defender Firewall, click on the toggle to set it to the On or Off position.
How to enable or disable the firewall on Mac
Apple keeps your route to the firewall toggle pretty simple, although you’ll have a faster trip if the System Settings icon is on the Dock. These instructions are based on macOS Ventura.

Step 1: Click on the Apple menu icon in your screen’s top left corner.
Step 2: Select System Settings on the drop-down menu.
Alternative method: Click on the System Settings icon if it appears on the Dock.

Step 3: The System Settings panel appears on your screen. Select Network on the left.
Step 4: Select Firewall on the right.

Step 5: Click on the toggle to enable or disable the firewall.
FAQ about enabling and disabling a firewall
What is a firewall?
With Windows and macOS, a firewall is a security component built into the operating system that monitors all local network and internet traffic coming in and out of your computer. Pre-set inbound and outbound rules define what apps, programs, and services can and can’t transmit to and from any network, whether they’re private or public.
Should I turn off my firewall?
Generally, you should never turn off the firewall on Windows PCs and Macs. Firewalls block malware and other malicious data that could sneak past a router or gateway’s built-in firewall. They also block infected apps and programs installed on your computer.
Also, firewalls are highly configurable, so you can make exceptions to specific applications without completely lowering your guard against all things unsavory lurking on the internet.
Can I temporarily disable my firewall?
You’re safe in temporarily disabling your computer’s firewall, but we don’t suggest keeping it disabled for very long. Firewalls keep you safe from the bad actors lurking on the internet—and possibly even on your local network.
When can I temporarily disable my firewall?
You should only disable your firewall temporarily if it does the following:
- Interferes with hardware installation
- Blocks driver downloads and system updates
- Prevents apps and programs from connecting to a remote server
What are the Domain, Private, and Public profiles in Windows Defender Firewall?
Here’s a brief description of what each profile covers:
- Domain – Computers connected to a network managed by a domain controller. This profile usually applies to corporate-level connections, like a group of servers.
- Private – Computers connected to a business or home network that’s not directly connected to the internet. This profile applies to everyone with a router or hardware firewall.
- Public – Computers connected to the internet in coffee shops, libraries, malls, and so on. This profile applies to everyone connecting to publicly available Wi-Fi and wired connections.
Windows selects Public as the default because it has the highest level of security.
| Fastest VPN | Fastest for families | Fastest free VPN |
|---|---|---|
| ExpressVPN | IPVanish | Hide.me |
| $$ | $ | Free |
| Visit ExpressVPN | Visit IPVanish | Visit Hide.me |
VPNs are great for keeping your internet activity safe—but they often slow down your internet in the process. A VPN is designed to encrypt your data by spoofing your IP address, making it look like you’re using the internet from a different location. That means you have to sign on to a server located hundreds or possibly even thousands of miles away, which understandably sucks up some of your Wi-Fi juice.
Dodgy VPNs slow down your speed even further by throttling your connection, bombarding you with pop-up ads, or even hijacking your bandwidth for their own purposes. (Not cool!) But the VPNs we highlight here don’t reduce internet speeds to dismaying levels. They deliver fast speeds, excellent performance, and great privacy features.
So, take a look and see which of the fastest VPNs will work best for you.
Pro tip:
If you’re curious for more details about how VPNs work, head to the “What is a VPN?” section further down on this page.
Which VPN is fastest?
Based on our research, we consider ExpressVPN the fastest VPN out there. It consistently takes the top scores in internet speed tests and performs excellently when you’re doing bandwidth-intensive tasks like downloading big files or streaming video on a foreign version of Netflix.
ExpressVPN gives you access to over 3,000+ servers—another plus if you’re concerned about speed. The more servers you can choose from, the greater flexibility you get. If one server is too slow because it’s too far away from your home network or bogged down by too many users, you can hop to another that works more efficiently.
ExpressVPN is also excellent thanks to its top-notch security features and privacy policies. It doesn’t keep any logs of your data. And there’s a “kill switch” (available only for desktop, sadly) that will disable your internet if your VPN server disconnects. Sometimes a VPN server can struggle to connect for whatever reason, and a kill switch keeps your activity secret in the event of a technical malfunction.
How do you test a VPN’s speed?
To see how much firepower your VPN is dishing out, download our speed test app to run a quick diagnostic. First, take the speed test with the VPN turned off, so you get a baseline of how much speed your internet delivers in general. Then, switch on the VPN and run the test again. You can see how much your bandwidth is impacted by comparing the difference between the numbers.
You can also see how fast a VPN is by playing games and using Netflix. If your Wi-Fi is buffering more than usual when you’re using Netflix and on the VPN, then you may want to try signing on to a different VPN server or seeking out a new service.


How do you test a VPN’s speed?
To see how much firepower your VPN is dishing out, use our speed test to run a quick diagnostic. First, take the speed test with the VPN turned off, so you get a baseline of how much speed your internet delivers in general. Then, switch on the VPN and run the test again. You can see how much your bandwidth is impacted by comparing the difference between the numbers.
You can also see how fast a VPN is by playing games online and using Netflix. If your Wi-Fi is buffering more than usual when you’re using Netflix and on the VPN, then you may want to try signing on to a different VPN server or seeking out a new service.
Best VPNs for fast internet
| Best for | Service | Price | # of servers | Max devices per subscription | Get it |
|---|---|---|---|---|---|
| Fastest overall | ExpressVPN | $99.95 per 15 mos. ($6.67/mo.) | 3,000+ | 5 | Sign Up |
| Fastest with extra features | Hotspot Shield | $7.99/mo. | 3,200+ | 5 | Sign Up |
| Fastest for downloading and streaming | Private Internet Access | $69.95 per 2 yrs. ($2.69/mo.) | 2,640+ | 10 | Sign Up |
| Fastest for families | IPVanish | $77.99 per yr. ($6.49/mo.) | 1,500+ | Unlimited | Sign up |
| Fastest free service | Hide.me | Free ($129.95 per 2 yrs. for paid version) | 1,700+ | 1 (10 for paid service) | Sign up |
These are some of the fastest VPNs you can find—but each have their merits and their drawbacks. ExpressVPN is truly the fastest of the bunch. In fact, it’s pretty much the best VPN you can get, period, second only to NordVPN in terms of features and performance.
Hotspot Shield is another VPN that’s well known for delivering excellent speeds, especially for intensive activities like gaming and torrenting. Private Internet Access is a fast VPN with some nice side bonuses, including servers for torrenting and an affordable price.
IPVanish maintains quality VPN speeds even as you can hook up unlimited devices on a single account—a generous offer in contrast to the usual five devices that most VPNs allow. Hide.me, meanwhile, is one of the few free VPN services that delivers solid speeds, even though it is more limited overall.
Pro tip:
If you’re interested in more than just speed when it comes to VPN performance, see our best VPNs for 2020 for the lowdown on other features and security measures to think about.
ExpressVPN
-
3,000+ servers in 94 countries
-
Devices: 5 max on one account
-
30-day money-back guarantee
-
Headquarters: British Virgin Islands
Recommended price tier: $99.95 billed every yr. ($8.32/mo.)
As one of the best-designed VPNs on the market, ExpressVPN beats countless other VPNs in speed tests conducted by VPN reviewers and experts. The service lets you stream video and play games online without excess buffering, whether you’re connected to a server in the US or to one as far off as Thailand. And if one server isn’t connecting well, you can always sign up for a different one—there are many, many servers to choose from.
ExpressVPN is also great because it doesn’t log your data, so it keeps no records of your internet usage that might come into unwanted hands in the event of a leak or government subpoena. The only drawback is that it’s a bit more expensive than many other options. But if you require top performance, it’s worth the money.
![]() Pros:
Pros:
- Fastest VPN speeds
- Excellent privacy controls
![]() Cons:
Cons:
- Limitations on kill switch feature
- Higher price than many VPNs
Hotspot Shield
-
3,200+ servers in 80+ countries
-
Devices: 5 max on one account
-
7-day money-back guarantee
-
Headquarters: United States
Recommended price tier: $7.99 per month
Hotspot Shield is another super speedy VPN, rising to the top in both long-distance and short-distance connections in tests conducted by Ookla’s Speedtest.net in 2019. And its consistency goes back a long way, proving useful for activists during protest movements in places like Turkey and Hong Kong since the early 2010s.
The VPN’s $7.99 a month price tag comes with some great extra features, including a password manager, a spam call blocker, and an identity theft protection system—all parts of the Pango subscription service that you get as part of signing up.
However, if you’re looking for premium privacy as well as premium speed, Hotspot Shield may not be ideal since it maintains logs of some user data, including the length of your sessions and how much data you’ve consumed.
![]() Pros:
Pros:
- Tons of extras included with price
- Sleek user interface
![]() Cons:
Cons:
- Limited privacy protections
- Higher price than many VPNs
Pro tip:
Take our How Much Speed Do I Need? Tool to get an idea of your bandwidth requirements as you shop around for a speedy VPN.
Private Internet Access
-
2,640+ servers in 47 countries
-
Devices: 10 max on one account
-
30-day money-back guarantee
-
Headquarters: United States
Private Internet Access doesn’t tout speed as a selling point like some other VPNs do, but it performs with top-tier speed on both short- and long-distance connections, getting excellent ratings from FastestVPNGuide.com. Message board users also report that it maintains excellent speeds and runs smoothly with no disconnects during bandwidth-intensive tasks like downloading and file sharing—something this VPN is particularly known for.
Private Internet Access also has excellent encryption and security protocols. It doesn’t log your data, and it comes with a “kill switch” function, which keeps your identity safe from exposure if a VPN server loses its connection. All in all, it’s a solid VPN that delivers fast service at a price below many of its fanciest competitors.
![]() Pros:
Pros:
- Fast P2P file-sharing capabilities
- Affordable price
![]() Cons:
Cons:
- Fewer bells and whistles compared to some VPNs
- Limited customer support
IPVanish
-
1,300+ servers in 75 countries
-
Devices: Unlimited on one account
-
30-day money-back guarantee
-
Headquarters: United States
Recommended price tier: $77.99 billed every yr. ($6.49/mo.)
IPVanish consistently ranks at the top of the list in many VPN speed tests and gets excellent reviews for the high performance capacity of its servers, both located inside the United States and abroad. Even better, it doesn’t set a limit on the number of devices you can use on one account, so using this VPN is a great way to save some dough if you want something that can serve a wide range of devices or a big family.
But is it good for privacy too? IPVanish came into some controversy in 2018 after accusations surfaced on Reddit that it was logging users’ data, leaving them vulnerable to potential exposure by security breaches and government server seizures. However, the CEO of IPVanish’s parent company at the time insisted that no logs were being kept when it acquired IPVanish, and to this day IPVanish publicly maintains a no-logging policy.
![]() Pros:
Pros:
- Unlimited devices on accounts
- Live chat support
![]() Cons:
Cons:
- Complicated privacy policy
- Cumbersome user controls
Pro tip:
VPNs frequently offer limited-time offers to entice customers. Before signing up for a service, consider looking around at a few options to see if you can get a nicer price.
Hide.me
-
1,700+ servers in 72 locations (5 servers only for free service)
-
Devices: 10 on paid service, 1 on free service
-
30-day money-back guarantee
-
Headquarters: United States
Recommended price tier: Free version
We generally advise against using free VPNs. They tend to be a lot slower than paid VPN services, loaded up with ads and other junk. And the most unscrupulous ones do sketchy things like sell your data to third parties as a way to generate revenue. As they say—everything comes with a price.
But . . . Hide.me’s free VPN option ain’t half bad. It performed way better than Windscribe (our other preferred free VPN) in our own battery of speed tests and it’s super easy to use. You don’t even need to put in a credit card to get started.
There are some definite drawbacks, though. You’ll notice a significant drop in your internet speed after you’ve signed on to one of its servers. You can pick from only five server locations if you’re on the free service, you get a monthly data cap of just 10 GB, and you can use only one device at a time. This will work in a pinch if you need a VPN every once in a while, but a paid service is still your better bet for more heavy-duty use.
![]() Pros:
Pros:
- Easy account setup with no credit card needed
- Simple user controls
![]() Cons:
Cons:
- Small cap on data use for free service
- Fewer servers than many VPNs
Pro tip:
VPNs frequently offer limited-time offers to entice customers. Before signing up for a service, consider looking around at a few options to see if you can get a nicer price.
What is a VPN?
VPN means “virtual private network.” It’s a service that enhances your anonymity and encrypts your data as you go online. To use a VPN, you log on to a server hosted by the VPN service. Your IP address is then “spoofed,” giving the appearance that you’re using the internet with a different IP address and location.
VPNs work as a kind of invisibility cloak, letting you surf the internet without worrying about public exposure. They keep your data safe from snooping internet service providers, governments, and hackers. They also let you get around censorship and firewalls, providing access to geo-specific streaming platforms and websites that have been blocked by authorities.
Our verdict—ExpressVPN is fast and secure
We think you should go for ExpressVPN if you’re looking for a fast VPN that won’t slow your internet down. Its servers are efficient and reliable, and there are tons to choose from. Not only that, but ExpressVPN also maintains excellent security standards, so you won’t have to worry about sacrificing your privacy or taking unnecessary risks in exchange for slightly faster speeds.
It’s a bit pricier than other VPNs, though, so we also recommend Private Internet Access as a more affordable option—it will also deliver top-notch performance and won’t hamper your internet speeds too much.
FAQ about fastest VPNs
Does a VPN increase internet speed?
It’s unlikely that a VPN will increase your internet speed. More often than not, it will decrease your speed.
A VPN lets you sign on to a server that’s located a significant distance away from you—in a different state or even in a different country. This creates a virtual “tunnel” to protect your anonymity, giving the impression that you’re using the internet from a different IP address and location. But that taxes your bandwidth because it adds another layer to your internet activity.
That said, there are some rare cases where your speed might increase. According to NordVPN, using a VPN might occasionally increase your speed. For example, it may prevent you in some instances from getting your internet throttled by an internet service provider (ISP). ISPs sometimes turn down network speeds to avoid area congestion, and your ISP might throttle your speed if it sees you torrenting files.
With a VPN, your ISP will be able to see that you’re using data on its network, but it won’t see what kind of activity you’re doing. But the ISP could still reduce your speeds if you have exceeded your monthly data cap.
Also, occasionally signing on to a VPN can lead to a glitch in the routing process, whereby your ISP will send your traffic through a different channel—inadvertently improving your speed. That’s not super common, though, and likely not something you have much control over.
Does a VPN slow internet speed?
Yes, often a VPN will slow down your internet speed. However, not all VPNs are built the same, and some are more efficient and reliable than others. Free VPNs tend to slow down your speeds the most because they have a smaller number of servers to choose from, they’re loaded up with ads, and they may even put a cap on your bandwidth capabilities.
But the best VPNs—such as ExpressVPN, Hotspot Shield, Private Internet Access, and IPVanish—incorporate quality servers and software that lets you keep doing your internet activities effectively. With them you’ll experience minimal disconnects or buffering. They also have more servers to choose from, which improves your chances at getting a solid speed.
Does a VPN help with buffering?
VPNs aren’t designed to cut down on buffering and, in many cases, they won’t improve your buffering.
Buffering is the annoying delay that happens in streaming and gaming when your computer is sending a signal to your network. It’s also referred to as “latency.” VPNs tend to lead to slower speeds and higher latency (which leads to more buffering) since they’re making your internet work harder, routing your traffic through a separate server to encrypt your browsing activity.
How do you make a VPN faster?
You can make a VPN faster by signing on to a server that’s nearer to your current location. If, for example, you live in Atlanta, then you will likely get better speeds if you sign on to a VPN server located in Florida as opposed to one in Israel or Japan. Some servers also get bogged down by a lot of users, so you can try a few different options rather than simply using whatever server the VPN automatically signs you into.
What is the fastest VPN?
ExpressVPN consistently gets ranked as the fastest VPN in industry-wide tests and comparisons. It’s an excellent VPN in general, and we highly recommend it. Hotspot Shield is also one of the fastest VPNs, ranking at the top in an assessment by Speedtest.net in 2019.
It’s important to keep in mind that VPN speeds vary from user to user. The speeds you get depend on your location, the VPN server you’re singing on to, and what kind of internet speeds you have to begin with. But the best VPNs will perform efficiently and smoothly and, in many cases, you may not even notice a drop in speeds at all.
You don’t need a third-party subscription to manage children with an iPhone, iPad, or Mac. Apple provides easy-to-use parental controls with a quick tap or click on the Settings icon. From there, you can restrict specific apps, set purchase permissions, lock down the device for the night, and more.
We’ll explain how you can set up parental controls for all Apple devices with iOS 16, iPadOS 16, and MacOS Ventura 13.
Need more tools to keep your kids safe?
Apple’s parental controls are great, but they apply to Apple devices only. Check out our other guides for solutions you can apply outside the Apple ecosystem.
How to create a child account for iOS
Parental control settings aren’t device-specific. Instead, you create an Apple ID for your child you can manage from any Apple device. Once you create the account, you can use Quick Start to set up a new iPhone or iPad with your preferred parental controls already in place.
Here’s how to create a new child account from your iPhone, iPad, or Mac:

Step 1: Tap or click on Settings.
Step 2: Tap or click on Family.
Step 3: Tap or click on the blue Add Member button.
Step 4: Tap Create Child Account.
Step 5: Enter the child’s name, birthday, and then tap or click on Verify You’re an Adult.

Step 6: Tap or click on the Continue With [security] popup to give parental consent. In our case, we used Face ID.
Step 7: Tap or click on Agree or Disagree for Apple’s Family Privacy Disclosure and its Terms and Conditions.
Step 8: Tap Continue to confirm the child’s new email address.
Step 9: Tap or click on the popup to verify the address.
Step 10: Create a password for the child’s new Apple ID.
Step 11: Choose a phone number to receive verification codes.
That’s it. You can use this Apple ID on any iPhone, iPad, or Mac you choose. Now, let’s take a deep, deep dive into the fathomless parental controls.
iPhone parental controls: a brief overview
You can manage children and monitor their activities by tapping or clicking through this path on your iPhone, iPad, or Mac:
Settings > Family > Your Child’s Name
Everything you need falls under the Screen Time category. Here is the list of tools provided to you. Click on any of the following links to jump to instructions on how to modify each.
- Downtime
- App Limits
- Communication Limits
- Communication Safety
- Always Allowed
- Content & Privacy Restrictions (App Store, iTunes, Web browsing, Siri, Game Center)
However, before you begin, you must enable Screen Time on your child’s account before you can manage content and permissions.
How to enable Screen Time
First, tap or click on the following path to reach the Screen Time settings:
Settings > Family > Your Child’s Name > Screen Time

Step 1: Tap or click on Turn On Screen Time.
Step 2: A new screen appears, explaining all the available tools. Tap or click on Turn On Screen Time again.
Step 3: Tap or click on the slider to set the child’s age (5–18). The default settings adjust accordingly.
Step 4: Tap on a category to customize the content restrictions for Apps, Books, TV Shows, Movies, and more.
Step 5: Tap or click on Turn On Restrictions when you’re done. Alternatively, tap or click on Set Up Later to customize the restrictions some other time.
Step 6: Tap or click on Turn on Communication Safety to protect your child from sensitive photos displayed in the Messages app. Alternatively, you can tap or click on Set Up Later.

Step 7: Select a Start and End time period and then tap or click on Turn On Downtime. Alternatively, you can tap or click on Set Up Later if you need a customized Downtime schedule for your child.
Step 8: Set the daily time limits for your child’s apps. You can choose all apps and categories, select a specific category, or select apps individually.
Step 9: Tap or click on Set to define the Time Amount, and then tap or click on Set App Limit. Alternatively, you can tap or click on Set Up Later.
Step 10: Create a Screen Time passcode.
Step 11: Enter the Screen Time passcode again to complete the setup.
That’s it. Your child’s account is ready. If at any point you selected Set Up Later or need to adjust the settings, read on to find out how.
How to set your child’s downtime
Downtime is ideal when you want to block access to an Apple device during bedtime. Children receive a five-minute warning before downtime kicks in, allowing them to request more time if needed. Some apps and phone calls you choose elsewhere in the Screen Time controls will bypass the downtime restriction.
First, follow this path:
Settings > Family > Your Child’s Name > Screen Time

Step 1: Tap or click on Downtime.
Step 2: Enter your Screen Time PIN.
Step 3: Tap the Scheduled toggle to enable Downtime (green).
Step 4: Tap Every Day and select the start and end times, or select Customize Days and set specific times for each day.
Step 5: Tap the Block at Downtime toggle if you want to lock the device during Downtime. However, the child can ask for more time.
Keep in mind Downtime applies only once per day—you cannot schedule multiple Downtimes within a single day. If you need more than one block of time scheduled, use the parental controls in your router or gateway to block internet access for a specific time, like during homework hours.
How to set app limits
You can set daily time limits for any app installed on the child’s device. Tap on a category to limit all related apps or tap on a specific app. There’s an option to limit access to all installed apps too.
First, follow this path:
Settings > Family > Your Child’s Name > Screen Time

Step 1: Tap or click on App Limits.
Step 2: Tap or click on Add Limit.
Step 3: Tap or click on All Apps & Categories to set limits on all apps your child uses. Alternatively, tap or click on the circle next to a category (like Social) to select all social apps, or tap on a category to choose a specific app (like Discord).
Step 4: Tap or click on Next.
Step 5: Select the amount of time your child can use the app(s) each day. Alternatively, tap or click on Customize Days to set different time limits each day.
Step 6: Tap or click on Add to complete.
How to set communication limits
The limits you set apply to Phone, Messages, FaceTime, and iCloud contacts. Here you can restrict communication to Contacts Only, Contacts & Groups with at Least One Contact, or Everyone. To get started, follow this path:
Settings > Family > Your Child’s Name > Screen Time

Step 1: Tap or click on Communication Limits.
Step 2: Tap or click on During Screen Time to restrict who your child can communicate with during normal hours.
Step 3: Tap or click on During Downtime to restrict who your child can communicate with during Downtime hours. If you select Specific Contacts, a popup appears for you to select an existing contact or create a new one.
Step 4: Slide the Manage Child’s Contacts toggle into the On position to manage contacts remotely. A popup appears for you to select an existing contact or create a new one.
How to set communication safety
This setting only applies to the Messages app, which detects nude photos before they’re received and seen by your child. To toggle this setting on, follow this path:
Settings > Family > Your Child’s > Screen Time

Step 1: Tap or click on Communication Safety.
Step 2: Tap or click on the toggle next to Check for Sensitive Photos. It turns green when you enable this setting.
Step 3: Tap or click on the toggle next to Improve Communications Safety if you want to help Apple improve this tool (optional).
How to set Always Allowed apps and contacts
You can allow your child to use specific apps at all times and who your child can contact during Downtime. To change these settings, follow this path:
Settings > Family > Your Child > Screen Time

Step 1: Tap or click on Always Allowed.
Step 2: Tap or click on Contacts to select Everyone or Specific Contacts. If you choose the latter, a popup appears for you to select an existing contact or create a new one.
Step 3: Tap or click on any red “minus” icon to remove an app from the Allowed Apps list. Phone, Messages, FaceTime, and Maps are Always Allowed by default.
Step 4: Tap or click on any green “plus” icon to add an app to the Allowed Apps list.
How to change the Content & Privacy Restrictions settings
You need to enable this feature to manage how your child installs apps and makes in-app purchases. Here you can also block Apple-specific apps like Mail and Safari.
However, this section is fully loaded, so we’ll break it all down into six parts. To start, follow this path:
Settings > Family > Your Child > Screen Time
Step 1: Tap or click on Content & Privacy Restrictions.
Step 2: Tap or click on the toggle next to Content & Privacy Restrictions to enable this feature. It turns green when enabled.
iTunes & App Store Purchases | Allowed Apps | Store content | Web content | Siri content | Game Center restrictions
How to modify iTunes & App Store purchases
Here you can control what apps your child installs and deletes. You can also allow or block in-app purchases.

Step 1: Tap or click on iTunes & App Store Purchases.
Step 2: Tap or click on Installing Apps to Allow or Don’t Allow.
Step 3: Tap or click on Deleting Apps to Allow or Don’t Allow.
Step 4: Tap or click on In-App Purchases to Allow or Don’t Allow.
Step 5: Tap or click on Always Require or Don’t Require. If you select Don’t Require, your child isn’t prompted to enter a password again after the first purchase.
Step 6: Tap or click on Done when you’re finished.
How to modify the Allowed Apps list
Here you can enable or disable the built-in Apple apps, like Mail and Safari.

Step 1: Tap or click on Allowed Apps.
Step 2: Tap on the toggle next to any app you wish to enable (green) or disable (gray).
How to set Content Restrictions
This section provides all the settings you need to restrict movies, TV shows, websites, Siri results, and Game Center activity.

Step 1: Tap or click on Content Restrictions.
Step 2: The following screen breaks down into four cards and their individual settings:
Allowed Store Content
- Music, Podcasts, News, Fitness – Clean or Explicit
- Music Videos – Off or On
- Music Profiles – Off or On
- Movies – Don’t Allow, Not Rated, from G to NC-17, Unrated, Allow All
- TV Shows – Don’t Allow, from TV-Y to TV-MA, Allow All
- Books – Clean or Explicit
- Apps – Don’t Allow, from 4+ to 17+, Allow All
- App Clips – Allow or Don’t Allow
Web Content—Select one of three
- Unrestricted
- Limit Adult Websites – Tap the Add Website link for Always Allow or Never Allow to enable and block specific adult-oriented websites.
- Allowed Websites – Tap the Add Website link to add a website to the preselected list of nine (Disney, PBS Kids, National Geographic Kids, etc).
Siri
- Web Search Content – Allow or Don’t Allow
- Explicit Language – Allow or Don’t Allow
Game Center
- Multiplayer Games – Don’t Allow, Allow With Friends Only, or Allow with Everyone
- Adding Friends – Allow or Don’t Allow
- Connect with Friends – Allow or Don’t Allow
- Screen Recording – Allow or Don’t Allow
- Nearby Multiplayer – Allow or Don’t Allow
- Private Messaging – Allow or Don’t Allow
- Profile Privacy Changes – Allow or Don’t Allow
- Avatar & Nickname Changes – Allow or Don’t Allow
Other restrictions
Finally, on the Content & Privacy Restrictions screen, you can set restrictions to Allow or Don’t Allow for the following settings:
- Share My Location
- Passcode Changes
- Account Changes
- Cellular Data Changes
- Driving Focus
- TV Provider
- Background App Activities
Other spending tools at your child’s disposal
You can use two other tools besides Screen Time to manage your child’s spending.

Ask To Buy
All Family members have access to the credit card on file when you allow Purchase Sharing. The Ask To Buy feature gives you more control over how your child purchases apps, in-app items, and media.
When your child selects an app or media to purchase, an Ask Permission prompt appears on the child’s screen. The child taps Ask—the parent approves or denies the purchase directly on their device.
Follow this route to enable Ask To Buy on the child’s account:
Settings > Family > Your Child > Ask To Buy
Ask to Buy purchases apply to App Store, iTunes Store, and Apple Books only.
Apple Cash
Apple Cash is an alternative to your child using the credit card on file. It’s a digital card you create for your child in Wallet and is used with any service that accepts Apple Pay. Your child can receive money through Apple Cash as well.
To get started, follow this path:
Settings > Family > Your Child > Apple Cash
Final call: Keep your guard up
Apple provides an incredible toolset for parents at no extra cost. As we’ve shown, you can block access to your child’s Apple device overnight, restrict the content they consume, limit app use, and more.
But kids are clever, especially young teens and older, who are a bit more resistant to your governing ways. We suggest a three-prong approach to parental controls as a failsafe in case something goes awry and your child streams questionable content until the roosters crow at dawn.
Use the parental controls built into your router or gateway to complement Apple’s free tools. Also, take advantage of your mobile provider’s tools to keep your child’s cellular use at bay, like AT&T Secure Family and AT&T Purchase Blocker.
FAQ about iPhone parental controls
The following questions and answers are based on iOS 16, iPadOS 16, and MacOS Ventura 13. They may not apply to Apple’s older operating systems.
Do the parental controls on iPhone, iPad, and Mac require a subscription?
No, you do not need a subscription to use Apple’s parental controls. They are available for free across all Apple devices.
Do I need to set the parental controls for each Apple device my child uses?
No, the settings apply to your child’s Apple ID account, so any apps you block or content restrictions you set carry across all Apple devices.
Do I need to set the parental controls directly on my child’s device?
No, you can set and modify the parental control settings on any Apple device you use. If you’re setting up a new Apple device for your child, you can use Quick Start to port your child’s Apple ID and parental settings to that device.
Email encryption isn’t a mainstream feature. Corporate environments primarily use encryption for exchanging sensitive data. But what if you need to email tax documents and you don’t feel comfortable merely locking the files behind a password?
The good news is that you don’t need a corporate account to encrypt emails. Full email encryption on a consumer level is possible and not overly complicated.
This guide will show you how to set up your email client to use an S/MIME certificate so your email will be encrypted. We will also show you how to use free services like Mailvelope and OpenKeychain. If you’d rather use a paid third-party email service, we list a few examples of those as well.
Start with a secure internet connection.
Security isn’t the only important thing about your internet connection. Enter your zip code below to see if there’s a better provider (and plan) in your area.
Get an S/MIME certificate
The bottom line with end-to-end encryption outside a corporate environment is that you must install an S/MIME certificate. Think of it as a plug-in for your email client. Some just guarantee who you are, while others provide both digital signing and encryption.
While you can create a self-signed S/MIME certificate, the process is long and overly technical. The easy way to get an S/MIME certificate is to pay an annual fee. Here are five examples:
| Company | Plan | Cost | Get it |
|---|---|---|---|
| Entrust | S/MIME Personal | $50.00/yr. | View Plan |
| IdenTrust | Secure Email (S/MIME) | $18.00–$91.00/yr. | View Plan |
| GlobalSign | PersonalSign | $59.00–$79.00/yr. | View Plans |
| Sectigo | Personal S/MIME | $15.00-$49.00/yr. | View Plan |
| SSL | Personal Basic Email | $30.00/yr. | View Plan |
How to encrypt email on Outlook for Windows 10
Outlook for desktop encrypts messages using an S/MIME certificate only if you have an active Microsoft 365 subscription.
We provide additional information about S/MIME in the email encryption FAQ below, which lists the caveats of using this method. The bottom line is that both parties need a digital signature for this method to work from end to end.
If you don’t have a Microsoft 365 subscription, Microsoft provides Personal and Family plans. Otherwise, your next best method is to use a browser extension.
How to install and select your certificate in Outlook
These instructions assume that you already obtained an S/MIME certificate, downloaded the file to your Windows PC, and have the required password handy.
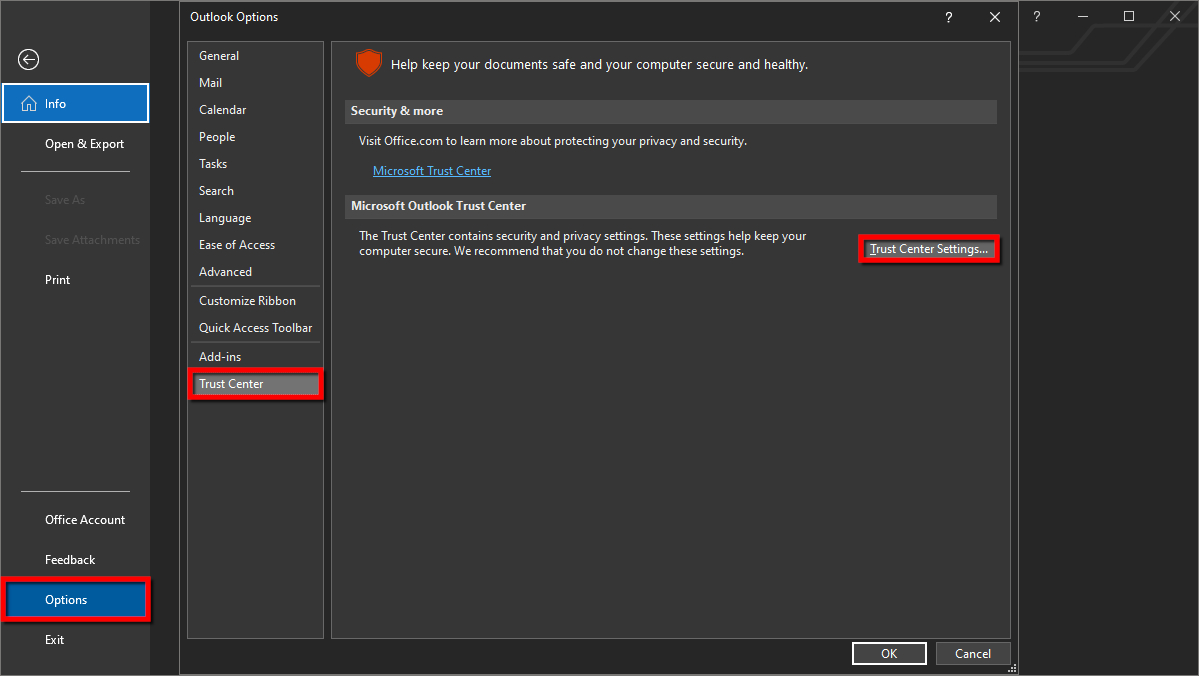
Step 1: With the Outlook desktop client open, click File located in the top left corner.
Step 2: Select Options on the next panel.
Step 3: On the Outlook Options window, select Trust Center listed on the left.
Step 4: Click on the Trust Center Settings button displayed on the right.
Step 5: Select Email Security listed on the left.
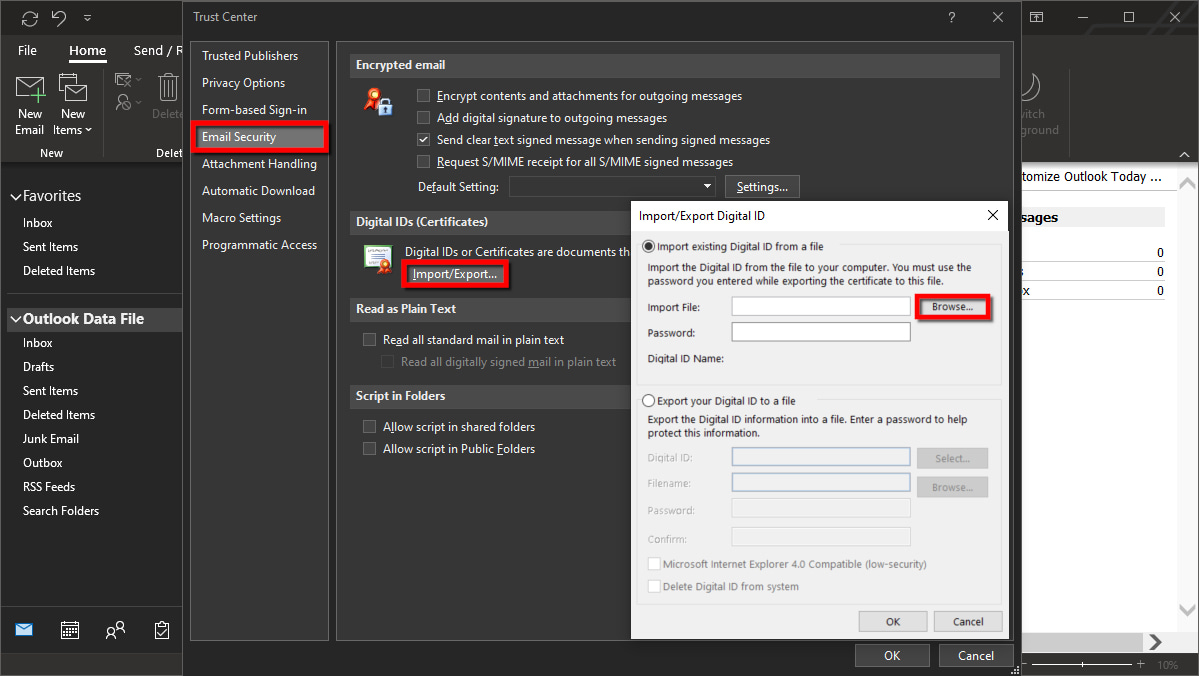
Step 6: Under Digital IDs (Certificates), click on the Import/Export button.
Step 7: Check the box next to Import Existing Digital ID from a File if it’s not already.
Step 8: Click the Browse button displayed next to Import File.
Step 9: Find and select the downloaded file. Then click Open.
Step 10: Enter the password associated with the certificate file and then click OK.
Step 11: Click the OK button displayed in the security dialog box.
At this point, you return to the Email Security panel in the Trust Center window. Your certificate should already be selected for signing and encryption by default. To verify, continue to the next step.
Step 12: Under Encrypted Email, click the Settings button.
Step 13: Create a unique security settings name or leave it as the default.
Under Certificates and Algorithms, you should see the certificates appearing next to Signing Certificate and Encryption Certificate.
How to encrypt a single message and attachment in Outlook
Step 1: Start a new message.
Step 2: Select File in the top left corner.
Step 3: Select Properties on the next panel.
Step 4: Click on the Security Settings button in the pop-up window.
Step 5: Click on the box next to Encrypt Message Contents and Attachments.
Step 6: Click the OK button to continue.
Step 7: Compose your email and send it as usual.
How to always send encrypted emails in Outlook
Step 1: With the Outlook client open, click on File located in the top left corner.
Step 2: Select Options on the next panel.
Step 3: Select Trust Center listed on the left in the Outlook Options screen.
Step 4: Click on the Trust Center Settings button.
Step 5: Select Email Security listed on the left.
Step 6: Under Encrypted Email, check the box next to Encrypt Contents and Attachments for Outgoing Messages.
Step 7: Click on the OK button to finish.
How to encrypt email on Outlook for macOS
With macOS, you import the S/MIME certificate to Keychain Access and then link to it inside Outlook. For this method, you need a Microsoft 365 subscription to enable encryption. If you don’t have a subscription, the next best method is to use a browser extension.
How to install a certificate in Outlook for macOS
These instructions assume that you already generated the certificate, assigned a password, and downloaded the file to your Mac. The following steps are based on instructions provided by Entrust.1
Step 1: Locate and double-click on the downloaded file and enter the certificate’s required password, not your Mac password.
Step 2: The Keychain Access app should open by default. On the left under Category, select Certificates.
Step 3: Click on the certificate displayed on the right. You will see an error noting that an “unknown authority” signed the certificate.
Step 4: Hold down on the Command key while clicking on the certificate.
Step 5: Select Get Info on the pop-up list.
Step 6: On the following pop-up window, click on the URL listed under Method #2. A secondary certificate downloads to your Mac.
Step 7: Locate and open the file you just downloaded (*.cer).
Step 8: Select Add in the pop-up window.
How to link certificates to Outlook on macOS
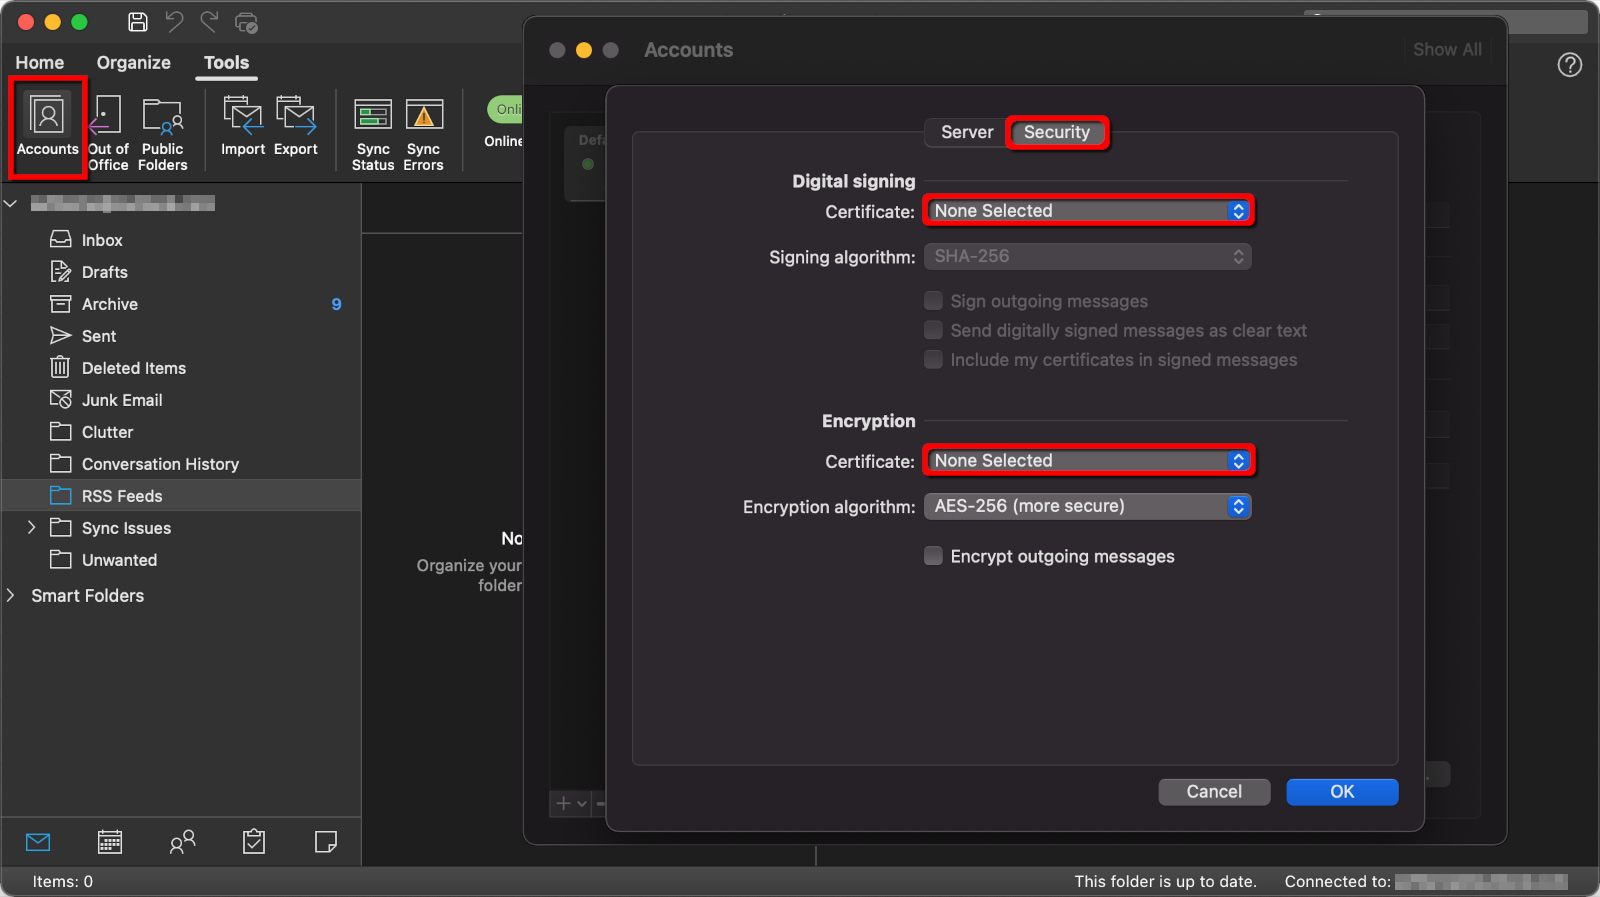
With the certificates now installed, you can link them within Outlook.
Step 1: With the Outlook desktop client open, select Tools on the menu bar.
Step 2: Select Accounts on the drop-down menu.
Step 3: Select Advanced.
Step 4: Click on the Security tab.
Step 5: Under Digital Signing, click the arrows next to Certificate and select the certificate you just installed.
Step 6: Check all three options listed in the Digital Signing section.
Step 7: Under Encryption, click the arrows next to Certificate and select the certificate you just installed.
Step 8: Select OK to finish.
How to encrypt Gmail
For the general user, Gmail handles encryption in two ways.
First, Google encrypts all files stored on its servers by default, including emails. If a hacker breaks into Google’s cloud, they can’t read your messages. This is called “encryption at rest.”
Second, Google automatically employs “encryption in transit” by using Transport Layer Security (TLS). This method doesn’t encrypt the actual message but instead encrypts the transport from sender to server. Think of this as sending an unencrypted message in a corked bottle that only the server can pop open.
To send a fully encrypted message from end to end, you need a Google Workspace Business or Enterprise account (formerly GSuite) or a third-party service. Even if you have an S/MIME certificate, there’s no way to “install” it in Google’s Gmail client without Google Workspace—it requires a Google Admin console.
How to use Confidential Mode in Gmail
One way to “lock” your emails away from prying eyes without using S/MIME encryption is to use Google’s Confidential Mode. This mode requires a passcode to unlock and will delete the message after a duration specified by you. Here’s how to use it:
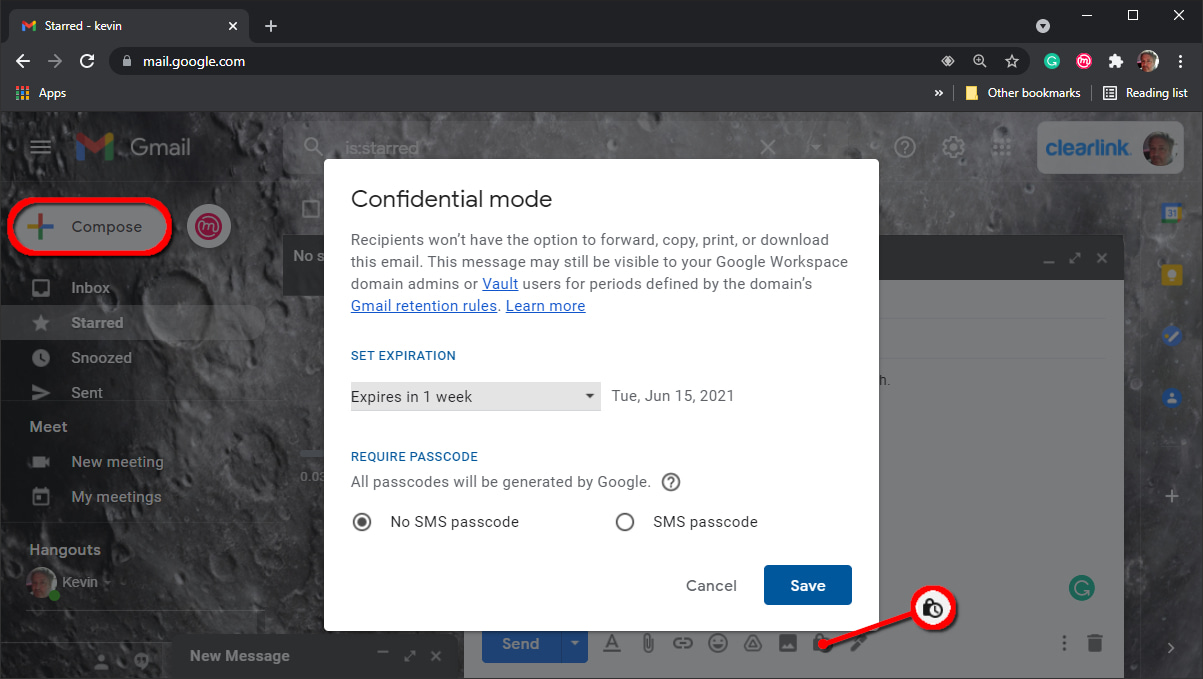
Step 1: With Gmail open in a browser, click on the Compose button to start your message.
Step 2: Write your message.
Step 3: Click on the lock/clock icon on the toolbar at the bottom.
Step 4: Click the Down arrow under Set Expiration and select one of five durations.
Step 5: Under Require Passcode, select one of two options:
- No SMS Passcode: Recipients using Gmail will not need a passcode to open the messages. For all other email clients, Google will send an emailed passcode.
- SMS Passcode: Recipients will receive a passcode in a text message.
Step 6: Click on the Save button.
Step 7: Click the Send button. If you chose the SMS Passcode option, move on to the next step.
Step 8: A pop-up window appears on your screen. Enter the recipient’s phone number and then click on the Send button.
Use a Chrome extension
You can install third-party Chrome extensions that provide end-to-end encryption for webmail clients like Gmail. Move on to the next section for more information.
How to use a browser extension for Gmail, Outlook.com, Yahoo! Mail, and more
As we previously pointed out, webmail clients encrypt the transport only while the email is in transit, not the actual message. For end-to-end encryption, you will need a browser extension.
In this example, we use Mailvelope. It supports Chrome, Firefox, and Chromium-based browsers, including Microsoft Edge.
How to use Mailvelope
Before you use this free service, keep in mind that the recipient must also use Mailvelope to decrypt your messages.
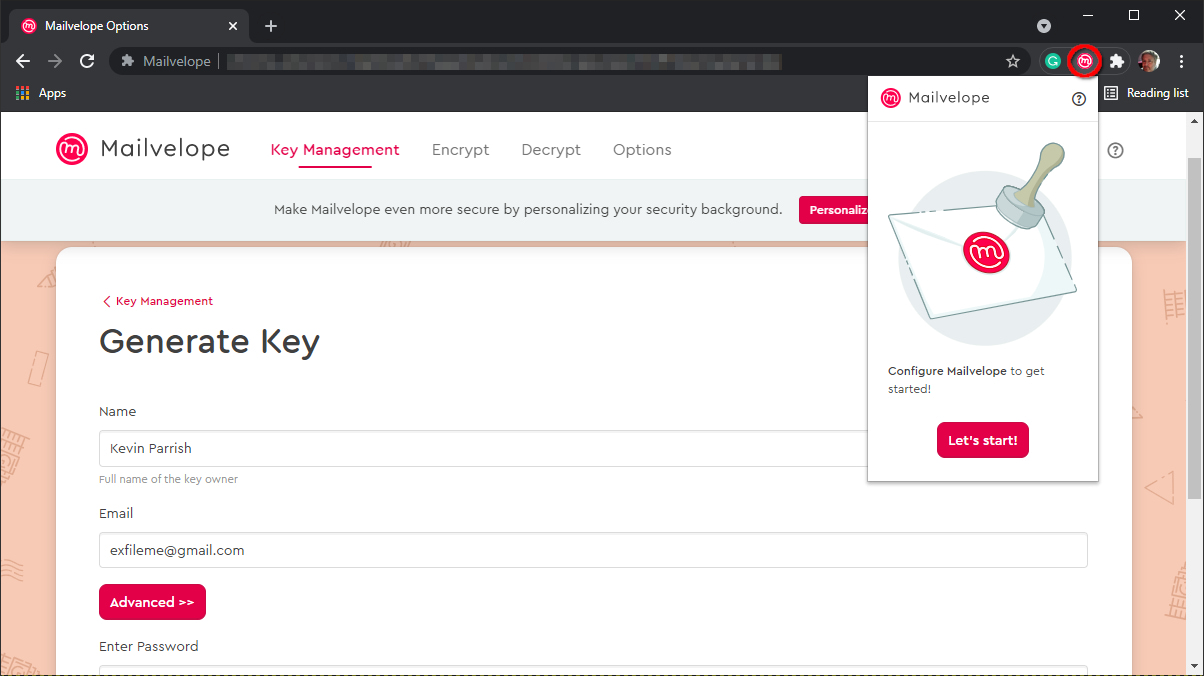
Step 1: Install the browser extension.
Step 2: Click the Mailvelope icon and then click on the red Let’s Start button.
Step 3: Click on the Generate Key button to create your key pair set.
Step 4: On the following screen, enter your name, email address, and password. You cannot reset the password, so be sure to store it somewhere like a password manager.
Step 5: Click on the Generate button.
Step 6: Launch your webmail client and then open the message sent to you by Mailvelope.
Step 7: Click on the encryption symbol and enter the password to read the email.
Step 8: Click on the link to verify your email address.
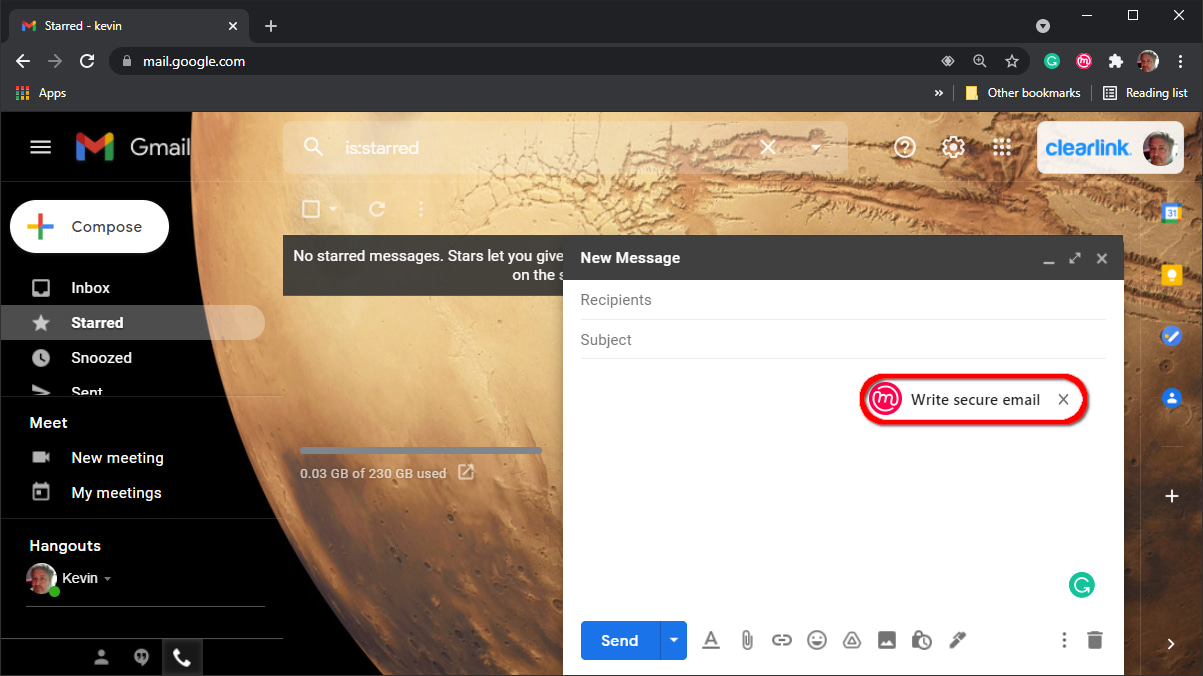
Step 9: Start a new email as usual, and then click on the Mailvelope icon if you want to send an encrypted message. The Mailvelope editor opens.
Step 10: Compose your message and then click the red Encrypt button.
Step 11: The Mailvelope editor closes, and you return to the webmail’s message editor.
Step 12: Add a subject and then click the Send button.
How to encrypt email on iPhone and iPad
Apple’s iOS and iPadOS platforms support S/MIME, but you must install the certificate first before enabling S/MIME. The recipient must also support S/MIME and send you a digitally signed email first.
How to install an S/MIME certificate on iPhone and iPad
The method may be different across S/MIME certificate providers. Typically, you must generate the certificate, create a password for that certificate, and then download the configuration profile, similar to how you switch to Apple’s beta program. After that, you must install the profile.
Step 1: Tap to open the Settings app.
Step 2: Tap on the “Profile downloaded” message.
Step 3: Tap Install.
Step 4: Enter your iOS or iPadOS passcode to confirm, not the certificate password.
Step 5: Tap Install twice.
Step 6: Enter your certificate password and then tap Next.
Step 7: Tap Done to complete.
How to enable an S/MIME certificate on iPhone and iPad
With the file installed, you can now select an email account and enable the S/MIME certificate.
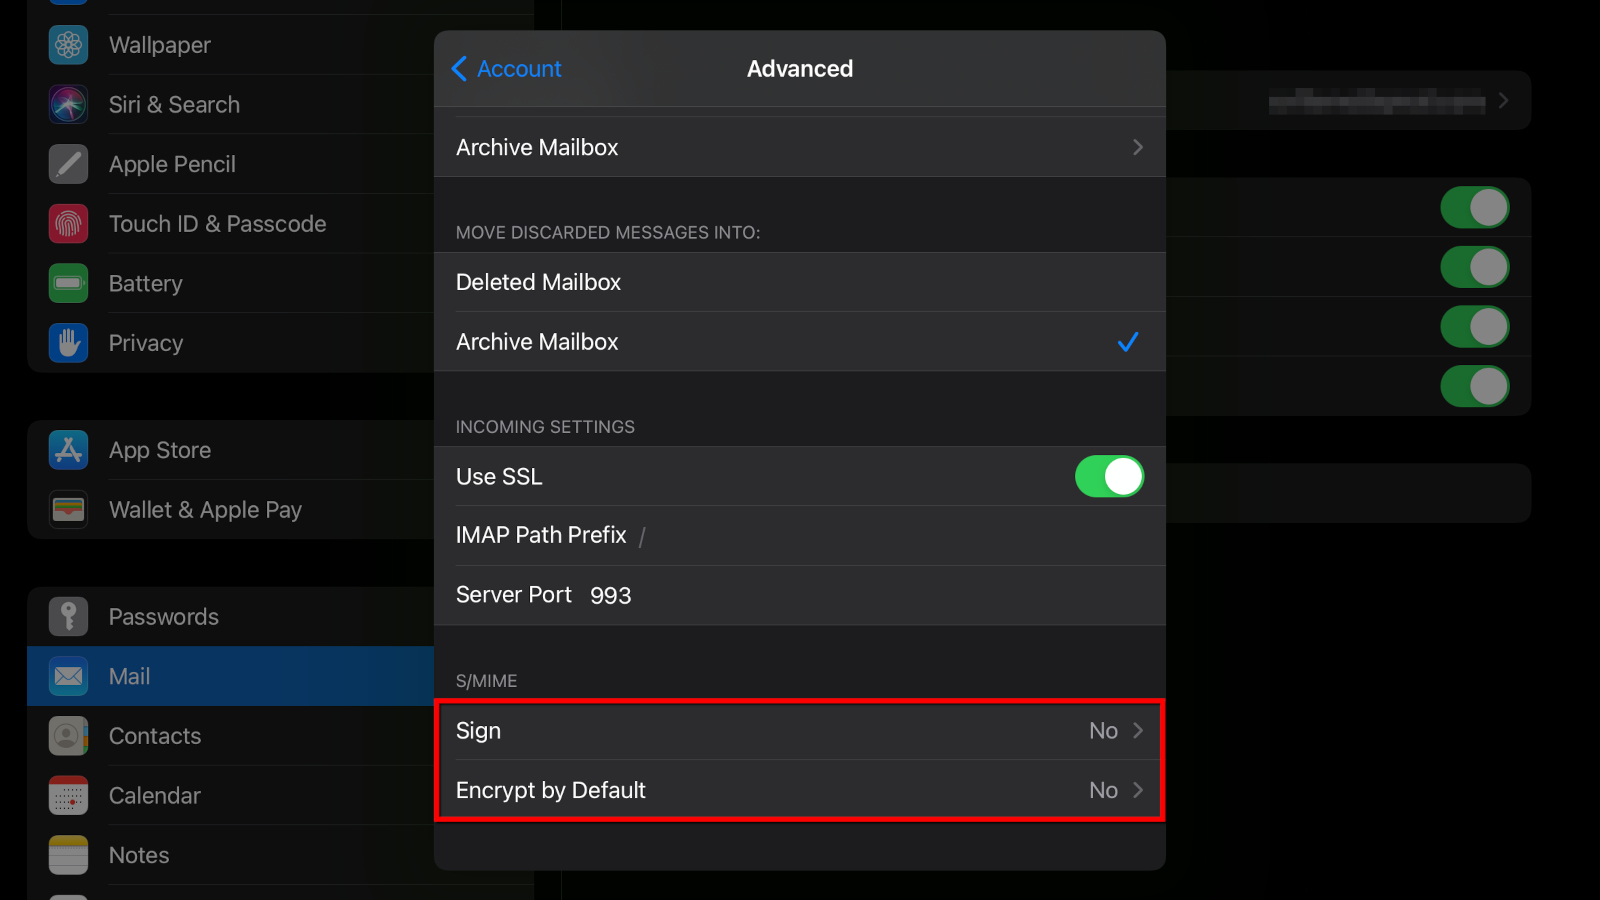
Step 1: Tap to open the Settings app.
Step 2: Tap Mail.
Step 3: Tap Accounts.
Step 4: Tap the email account you want to use to send and receive encrypted email.
Step 5: Tap Account.
Step 6: Tap Advanced.
Step 7: Under S/MIME, tap one or both options—Sign by Default and Encrypt by Default—and then select Yes.
If the Mail app doesn’t recognize the sender’s signing certificate, you may need to install it first before sending encrypted emails. Refer to Apple’s instructions on how to send an encrypted message outside an Exchange environment.
How to encrypt email on Android and Chrome OS
In this section, we use two Android apps: OpenKeychain and K-9 Mail. Both apps are open source and free to use, although donations are accepted. OpenKeychain manages public and private keys, whereas K-9 is an email client that supports OpenKeychain natively.
As with other methods, you will need to exchange public keys for end-to-end encryption to work. The recipient doesn’t need OpenKeychain specifically to decrypt your emails, but the person needs an encryption key management app.
For more information about public and private keys, see our email encryption FAQ.
How to install OpenKeychain
You need to install and configure this app first before K-9 Mail. Later, when you configure the K-9 Mail app, you will select OpenKeychain for cryptography.
Step 1: After installing OpenKeychain, tap Create My Key.
Step 2: Enter a full name or nickname and then tap Next.
Step 3: Enter your email address and then tap Next.
Step 4: Verify the information and then tap Create Key.
How to share your OpenKeychain public key
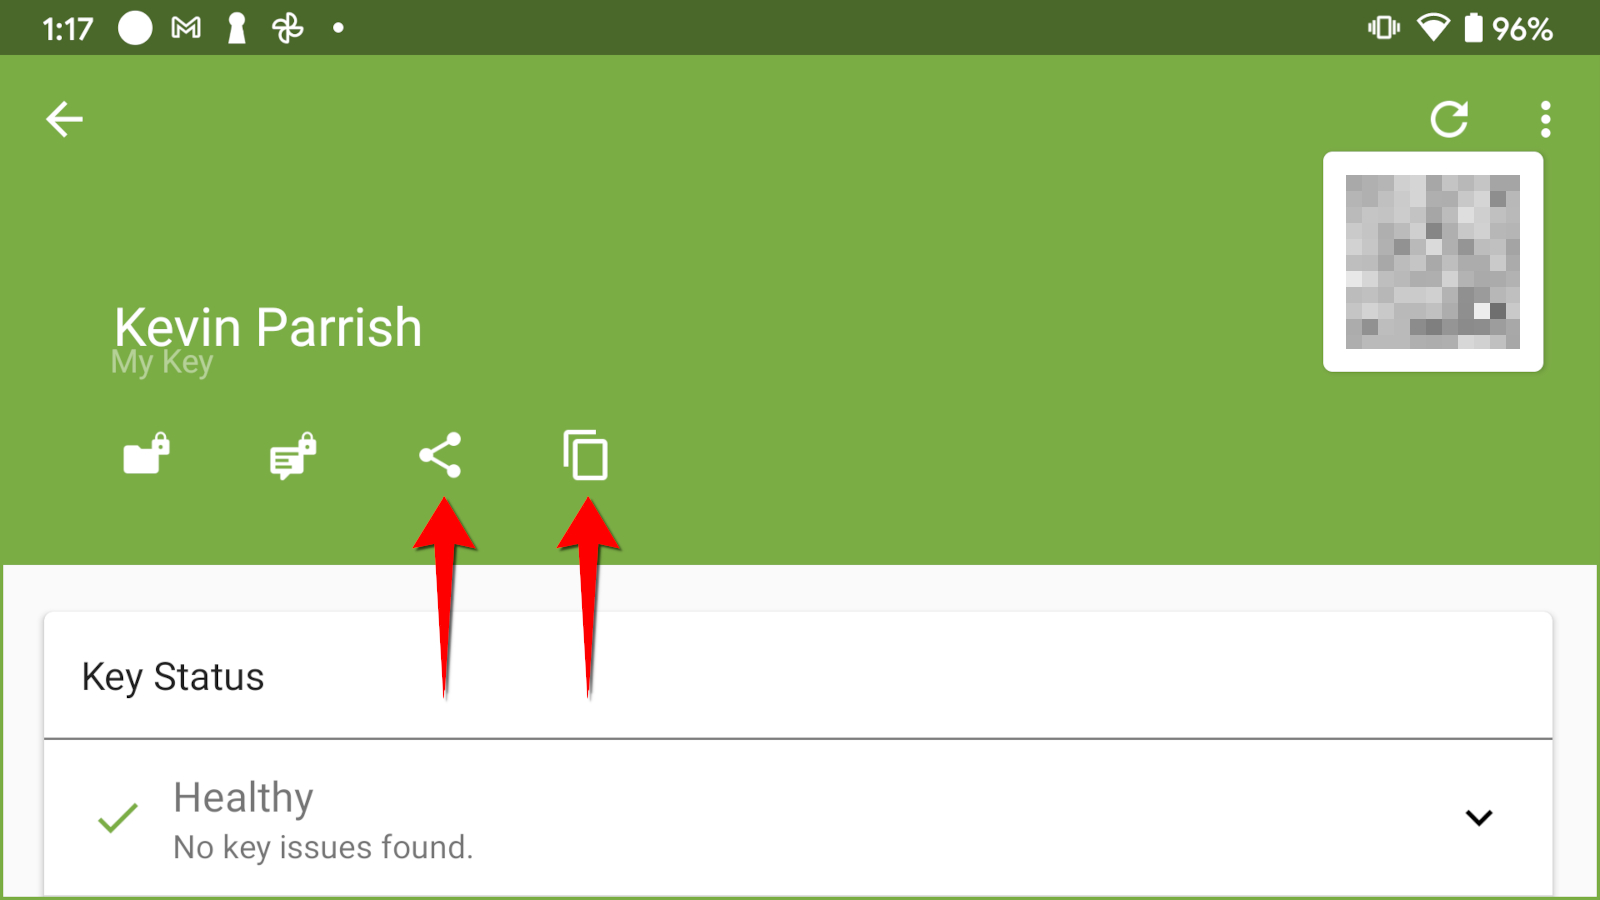
Step 1: Tap on the public key you just created.
Step 2: If the recipient is in the room, the person can scan the QR code. If not, move on to Step 3.
Step 3: If the recipient is not in the room, use one of the following methods:
- Tap the Share icon to share your key using Gmail, Google Drive, Nearby Share, and more.
- Tap the clipboard icon to copy your key to the clipboard. You can then paste your key in a message, email, document, and more.
How to send an encrypted message in K-9 Mail
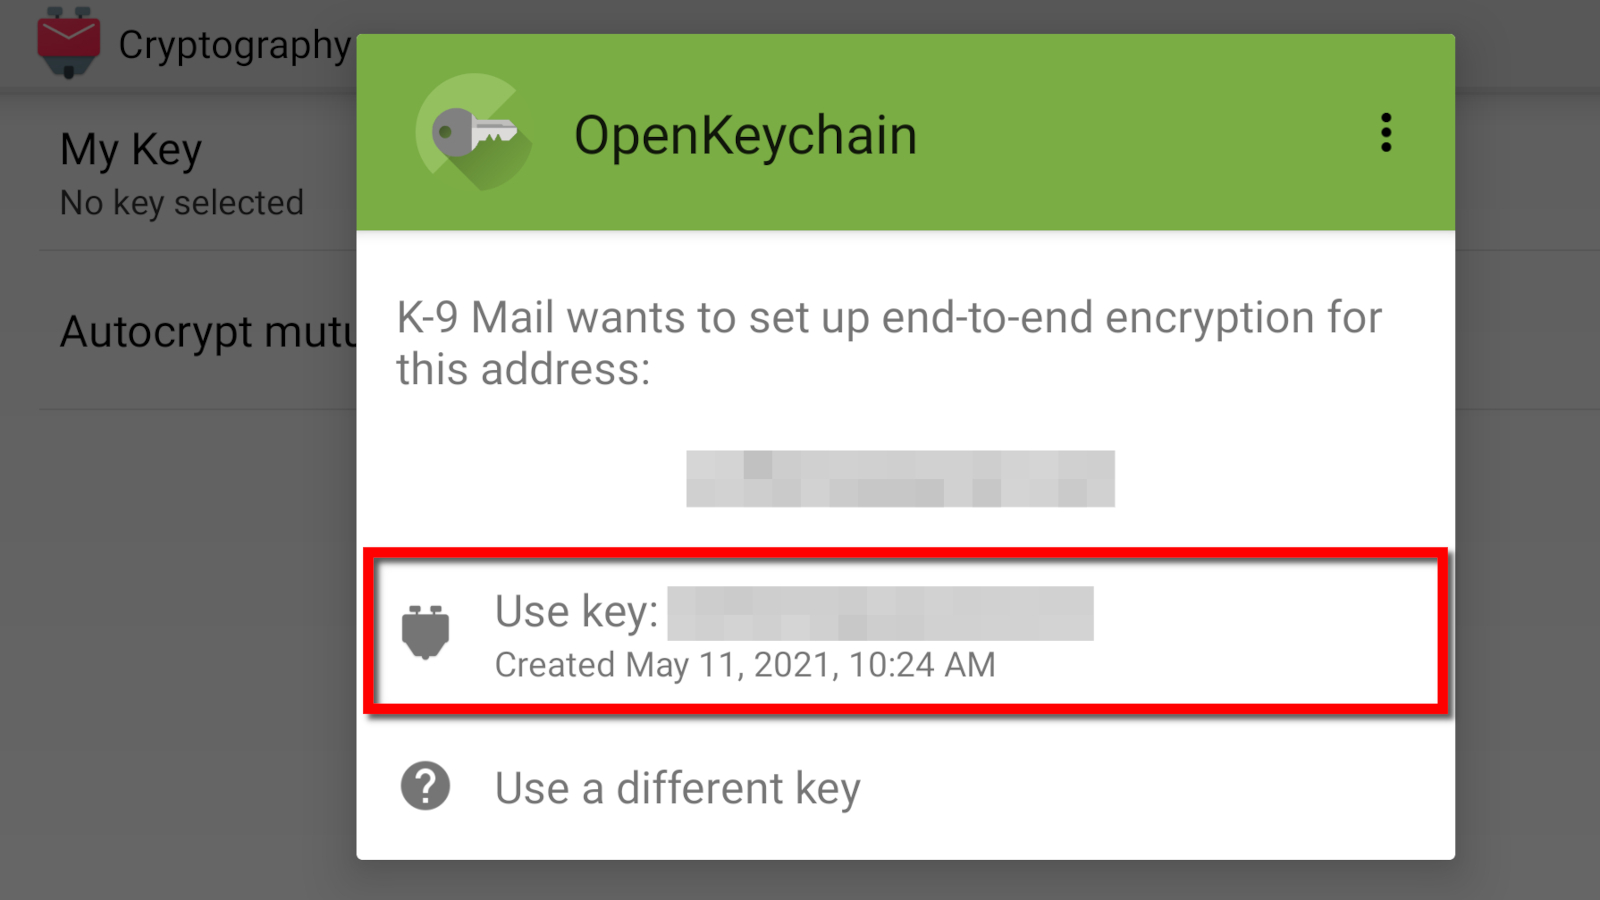
Here we will use the K-9 Mail Android app because it supports OpenKeychain natively.
Step 1: Install and configure K-9 Mail.
Step 2: Tap the three-dot ellipsis icon located in the bottom right corner.
Step 3: Tap on Settings listed on the pop-up menu.
Step 4: Tap Account Settings.
Step 5: Tap the Cryptography option on the following screen.
Step 6: Tap My Key.
Step 7: Tap OpenKeychain on the pop-up window.
Step 8: Tap Use Key.
Step 9: Compose and send your email.
Use third-party email encryption services
While paying an annual fee for an S/MIME certificate may be an unwanted expense, consider that some third-party services will cost you more. PreVeil is probably your best choice because it not only offers a free service but also doesn’t require users to create a new email address.
Here are a few examples:
| Provider | Free version? | Price | New email address required? | Get it |
|---|---|---|---|---|
| PreVeil | Yes | No | View Plans | |
| Private-Mail | No | Yes | View Plans | |
| ProtonMail | Yes | Yes | View Plans | |
| Tutanota | Yes | $1.06/mo. for Premium* | Yes | View Plans |
| Virtru | No | No | View Plans | |
| Zoho Mail | No | Yes | View Plans |
*Prices based on 12 month agreement
Asymmetric vs. symmetric encryption: What’s the difference?
Here we will explain the difference between these two encryption types.
Symmetric encryption
This method is less secure than asymmetric encryption because both parties share an identical key. Think of this method as using the same key to lock and unlock a door. If someone other than the intended individuals gains access to this key, they can unlock the door too.
Here’s a brief rundown on how symmetric encryption works:
Step 1: You and the recipient agree on a secret key and share it in a private channel. This key can be letters, numbers, a combination of both, or it can be created using the Diffie-Hellman Key Exchange.
Step 2: You encrypt the email using the shared key and send it to the recipient.
Step 3: The recipient decrypts your message using the shared key.
Asymmetric encryption
With this method, the private key is used only for decryption and cannot be shared. The public key is sharable and handles both identity and encryption. Both keys are mathematically linked.
This method is slower than symmetric encryption, but the keys are usually 2,048 bits or larger. You can also store public keys on public servers.
Here’s a brief rundown on how asymmetric encryption works:
Step 1: You create a public and private key pair.
Step 2: You share the “public” key with the sender or publish it to a public key server.
Step 3: The sender shares their “public” key with you to verify the sender’s identity.
Step 4: The sender encrypts their email with your “public” key and sends the message to you.
Step 5: Your email client decrypts the email using your “private” key.
Step 6: You respond to the email by encrypting the message with the sender’s “public” key.
Step 7: The sender decrypts the message using their “private” key.
What is Transport Layer Security (TLS)?
Webmail clients (Gmail, Outlook.com, Yahoo! Mail, and AOL Mail) support Transport Layer Security (TLS). It’s a security protocol that encrypts the communications—the transport—between the client and the server, not the email itself. This method uses asymmetric encryption.
Here’s a brief rundown on how TLS works:
Step 1: The transaction starts with a “hello” handshake between the email client and the server. Here, the server sends its public key to the client.
Step 2: The client verifies the server’s authenticity and then sends a tiny bit of data—encrypted using the server’s public key—for the server to decode.
Step 3: The server decrypts the data using its private key.
Step 4: The client and server exchange session keys.
Step 5: The client and server exchange “thank you” messages for verification.
Step 6: The client and server establish a secure connection.
Step 7: The client sends the plaintext email. This message is not encrypted.
Step 8: Upon receipt, the server verifies that the email wasn’t altered along the way and delivers the message.
TLS is not end-to-end encryption, meaning messages are protected only when they’re in transit. Since the email itself is not encrypted, Google’s bots can scan its contents. Moreover, this method works only if the recipient’s email client also supports TLS.
FAQ about email encryption
What is encryption at rest?
A good example of encryption at rest is Google Drive or Apple’s iCloud. These companies encrypt all data that you store on their servers. Your Gmail messages are encrypted until you load the app or website to read those messages.
You can also encrypt stored data on computers and mobile devices by turning on the encryption feature within the operating system. Apple and Samsung encrypt data by default.
What is encryption in transit?
Encryption in transit encrypts the communication between point A and point B. For example, Google establishes a secure connection between the Gmail web app and its webmail server. This method applies to public and private network communications.
What is a public key?
A public key is part of the asymmetric encryption process used to encrypt data. It is generated along with a paired private key using a mathematical algorithm. This key is made public (shared) and must be obtained from the recipient before the sender can transmit an encrypted message or attachment.
What is a private key?
A private key is part of the asymmetric encryption process used to decrypt data. It is generated along with a paired public key using a mathematical algorithm and is never shared. The recipient uses their private key to decode an encrypted message or attachment transmitted by the sender, who has the recipient’s public key.
A private key is also used in symmetric encryption to encrypt and decrypt data—there is no second public key.
What is Secure/Multipurpose Internet Mail Extensions (S/MIME)?
Secure/Multipurpose Internet Mail Extensions (S/MIME) is a standard (protocol) based on asymmetric encryption. The MIME aspect is essentially the raw email data you want to secure regardless of the transportation method.
While TLS secures the transport, a Man-in-the-Middle attack can intercept and expose your plaintext email. With S/MIME, even if your email falls into the wrong hands, it cannot be decrypted without the recipient’s private key. On that note, if hackers gain access to your email client, they can read your email encrypted with S/MIME.
Sources
1. Entrust, “How Do I Install My Secure Email (S/MIME) Certificate on Outlook (Mac OS X).” Accessed May 27, 2021.
-
Best content filter
 Net Nanny
- $39.99–$89.99/yr.
- Screen time management
- Alerts and reporting
- Internet filter
-
Best smartphone parental controls
 Norton Family
- $49.99/yr.
- App management
- Internet filter
- Time management
-
Best social media parental controls
 Bark
Bark- $50–$168/yr.
- Monitors 30+ social media platforms
- Sends alerts
- Time management
-
Best geofencing parental controls
 Qustodio
- $54.95–$137.95/yr.
- Geofencing and tracking
- Internet filtering
- App management
-
Best home network parental controls
 Gryphon Smart Mesh WiFi Router
- $149.99*
- Internet filtering
- Time management
- Malware protection
Data as of 11/29/2022. Offers and availability may vary by location and are subject to change.
*Amazon.com prices (as of 11/19/2022 9:12 MST). Read full disclaimer.
Parental controls cover everything from the settings in your YouTube account to locating your child using GPS. Unsurprisingly, it can be a bit daunting to dive into, especially for parents who are figuring it out for the first time.
If you’re stumped on what you need for parental controls, you’re in luck. We’ll walk you through all the different types of controls that you and your family might need.
What makes a good internet parental control?
There are two things that all good parental controls have:
- High degree of customization
- Broad applicability to different needs
Good parental controls are the ones that give the most actual control to parents. Here’s an example of why that’s so important.
When my kids started watching Netflix by themselves, they were into two shows: National Geographic documentaries and a low-budget cartoon that was basically just two irritating characters performing slapstick routines and screaming. Unsurprisingly, I got tired of the screaming show pretty fast, and I decided to turn on some parental controls.
Netflix’s parental controls at the time allowed you to set an age limit to block inappropriate content. This gave parents a range of options, from blocking just adult content to only allowing content for small children.
Unfortunately, the irritating cartoon my kids kept turning on was directed at the youngest age group, which meant that even turning on the maximum level of restrictions wouldn’t block the show. But it would block the more educational shows they liked. In other words, the parental controls were useless.
Customization is key
That’s just one example of how parental controls that have only one sliding scale are among the least useful for parents, but fortunately most modern software gives you much more customized control. The best products give you the ability to blacklist or whitelist specific sites or content, while also providing more generalized tools to filter or supervise content based on keywords or categories.
Broad applicability
Another important feature of parental control software is the ability to cover as many roles as possible. Many web browsers and other apps have their own built-in parental control tools, but having one tool that can deal with all of them at once is much better than managing a dozen different programs. And if that tool can also manage social media accounts or screen time, that’s even better.
Best content filter
$39.99–$89.99/yr.
Features:
- Screen time management
- Alerts and reporting
- Internet filter
Data as of 11/29/2022. Offers and availability may vary by location and are subject to change.
Net Nanny filters websites and manages screen time. It also provides a dashboard for parents to manage controls and see information about their kids’ computer use.
The basic version of this software covers just a single computer, and it doesn’t support mobile devices. Net Nanny does have plans that support up to 20 devices, including mobile, but these plans cost considerably more.
It should be no surprise that tools for filtering and blocking inappropriate content are some of the most common types of parental controls. It’s also hard to overstate their usefulness, especially for small children. While preventing kids from unintentionally stumbling into adult content on the internet is an obvious goal for any parental control software, kids today also have to contend with people actively targeting them when they get online.
Although there are malicious actors on the internet whose intent is to harm children, much of the disturbing content directed at kids is simply created to maximize ad revenue. YouTube, for instance, had a major problem with mass produced low-quality and disturbing content directed at children.1
This intentional targeting of children without parental consent eventually ended with Google and YouTube being fined a record $170 million.2 In response to this lawsuit, YouTube took the drastic measure of demonetizing kids videos across the site.3
This kids’ YouTube controversy highlights that although setting appropriate age limits is a good first step, the ability to more deliberately decide on the type of content your kids engage with is key to providing them with positive online experiences. Even if you’re not worried about them getting into trouble on purpose, it’s helpful to be able to steer them toward the content they actually want to see.
Best smartphone parental controls
$49.99/yr.
Features:
- App management
- Internet filter
- Time management
- Texting management
- Location tracking
Data as of 11/29/2022. Offers and availability may vary by location and are subject to change.
Norton Family is a good cross-platform parental control system that will work on most devices. Although it’s more expensive than some other basic parental controls, it supports an unlimited number of users and devices, which makes it a great deal for larger families.
Norton Family has a wide range of features, from web filtering to texting management tools. Just know that some of its features don’t work on iOS, so if you’re an Apple family, you might want to take that into consideration.
When you have older kids, their encounters with the internet are no longer limited to the family computer and school labs. One in five kids in the US has a phone by age eight and over half of kids have a smartphone by age 11.4 As such, modern parental controls have to work not only on PCs and laptops but also on the devices that kids use most often: smartphones.
You need parental control software that works across all the different platforms you use. Fortunately, many modern tools work on both Android and iOS, though features can vary across platforms. Again, when choosing a tool for your family, make sure that it supports all the features that you need. This might include not only basic web filtering and blocking but also tools for blocking or restricting apps, managing screen time, and handling social media.
Another factor to consider is how many devices or kids the software supports. The best parental control tools don’t put any limits or price restrictions on the number of devices or kids; however, if you have a small family, this might be less of a concern.
Pro Tip:
While devices designed for parental controls offer the most control and flexibility, most modern routers include basic parental controls you can set up yourself.
You should also know how easy the parental control software is for parents to use. Although setting up and managing controls across multiple devices can be a daunting task, the best tools offer user-friendly interfaces via both a web browser and smartphone apps.
Best geofencing parental controls
$54.95–$137.95/yr.
Features:
- Geofencing and tracking
- Internet filtering
- App management
- Time management
Data as of 11/29/2022. Offers and availability may vary by location and are subject to change.
Qustodio is a well-rounded parental control system that uses geofencing technology through its family locator feature.
Rather than constantly monitoring your kids over GPS, geofencing allows you to set up a “fence” around frequented areas like home or school that will notify you when a family member comes or goes.
Geofencing gives you a lot more flexibility than traditional GPS tracking programs. The lack of constant monitoring makes less work for parents and is less invasive for kids.
If you have older kids that drive (or have friends who do), it can be helpful to keep track of their locations, especially if they have responsibilities like running errands or picking up younger siblings. Fortunately, there’s a tool to help you do this: geofencing.
Geofencing creates a virtual boundary around a physical location using GPS or RFID (radio frequency identification), and it monitors mobile devices as they enter and leave this area. For parental controls, this means you can see when a child has left or arrived at a destination without them checking in. It can also alert parents if a child enters a zone marked as unsafe. You can also use it to notify you when your child is in a vehicle going over the speed limit.
There’s a lot of variation between the geofencing features in different parental control apps and many do not work across different platforms. When looking for a geofencing solution, make sure it gives you the features you want and that it’ll work on your kids’ devices.
Best home network parental controls

$229.00*
Features:
- Internet filtering
- Time management
- Malware protection
*Amazon.com prices (as of 11/29/2022 9:12 MST). Read full disclaimer.
The Gryphon Smart Mesh router combines network management tools, security, and parental controls in a single device. It gives you the ability to control not just the computers and mobile devices on your home network but also the smart TVs and smart devices.
You also get all the benefits of a fast tri-band mesh router, making it easy to install multiple devices to cover even the largest homes.
Managing a wide variety of internet-enabled devices at home can be a challenge, so many parents opt to go straight to the source: the home network.
Companies like Gryphon offer specialized routers and other physical devices that implement parental controls at the network level, filtering out unwanted content as it enters your home. These devices have a wide range of capabilities, including filtering content, blocking ads, and disabling devices during homework or bedtimes. Many Gryphon devices also provide statistics on internet use to help parents make decisions about schedules and screen time limits.
Most dedicated parental control devices have apps that allow you to control them from your phone, but many also require a subscription of some kind in order to deliver updates to the device. This subscription may or may not be included in the price of the device, so make sure that you read the fine print before buying.
The best parental control? Communication
When it comes to keeping your kids safe online, the most important tool is always communicating with them first. Teaching them digital literacy is a skill for which no amount of technological interventions can wholly compensate.
Working together with your kids can also save you a lot of time and effort, since chances are they know a lot more about how their generation uses the internet than you do. That’s a lot easier and more effective than playing Whac-A-Mole with every new website and app that comes out.
FAQ about internet parental controls
How do I turn on parental controls on my device?
Many devices, such as laptops and iPads, come with some built-in parental controls. To enable parental controls on your device, you can search for parental controls, or find them by opening up your settings.
Many kinds of parental controls, such as screen time restrictions, might be directly accessible in the settings menu. Other devices might keep these controls in a submenu, such as security or privacy. Some devices might have a dedicated parental control menu within the device settings.
For more information, see our guides on setting up parental controls:
How do I restrict internet access for my child?
You can restrict access to certain sites or types of content by using parental control software that comes with a content filter. If you want to restrict all access to the internet during times when your child is in bed or doing homework, you want parental controls that have time management features.
Are there free parental controls?
There are a lot of free parental control apps available, such as Google Family Link for Parents and FoxFilter. Many paid parental control apps, such as Qustodio, also have free trial periods or free versions of the software available.
Also, remember that many apps like Netflix and YouTube have built-in parental controls. It’s a lot more work to manage controls within every individual app, and many of these built-in controls don’t give you as many features as a dedicated parental control program would. Still, these parental control settings are a good place to start while you decide whether or not you want to invest in a more robust solution.
Are there loopholes for kids to get around parental controls?
There are always loopholes to any parental control solution. Some can be circumvented by simply rebooting the device. Others can be circumvented by using technologies like VPNs. While many parental controls will try to preemptively block potential workarounds like VPN sites, there are some loopholes that no app can fix—such as when your eight-year-old figures out his grandma’s password.
It’s also important to remember that even if your kids aren’t actively trying to circumvent parental controls, the “safe” and “not safe” areas of the internet are constantly moving targets. Just as with the case of creepy kids’ YouTube videos, inappropriate content can slip through the cracks, either through the actions of malicious individuals or larger systemic problems.
Although parental controls are powerful tools for minimizing the amount of risk your children encounter when they go online, it’s important not to lose perspective. No system is 100% effective. Part of maintaining a responsible internet policy for your kids is having a plan for what to do when that policy fails. It’s important to stay informed about the issues that kids face online so that you can talk with your children when they encounter something upsetting.
Will kids know parental controls are active?
There are some types of parental controls that can be installed without your kids knowing. However, as Caroline Knorr of Common Sense Media notes, parents should be cautious of any company that promises covert monitoring, as these companies tend to prey on parents’ fears.6
Covert monitoring can erode the trust between you and your children, incentivizing them to find loopholes in parental controls (and there are always loopholes) or to hide problems they are experiencing online.
We recommend using parental controls from companies that design their products to be used openly and honestly with your children, rather than those from companies that try to exploit parents’ fears. Parental controls work best when they serve to support your efforts to give your kids the best possible experience online.
- James Bridle, Medium, “Something Is Wrong on the Internet,” November 6, 2017. Accessed October 8, 2020.
- Federal Trade Commission, “Google and YouTube Will Pay Record $170 Million for Alleged Violations of Children’s Privacy Law,” September 4, 2019. Accessed October 8, 2020.
- Rebecca Jennings, Vox, “The Golden Age of Kids’ YouTube Is Over. Good.,” December 20, 2019. Accessed October 8, 2020.
- Anya Kamenetz, NPR, “It’s a Smartphone Life: More Than Half Of U.S. Children Now Have One,” October 31, 2019. Accessed October 8, 2020.
- NSPCC, “Ten Years Since the Byron Review: Are Children Safer in the Digital World?,” 2017. Accessed October 8, 2020.
- Caroline Knorr, Common Sense Media, “Parents’ Ultimate Guide to Parental Controls,” June 8, 2020. Accessed October 8, 2020.
Disclaimer
*Amazon.com Prices as of 6/16/2021 13:13 MST. Product prices and availability are accurate as of the date/time indicated and are subject to change. Any price and availability information displayed on Amazon.com at the time of purchase will apply to the purchase of this product. Highspeedinternet.com utilizes paid Amazon links
Most web browsers include private browsing so you can keep your internet activities hidden from curious eyes. Simply open a new window and surf as you please. This “mode” is called Incognito in Chrome, Private in Safari and Firefox, and InPrivate in Microsoft Edge.
But incognito mode isn’t entirely private. Let’s take a deeper look into incognito mode to understand why and see how you can browse the internet securely.
Shopping around for new internet?
Enter your zip code below to see which providers are available in your area.
What private browsing does for you
Private browsing prevents other users of the same device—like a shared laptop or tablet—from seeing your internet activity. The browser deletes the following data once you close an incognito window:
- All internet cookies
- Local browsing history
- Site data
- Site permissions
- Form information
Incognito mode essentially gives you a fresh start each time you open a private window and access the internet. It’s like you’re visiting these websites for the first time in a new web browser you just installed. So when someone else opens the same browser on the same device, the user can’t see your previous internet activity from a private window.
Minor details change between private modes for different internet browsers.
What private browsing doesn’t do for you
Incognito mode hides your internet activities from all other users that access the same device. It does not hide your activities from other entities:
- Websites
- Network management
- Your internet provider
- Your employer
- Government agencies
- Search engines
- Advertisers
Incognito mode doesn’t encode your data, it doesn’t hide your identity, and it doesn’t hide your IP address. For example, if you open a private window, log in to your Amazon account and buy a present, that purchase will still be visible in your Amazon account after you’ve exited incognito mode.
Why you should also use a VPN
Since private browsing applies only to hiding your internet activities from other users on a single device, you’ll want a great virtual private network (VPN) client to hide your activities from everything else on the internet. A VPN encrypts your data and routes that data across an encrypted connection to a remote private server. In turn, the server decrypts your data and sends it as plaintext to the destination.
By using a VPN, you’re virtually anonymous online, as destinations can’t see your IP address, device info, personal info, or region.
For truly private browsing, your best scenario is to open a private window and surf the internet using a VPN. However, make sure the VPN you choose doesn’t log your data (some free ones do)—that’s just giving someone else control over your data privacy. Your internet speed will seem slower than usual, but that’s because you’re taking an extra step to hide your activity through a remote server.
Beyond private browsing, we recommend using a VPN for a few different reasons, including remote work. To get a better picture of when using a VPN could be helpful, read our list of five reasons to use a VPN.
Pro tip:
Looking for total anonymity? We list the best browsers for security like Tor Browser and Opera.
What is Incognito Mode?
“Incognito Mode” is a term coined for the Incognito window in Google Chrome. It’s not a “mode” per se but a set of internal rules that tells Chrome to delete specific data when you close an Incognito window. Most web browsers have the same function but label it differently, like “Private” and “InPrivate.”
There are many reasons why you might want to browse incognito:
- You’re shopping for a gift and don’t want the recipient to know.
- You’re using a shared or public computer and want to maintain your privacy.
- You have an embarrassing search query.
- You want to sign in to two or more accounts of the same service, like Gmail.
How to start a private browsing session
Opening a private window is easy in any browser. Here’s how to start a session on the most popular browsers:
Chrome
Step 1: Click on the three-dot ellipsis icon in the top right corner.
Step 2: Select New Incognito Window on the drop-down menu.
Firefox
Step 1: Click on the three-line hamburger menu icon displayed in the top right corner.
Step 2: Select New Private Window on the drop-down menu.
Microsoft Edge
Step 1: Click on the three-dot ellipsis icon in the top right corner.
Step 2: Select New InPrivate Window on the drop-down menu.
Opera
Step 1: Click on the Opera logo in the top left corner.
Step 2: Select New Private Window on the drop-down menu.
Safari
Step 1: Click File on the menu bar.
Step 2: Select New Private Window on the drop-down menu.
How is Incognito Mode different from regular browsing?
As you navigate the web, your browser accumulates lots of information—your searches, the websites you visit, anything you add to a shopping cart, internet cookies, etc.
A regular web browser saves most of this information on your device and in the cloud to streamline your online experience. This data retention means you can do several things:
- Allows you to stay logged in to accounts for days at a time
- Allows online stores to keep items in your shopping cart
- Saves info so forms can autofill your name and information
- Remembers your activities so advertisers can show you relevant ads
Private browsing deletes all locally stored data when you close a private window.
More internet security resources
For many folks, VPNs—also known as Virtual Private Networks—sound like something you only need if you’re a corporate spy or a politician. There’s no way random internet data thieves are interested in your family newsletters or the password to your Facebook account . . . right?
Well, it’s a bit more complicated than that. Hackers probably don’t want to hijack your Facebook account—but, if you’re like many Americans, that same password probably opens other accounts.
There’s an easy, secure fix to all of this: a VPN.

What is a VPN?
A VPN is a software program that adds the most basic level of security to a public network by creating a virtual private network. It does this by encrypting your data and sending it to a remote server (located somewhere in the world, just not where you are), where the data is decrypted and sent along to its original destination.
This accomplishes two things: first, any data you send is secure from people on your current network; and second, identifying information about your current network, such as location, is hidden from any websites you access because your data looks like it’s coming from the VPN’s remote server.
You might think you don’t need to use a VPN, especially if you’re just using the internet for basic stuff like email, social media, and the occasional Netflix marathon. But there are plenty of situations in which you might want to use a VPN, even if you’re just sending (what you think is) boring, uninteresting data. Here are five times you should definitely consider a VPN.
1. Working from home
VPNs were—unsurprisingly—originally designed for businesses with multiple locations or remote employees. A VPN allows a company to maintain a secure network that can be accessed from anywhere with the right software and credentials.
Just remember that a work network is still a work network—outsiders can’t see what you’re sending, but your company still can.
2. Circumventing regional restrictions
If you’ve ever traveled to another country only to find that you’re suddenly unable to access all the websites and services you normally use, a VPN could come in handy.
I’m not just talking about streaming services such as Netflix and Hulu (global entertainment licensing is complicated), though this is probably one of the most popular reasons people turn to VPNs while traveling. Many online retailers won’t let you browse a country’s website if you’re not there, which is frustrating for residents who are just traveling. Some government websites are also region-restricted for security.
Luckily, a VPN can trick most of these sites into thinking you’re in the correct region, so you don’t have to worry about not being able to watch Netflix, shop, or pay traffic tickets online while traveling.
3. Skirting government censorship
While the US government doesn’t restrict or control what its citizens do online (though it does, to some extent, track them), not all governments are as hands-off.
Many countries—including China, North Korea, Iran, Syria, Ethiopia, Saudi Arabia, Vietnam, and Cuba—actively censor the internet and monitor citizens’ online activity. China’s notorious “Great Firewall of China” even blocks staples like Google and Facebook. If you happen to live in (or visit) a country with strict censorship laws, using a VPN to skirt them is a risky move—but often a necessary one.
4. Testing your internet speed
Traditional internet speed test websites may not detect Internet Service Provider (ISP) throttling because some ISPs just don’t throttle their network for those websites.
If you really want to find out whether your ISP is artificially lowering your speed, use a VPN. A VPN masks your activity from both the origin and the destination, so your ISP won’t know if you’re hitting up speed test sites or merely browsing Instagram. In extreme cases, you may want to use a VPN full-time to keep yourself off the throttle list (though you probably shouldn’t jump straight to this option, as using a VPN can also slow down your connection).
5. Using a public network
If you ever use a public, unsecured network—or any network where you’re not sure who else is connected, including private community networks (such as a hotel network with a password)—you should probably also be using a VPN. It’s not difficult for strangers with a little know-how to see what you’re doing on a shared network, whether that’s logging into social media or checking a credit card statement. A VPN is a cheap (sometimes free) solution that turns a public network into a private network and keeps your passwords and browsing activity safe from prying eyes.
There are plenty of reasons to use VPNs on both public and private networks—mainly general privacy and added security—even if the extra step means sacrificing some convenience. Just remember that using a VPN will most likely slow down your network speeds a little, so it’s important to start with a solid connection.
Take a look at 2019’s Fastest Internet Providers or enter your ZIP code to see what’s available in your area:
To make sure you get the best internet for you, ask the internet service providers in your area the following questions. To simplify this list, we’ve divided the questions into 4 categories: Equipment and Software, Speeds, Maintenance and Security, and Prices and Contracts.
Equipment and Software
First, find out what equipment and software each internet service provider requires, and how (and if) you’ll be charged for them.
1. Is the modem price included in the monthly access fee or is will I be charged a rental fee each month?
2. Can I purchase my own modem that will work with your service?
3. Who is responsible for the equipment if it breaks, and is there a warranty?
Speeds
Most providers offer different speeds at different prices. It’s a good idea to know what you plan to do online so you can get the right speed–at the right price.
4. What internet speeds do you offer?
5. Do you throttle bandwidth-intensive users?
6. Do you know what the peak usage times are?
Maintenance and Security
Know what to expect when technical problems and upgrades arise, and you’ll save yourself panic and inconvenience in the long run. Here are some questions to ask so you know what to expect from your ISP:
7. How often have you had customers reporting outages? About how long do they last?
8. What security options are included and how much do they cost? (Many ISPs offer a security suite download for free.)
9. How often do you update your antivirus files and apply software patches?
10. Do you have 24/7 technical support?
11. Is technical support available online, on the phone, on email, or a combination of these?
Prices and Contracts
Most ISPs today offer no-contract prices and with-contract prices to their customers. Be sure to ask for details and know what is reasonable for you.
12. Is there a contract?
13. What is the minimum contract length?
14. Is there a cancellation fee for canceling early?
15. How long do I have if I am dissatisfied and want to cancel with no penalty?
16. Once the term of the contract is up, will my monthly costs change?
17. How do you handle price increases and is my price guaranteed for a certain time?
18. Is the service unlimited, or is there a limit on the monthly usage?
19. If there is a limit each month, are there penalties for going over, including fees or having my service slowed or cut off?
20. What additional fees can I expect?

Best social media parental controls
$99/yr.
Features:
Data as of 11/29/2022. Offers and availability may vary by location and are subject to change.
Bark takes a different approach than other parental controls by focusing on analyzing your kids’ social media activity and looking for patterns rather than filtering and restricting content. Bark can send you alerts if it identifies issues like cyberbullying, violence, or adult content in your kids’ social media, as well as signs of depression and mental health issues.
It also offers traditional blocking and filtering tools, but its proactive approach to monitoring online activity is what sets it apart from other parental controls.
At $99 for an annual subscription, Bark is one of the pricier options, but it does offer a free trial for those who are curious.
With greater awareness of cyberbullying and other harmful kinds of online interaction, social media controls have become an important part of parental control software.
One of the challenges for creating robust parental controls for social media is that software developers are aiming at an ever-moving target. When the UK commissioned a comprehensive study of child safety online in 2008, many popular social media platforms including Instagram, Snapchat, and WhatsApp did not exist. In a follow-up study ten years later, they found not only that many of their original recommendations had not been implemented, but also that the online ecosystem had changed so much that many of their recommendations were now completely irrelevant.5
With these challenges, choosing the best parental control solution for your kids’ social media habits relies heavily on maintaining an open line of communication with them. You need to know what social media platforms they and their friends use most and make sure that the tools you choose are capable of managing them. Good controls also provide broad tools like caps on total time spent on social media as well as tools to turn social media off when it’s time for homework or sleep.