I will never, ever tell you to disable the firewall on your computer. That’s just crazy talk right there. Doing so opens the door to hackers and malware, all eager to seize your computer and steal your data. Not fun.
But there may come a time when you need to disable the firewall on Windows or Mac temporarily to troubleshoot issues—and that’s my only exception. For this reason, I’ll show you where to disable and enable the firewall on Windows PCs, desktop Macs, and MacBooks.
A note before going in
The firewall on your Windows PC, Mac desktop, and MacBook is enabled by default. If you dig in and find that it’s been unknowingly turned off for some reason, chances are you already have some form of malware installed. I’d run a third-party virus scanner to clean out the malicious trash or perhaps even reset the device to its out-of-the-box state if the pesky bugs persist. Malware can slow your computer to a crawl and severely reduce your internet speeds, among other things.
How to enable or disable the firewall on Windows 11
You can take two paths to access the Microsoft Defender Firewall toggle. I will first give you Microsoft’s official instructions, followed by a shorter route using the hidden icons menu.
The Start button route
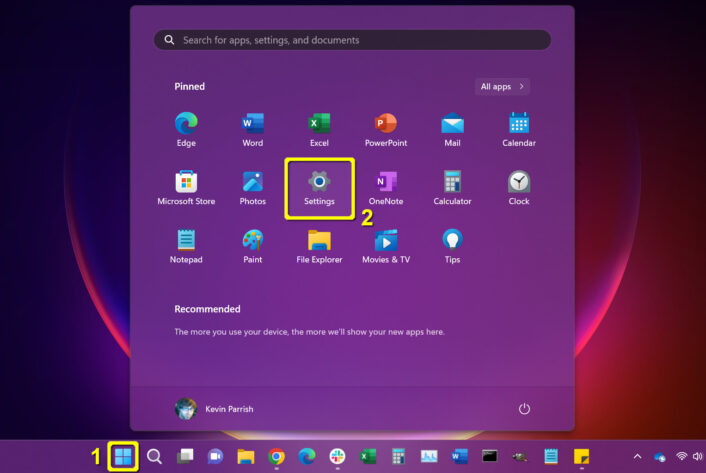
Step 1: Select the Start button.
Step 2: Select Settings on the Start Menu.
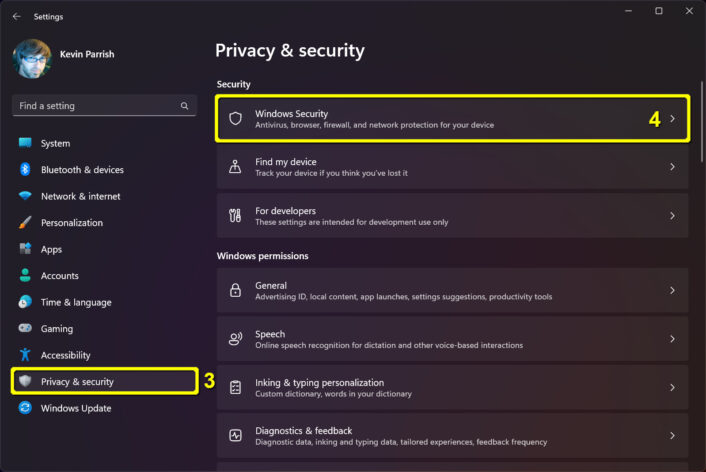
Step 3: The Settings panel appears on your screen. Select Privacy & Security on the left.
Step 4: Select Windows Security on the right.
Step 5: Select Firewall & network protection from the following list appearing on the right.
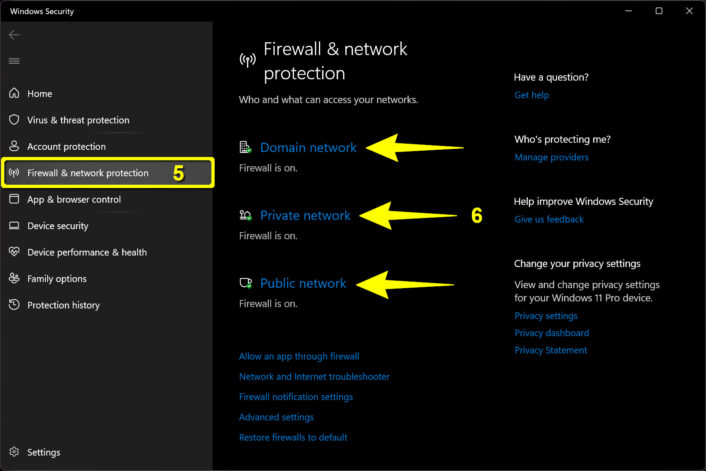
Step 6: The Windows Security panel appears on your screen with the Firewall & network protection category already selected. Choose Domain network, Private network, or Public network (see FAQ).
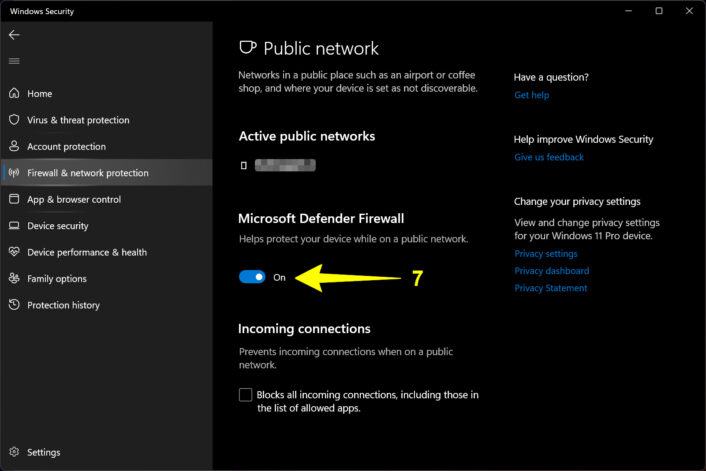
Step 7: Under Microsoft Defender Firewall, click on the toggle to set it to On or Off.
The hidden icons route
Here’s the shorter route to accessing the Microsoft Defender Firewall toggle. In my case, the Windows Defender icon resides in the hidden icons pop-up balloon. However, you may see the icon seated on the Taskbar instead.
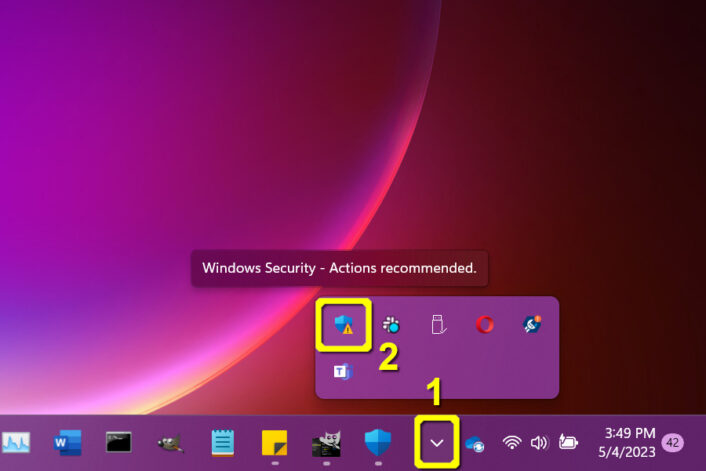
Step 1: Select the Show hidden icons button (up arrow) on the Taskbar.
Step 2: Select the Windows Security icon.
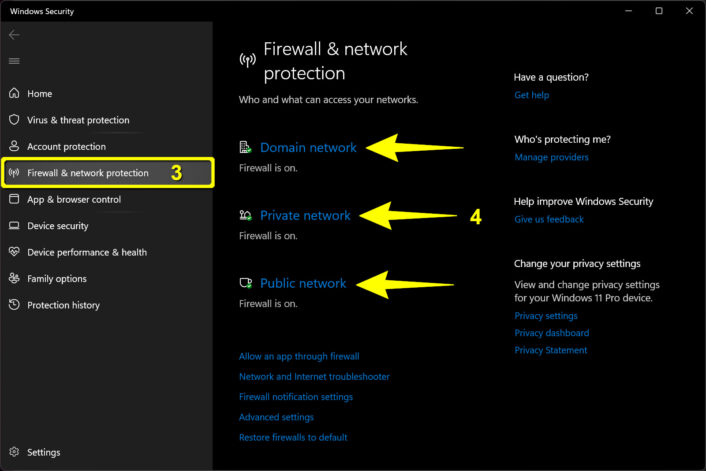
Step 3: The Windows Security panel appears on your screen. Select Firewall & network protection on the left.
Step 4: Select Domain network, Private network, or Public network (see FAQ) on the right.
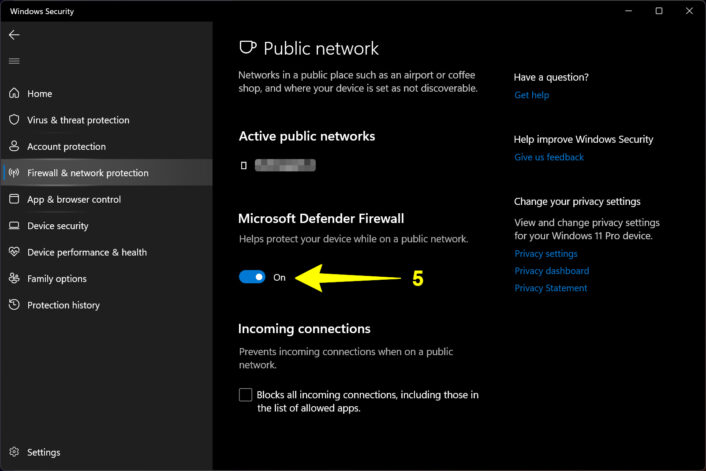
Step 5: Under Microsoft Defender Firewall, click on the toggle to set it to the On or Off position.
How to enable or disable the firewall on Windows 10
The instructions to reach the firewall toggle are different on Windows 10 than on Windows 11. But like Windows 11, you have two ways to reach the firewall toggle: using the traditional Start button method or the (faster) hidden icons route.
The Start button route
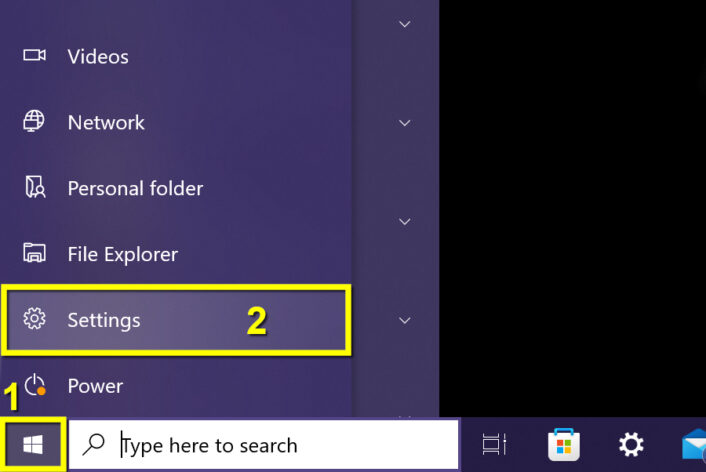
Step 1: Select the Start button.
Step 2: Select the Settings icon.
Step 3: The Settings panel appears on your screen. Select the Update & Security tile.
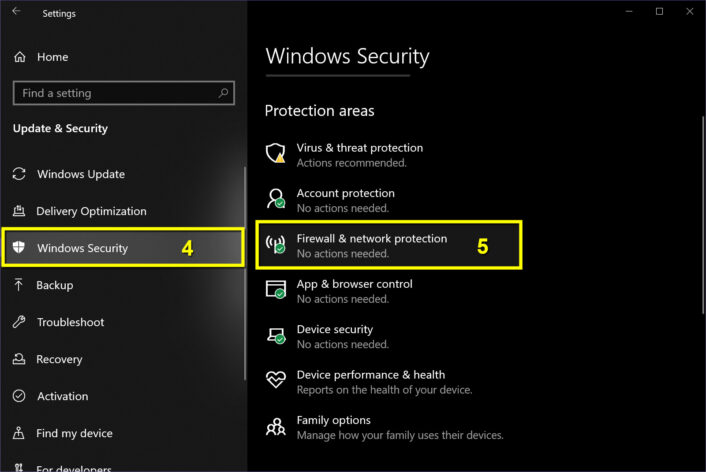
Step 4: Select Windows Security on the left.
Step 5: Select Firewall & network protection on the right.
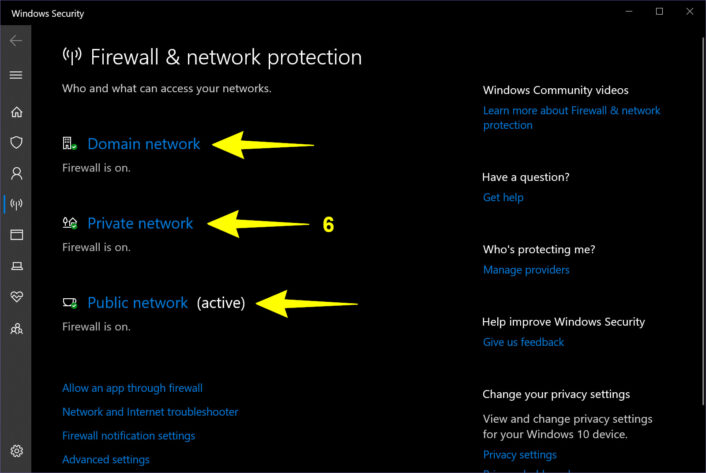
Step 6: The Windows Security panel appears on your screen. Select Domain network, Private network, or Public network (see FAQ).
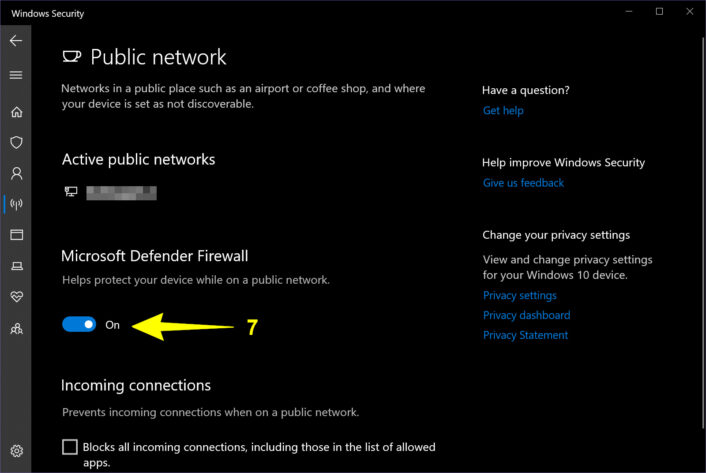
Step 7: Under Microsoft Defender Firewall, click on the toggle to set it to the On or Off position.
The hidden icons route
You can bypass the Settings window altogether and go directly to the Windows Security screen using these instructions.
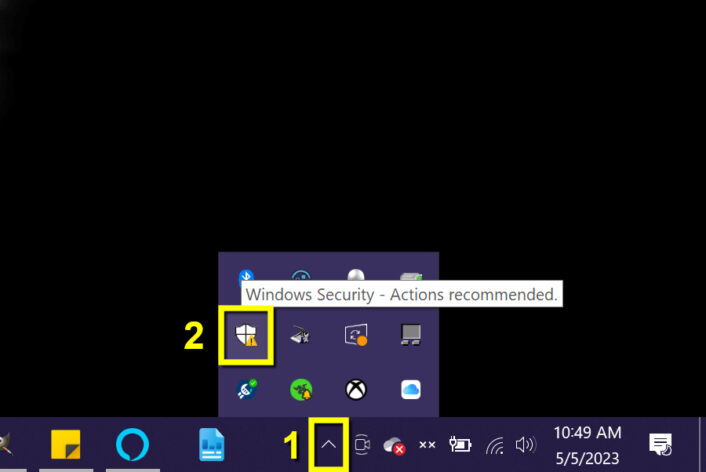
Step 1: Select the Show hidden icons button (up arrow) on the Taskbar.
Step 2: Select the Windows Security icon in the pop-up menu.
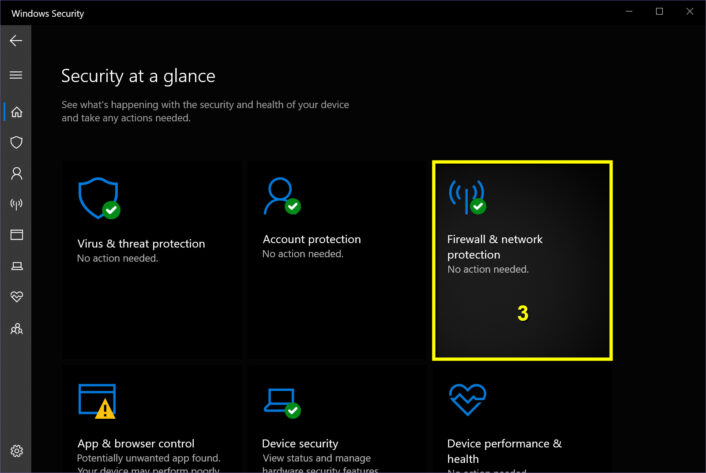
Step 3: The Windows Security panel appears on the screen. Select the Firewall & network protection tile.
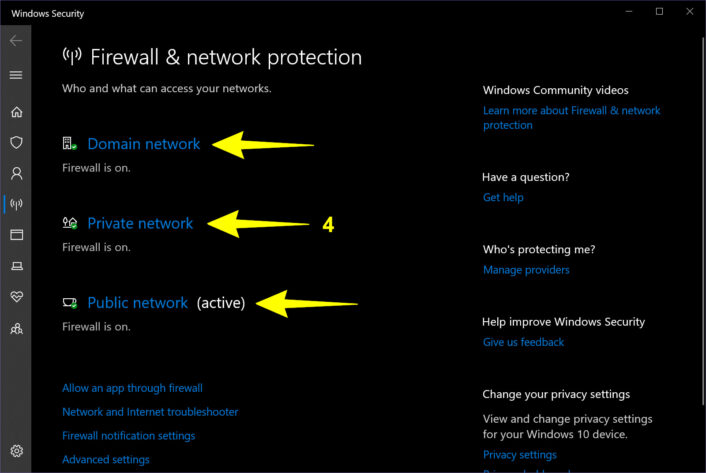
Step 4: Select Domain network, Private network, or Public network (see FAQ).
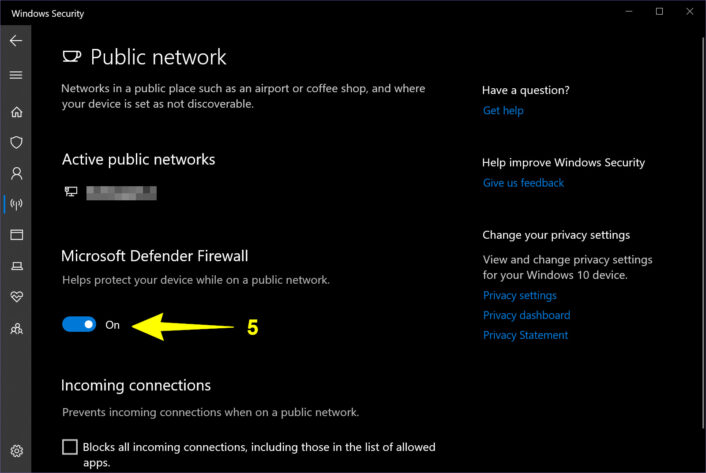
Step 5: Under Microsoft Defender Firewall, click on the toggle to set it to the On or Off position.
How to enable or disable the firewall on Mac
Apple keeps your route to the firewall toggle pretty simple, although you’ll have a faster trip if the System Settings icon is on the Dock. These instructions are based on macOS Ventura.
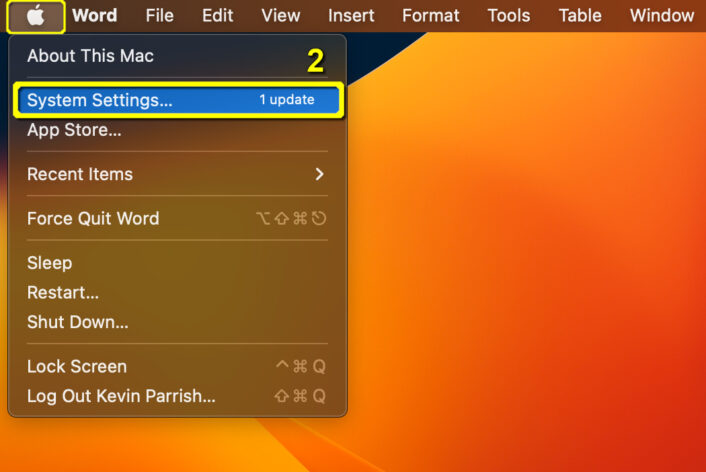
Step 1: Select the Apple menu icon in your screen’s top left corner.
Step 2: Select System Settings on the drop-down menu.
Alternative method: Select the System Settings icon if it appears on the Dock.
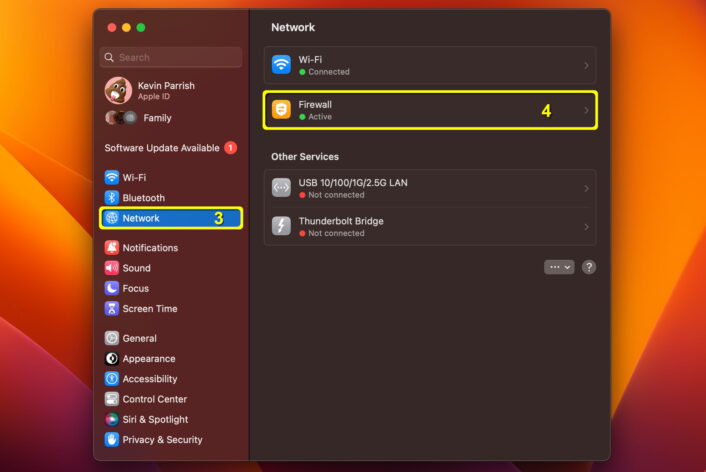
Step 3: The System Settings panel appears on your screen. Select Network on the left.
Step 4: Select Firewall on the right.
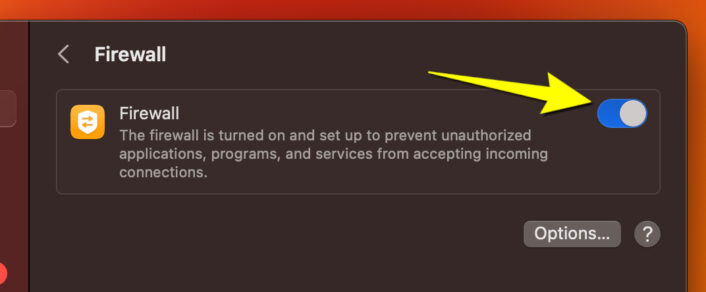
Step 5: Select the toggle to enable or disable the firewall.
FAQ about enabling and disabling a firewall
What is a firewall?
Should I turn off my firewall?
Can I temporarily disable my firewall?
When can I temporarily disable my firewall?
What are the Domain, Private, and Public profiles in Windows Defender Firewall?
Do smartphones and tablets have firewalls?
You don’t need a third-party subscription to manage children with an iPhone, iPad, or Mac. Apple provides easy-to-use parental controls with a quick tap or click on the Settings icon. From there, you can restrict specific apps, set purchase permissions, lock down the device for the night, and more.
I’ll explain how you can set up parental controls for the iPhone, iPad, and Mac.
Need more tools to keep your kids safe?
Apple’s parental controls are great, but they apply to Apple devices only. Check out our other guides for solutions you can apply outside the Apple ecosystem.
In this guide:
Create a child account | Parental controls overview | Enable Screen Time | Downtime | App Limits | Communication Limits | Communication Safety | Always Allowed Apps & Contacts | Content & Privacy Restrictions | FAQ
In this guide:
- Create a child account
- Parental controls overview
- Enable Screen Time
- Downtime
- App Limits
- Communication Limits
- Communication Safety
- Always Allowed Apps & Contacts
- Content & Privacy Restrictions
- FAQ
How to create a child account for iOS
Parental control settings aren’t device-specific. Instead, you create an Apple ID for your child you can manage from any Apple device. Once you create the account, you can use Quick Start to set up a new iPhone or iPad with your preferred parental controls already in place.
Here’s how to create a new child account from your iPhone, iPad, or Mac:
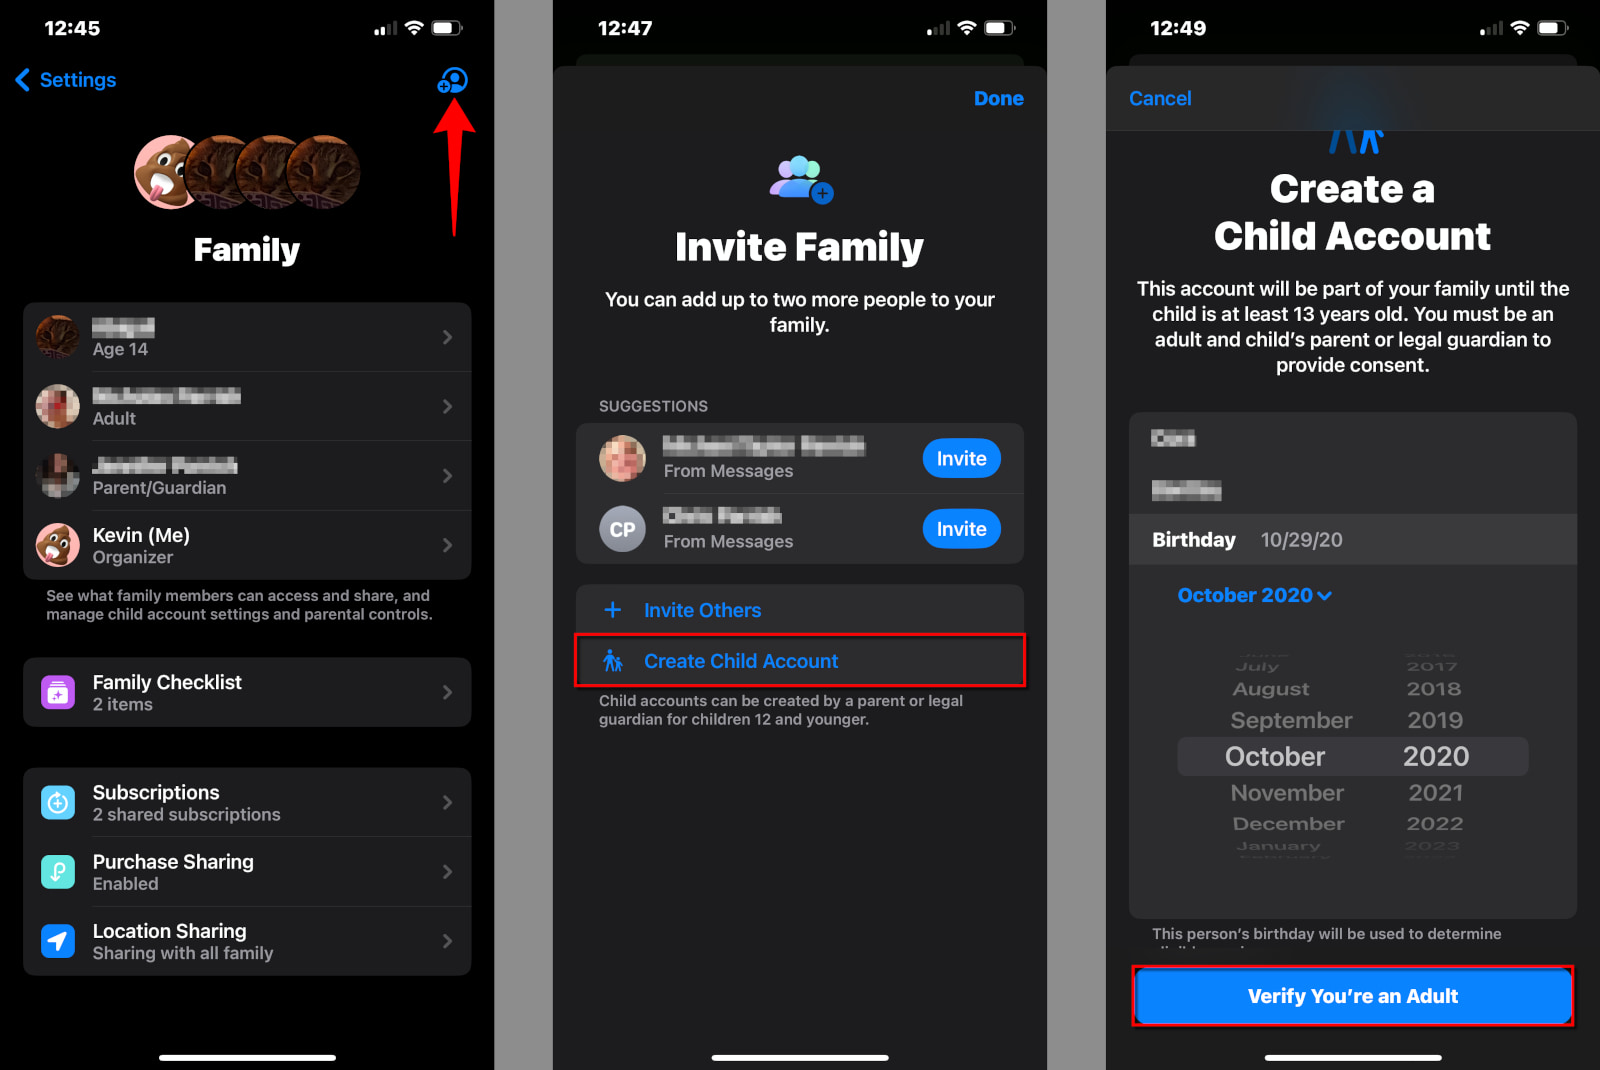
Step 1: Tap or click on Settings.
Step 2: Tap or click on Family.
Step 3: Tap or click on the blue Add Member button.
Step 4: Tap Create Child Account.
Step 5: Enter the child’s name, birthday, and then tap or click on Verify You’re an Adult.
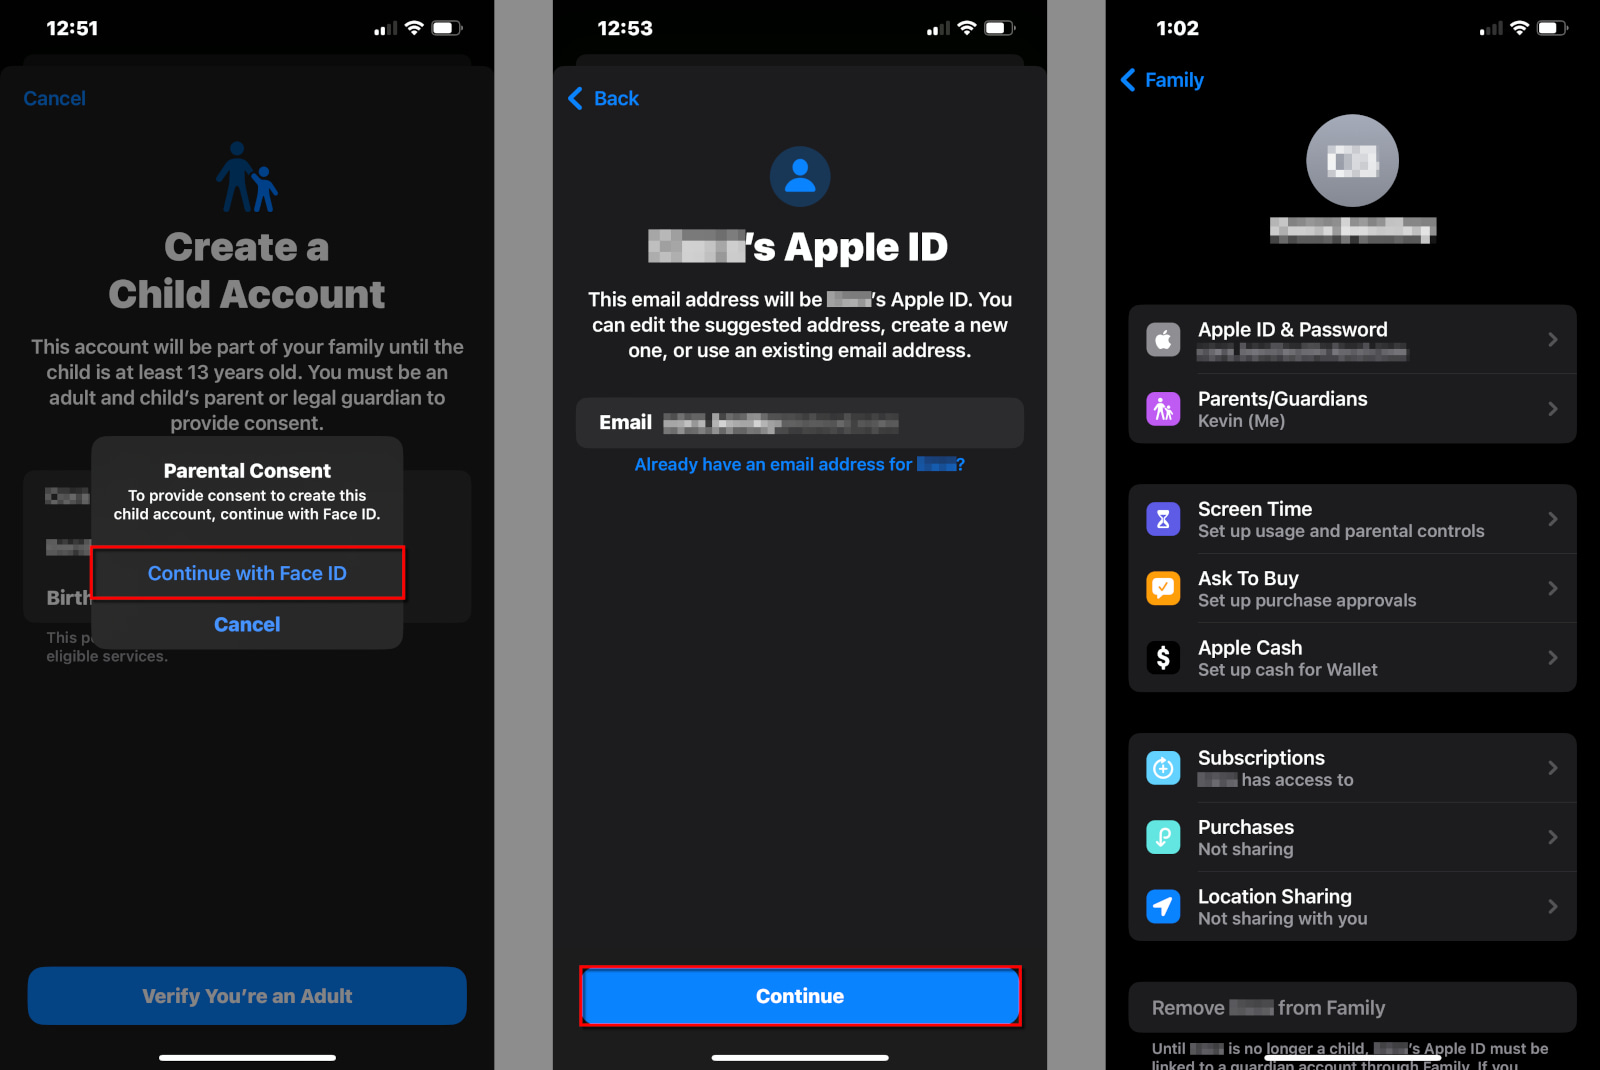
Step 6: Tap or click on the Continue With [security] popup to give parental consent. In my case, I used Face ID.
Step 7: Tap or click on Agree or Disagree for Apple’s Family Privacy Disclosure and its Terms and Conditions.
Step 8: Tap Continue to confirm the child’s new email address.
Step 9: Tap or click on the popup to verify the address.
Step 10: Create a password for the child’s new Apple ID.
Step 11: Choose a phone number to receive verification codes.
That’s it. You can use this Apple ID on any iPhone, iPad, or Mac you choose. Now, let’s take a deep, deep dive into the fathomless parental controls.
iPhone parental controls: a brief overview
You can manage children and monitor their activities by tapping or clicking through this path on your iPhone, iPad, or Mac:
Settings > Family > Your Child’s Name
Everything you need falls under the Screen Time category. Here is the list of tools provided to you—simply click on any of the following links to jump to instructions on how to modify each.
- Downtime
- App Limits
- Communication Limits
- Communication Safety
- Always Allowed
- Content & Privacy Restrictions (App Store, iTunes, Web browsing, Siri, Game Center)
However, before you begin, you must enable Screen Time on your child’s account before you can manage content and permissions.
Does your internet provider offer parental tools?
Many internet providers offer additional tools to help keep your kids safe online. If your provider doesn’t, enter your zip code below to see what’s available to you.
How to enable Screen Time
First, tap or click on the following path to reach the Screen Time settings:
Settings > Family > Your Child’s Name > Screen Time
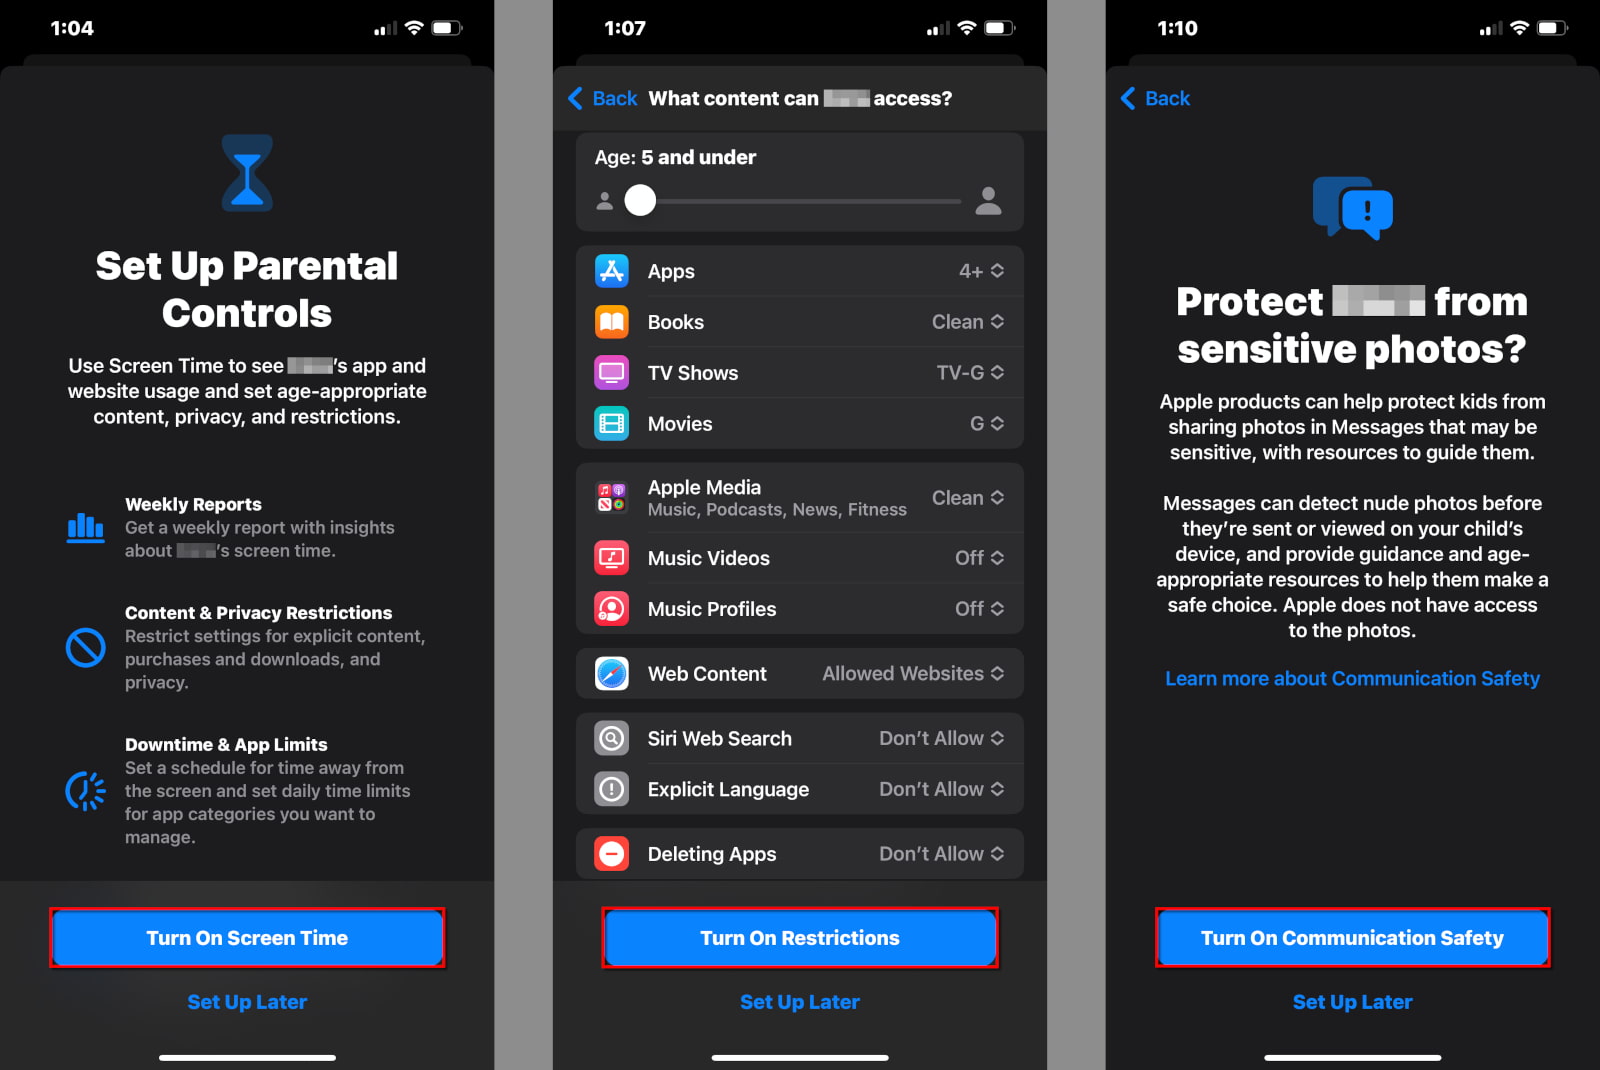
Step 1: Tap or click on Turn On Screen Time.
Step 2: A new screen appears, explaining all the available tools. Tap or click on Turn On Screen Time again.
Step 3: Tap or click on the slider to set the child’s age (5–18). The default settings adjust accordingly.
Step 4: Tap on a category to customize the content restrictions for Apps, Books, TV Shows, Movies, and more.
Step 5: Tap or click on Turn On Restrictions when you’re done. Alternatively, tap or click on Set Up Later to customize the restrictions some other time.
Step 6: Tap or click on Turn on Communication Safety to protect your child from sensitive photos displayed in the Messages app. Alternatively, you can tap or click on Set Up Later.
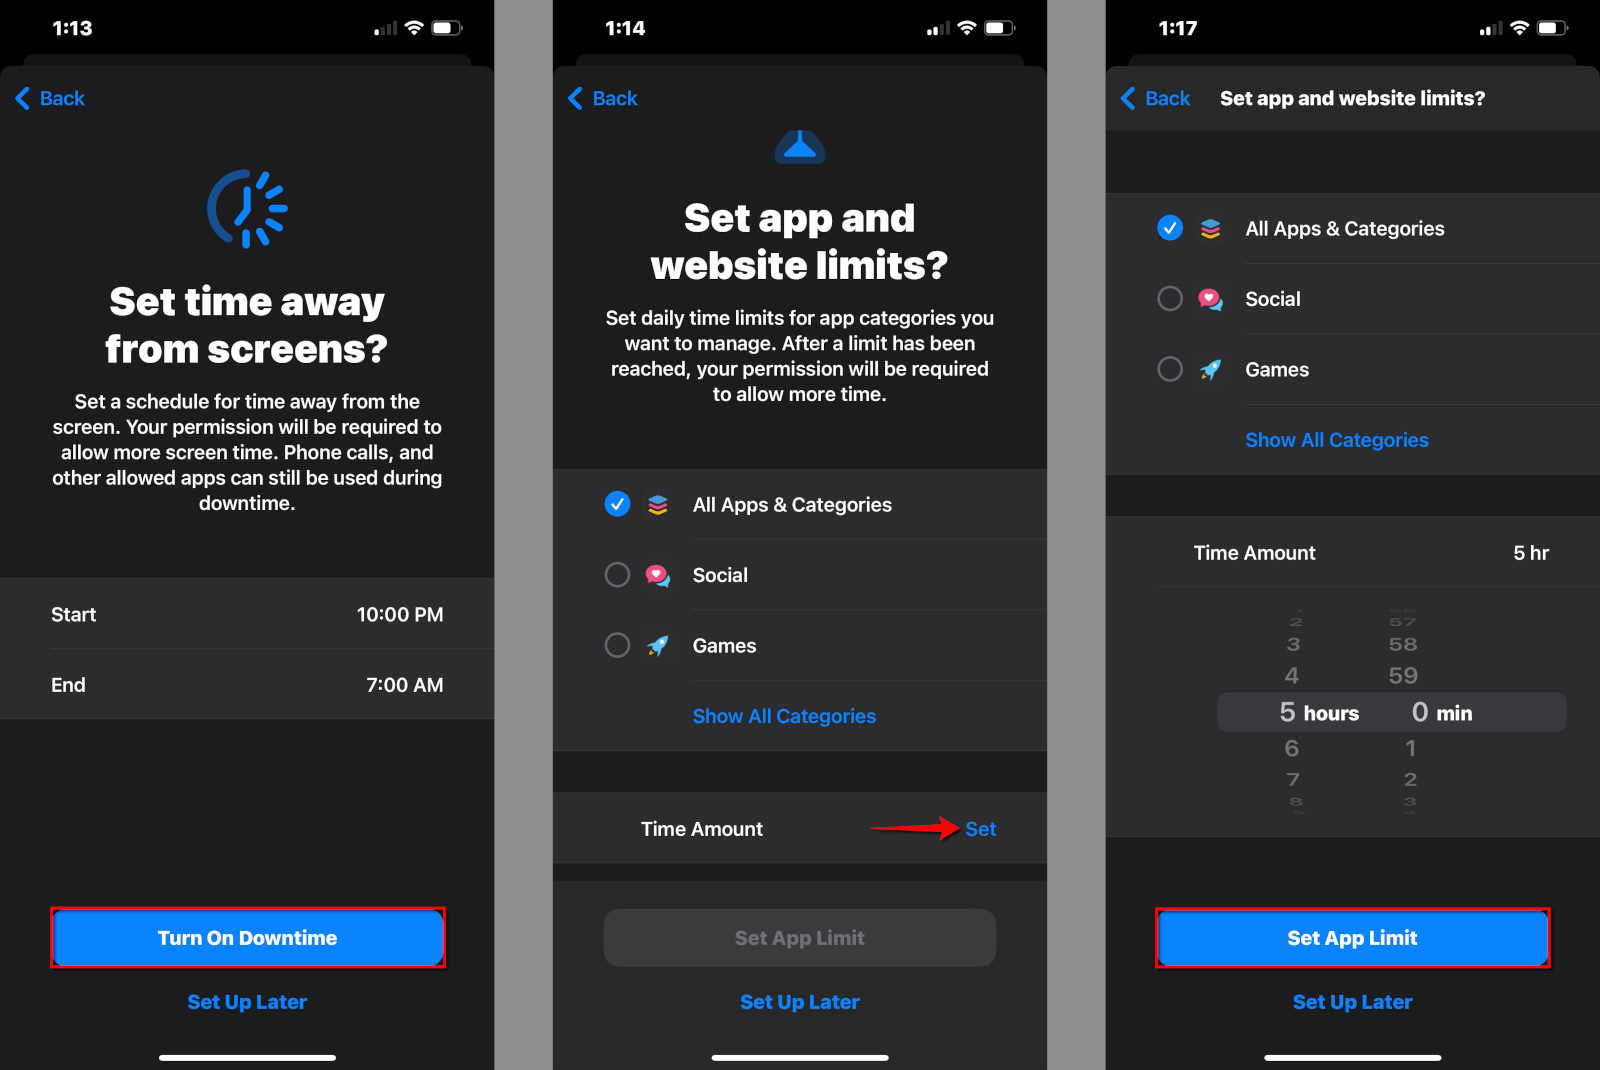
Step 7: Select a Start and End time period and then tap or click on Turn On Downtime. Alternatively, you can tap or click on Set Up Later if you need a customized Downtime schedule for your child.
Step 8: Set the daily time limits for your child’s apps. You can choose all apps and categories, select a specific category, or select apps individually.
Step 9: Tap or click on Set to define the Time Amount, and then tap or click on Set App Limit. Alternatively, you can tap or click on Set Up Later.
Step 10: Create a Screen Time passcode.
Step 11: Enter the Screen Time passcode again to complete the setup.
That’s it. Your child’s account is ready. If at any point you selected Set Up Later or need to adjust the settings, read on to find out how.
How to set your child’s downtime
Downtime is ideal when you want to block access to an Apple device during bedtime. Children receive a five-minute warning before downtime kicks in, allowing them to request more time if needed. Some apps and phone calls you choose elsewhere in the Screen Time controls will bypass the downtime restriction.
First, follow this path:
Settings > Family > Your Child’s Name > Screen Time
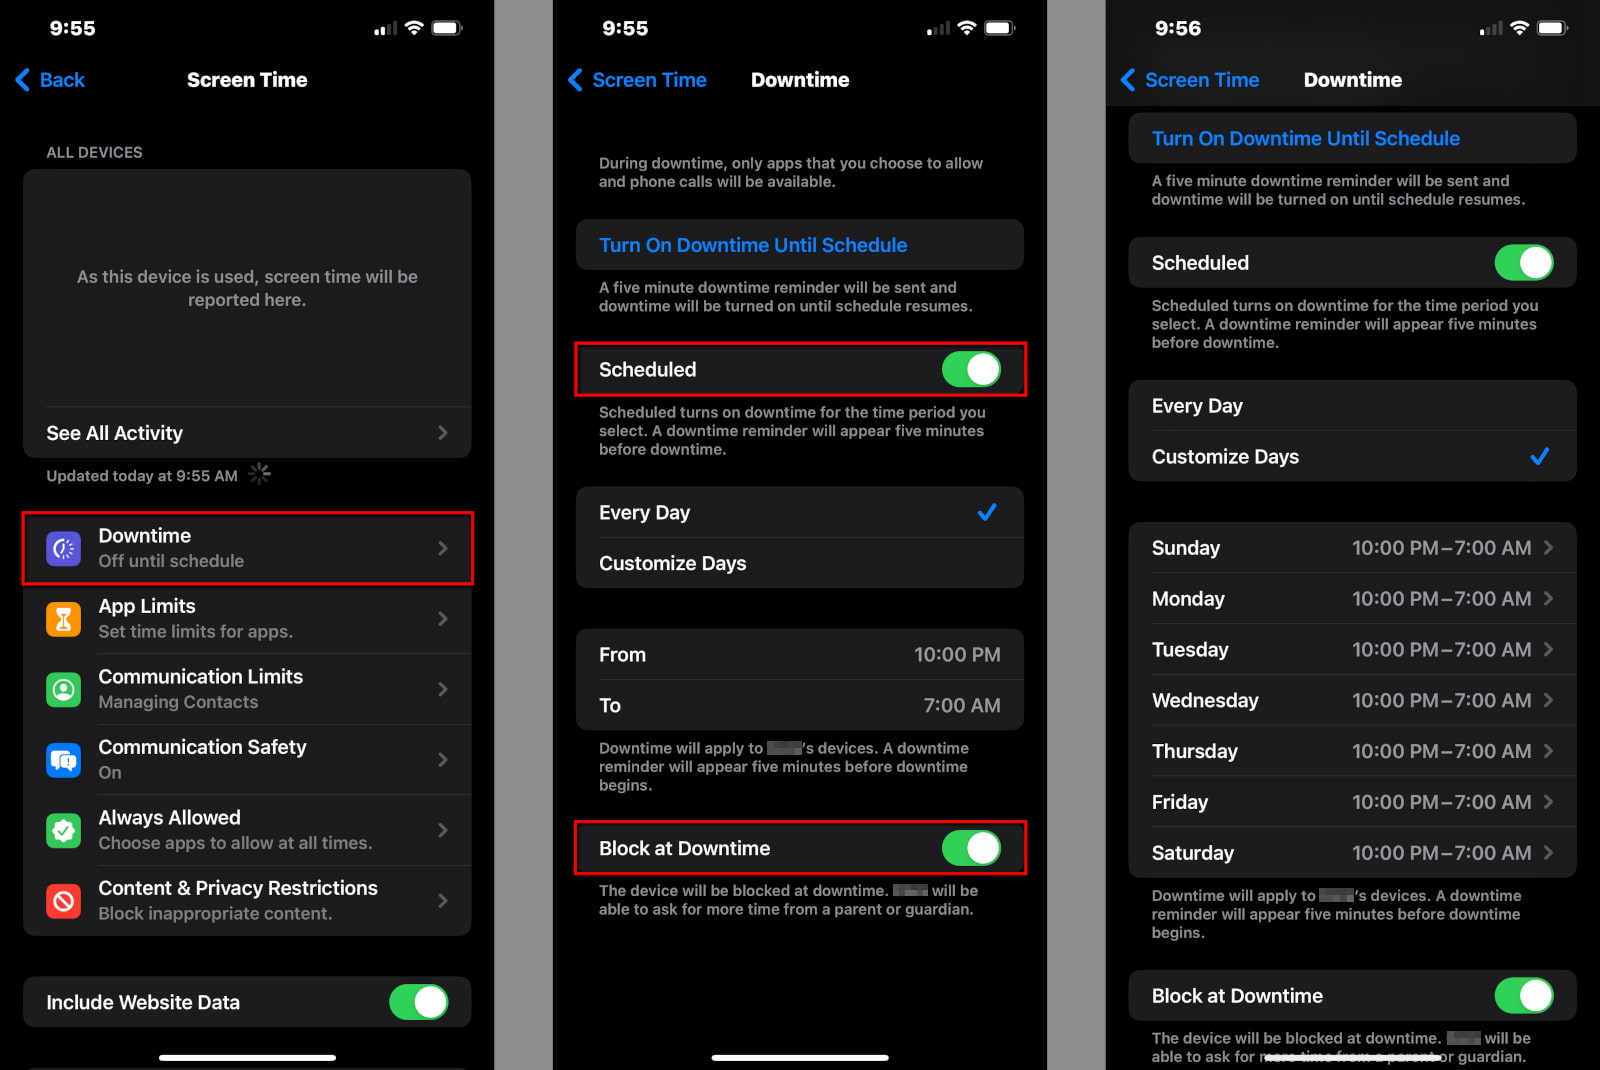
Step 1: Tap or click on Downtime.
Step 2: Enter your Screen Time PIN.
Step 3: Tap the Scheduled toggle to enable Downtime (green).
Step 4: Tap Every Day and select the start and end times, or select Customize Days and set specific times for each day.
Step 5: Tap the Block at Downtime toggle if you want to lock the device during Downtime. However, the child can ask for more time.
Keep in mind Downtime applies only once per day—you cannot schedule multiple Downtimes within a single day. If you need more than one block of time scheduled, use the parental controls in your router or gateway to block internet access for a specific time, like during homework hours.
How to set app limits
You can set daily time limits for any app installed on the child’s device. Tap on a category to limit all related apps or tap on a specific app. There’s an option to limit access to all installed apps too.
First, follow this path:
Settings > Family > Your Child’s Name > Screen Time
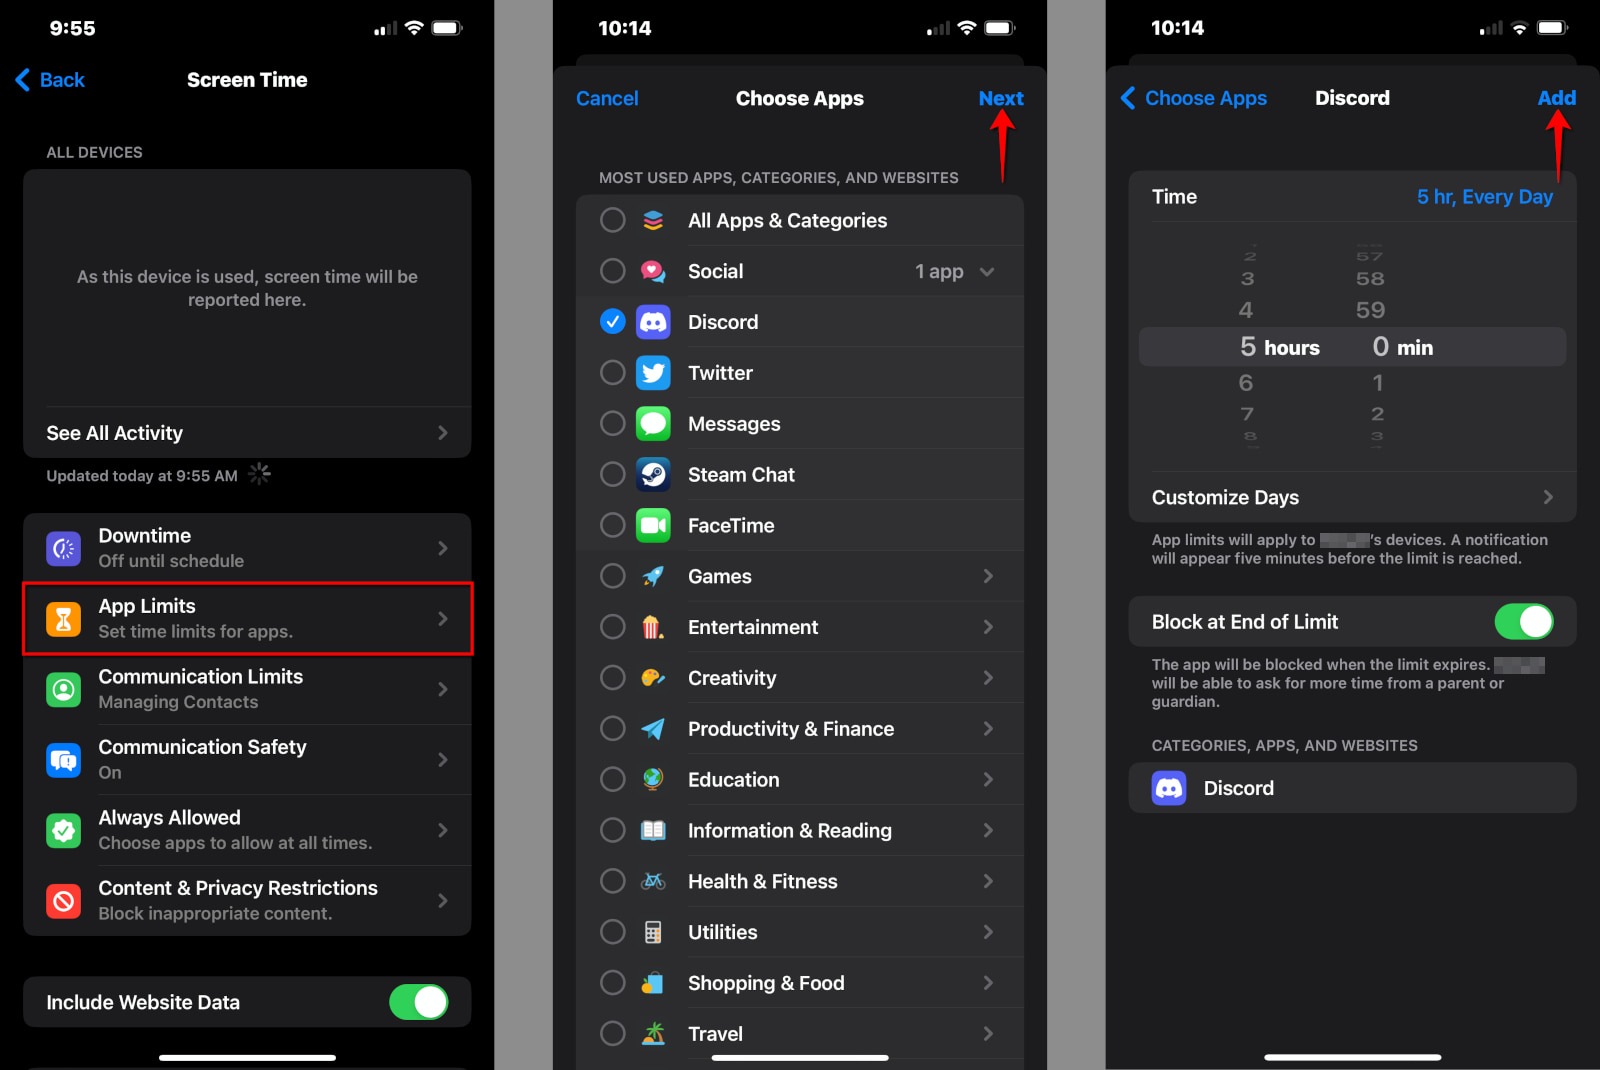
Step 1: Tap or click on App Limits.
Step 2: Tap or click on Add Limit.
Step 3: Tap or click on All Apps & Categories to set limits on all apps your child uses. Alternatively, tap or click on the circle next to a category (like Social) to select all social apps, or tap on a category to choose a specific app (like Discord).
Step 4: Tap or click on Next.
Step 5: Select the amount of time your child can use the app(s) each day. Alternatively, tap or click on Customize Days to set different time limits each day.
Step 6: Tap or click on Add to complete.
How to set communication limits
The limits you set apply to Phone, Messages, FaceTime, and iCloud contacts. Here you can restrict communication to Contacts Only, Contacts & Groups with at Least One Contact, or Everyone. To get started, follow this path:
Settings > Family > Your Child’s Name > Screen Time
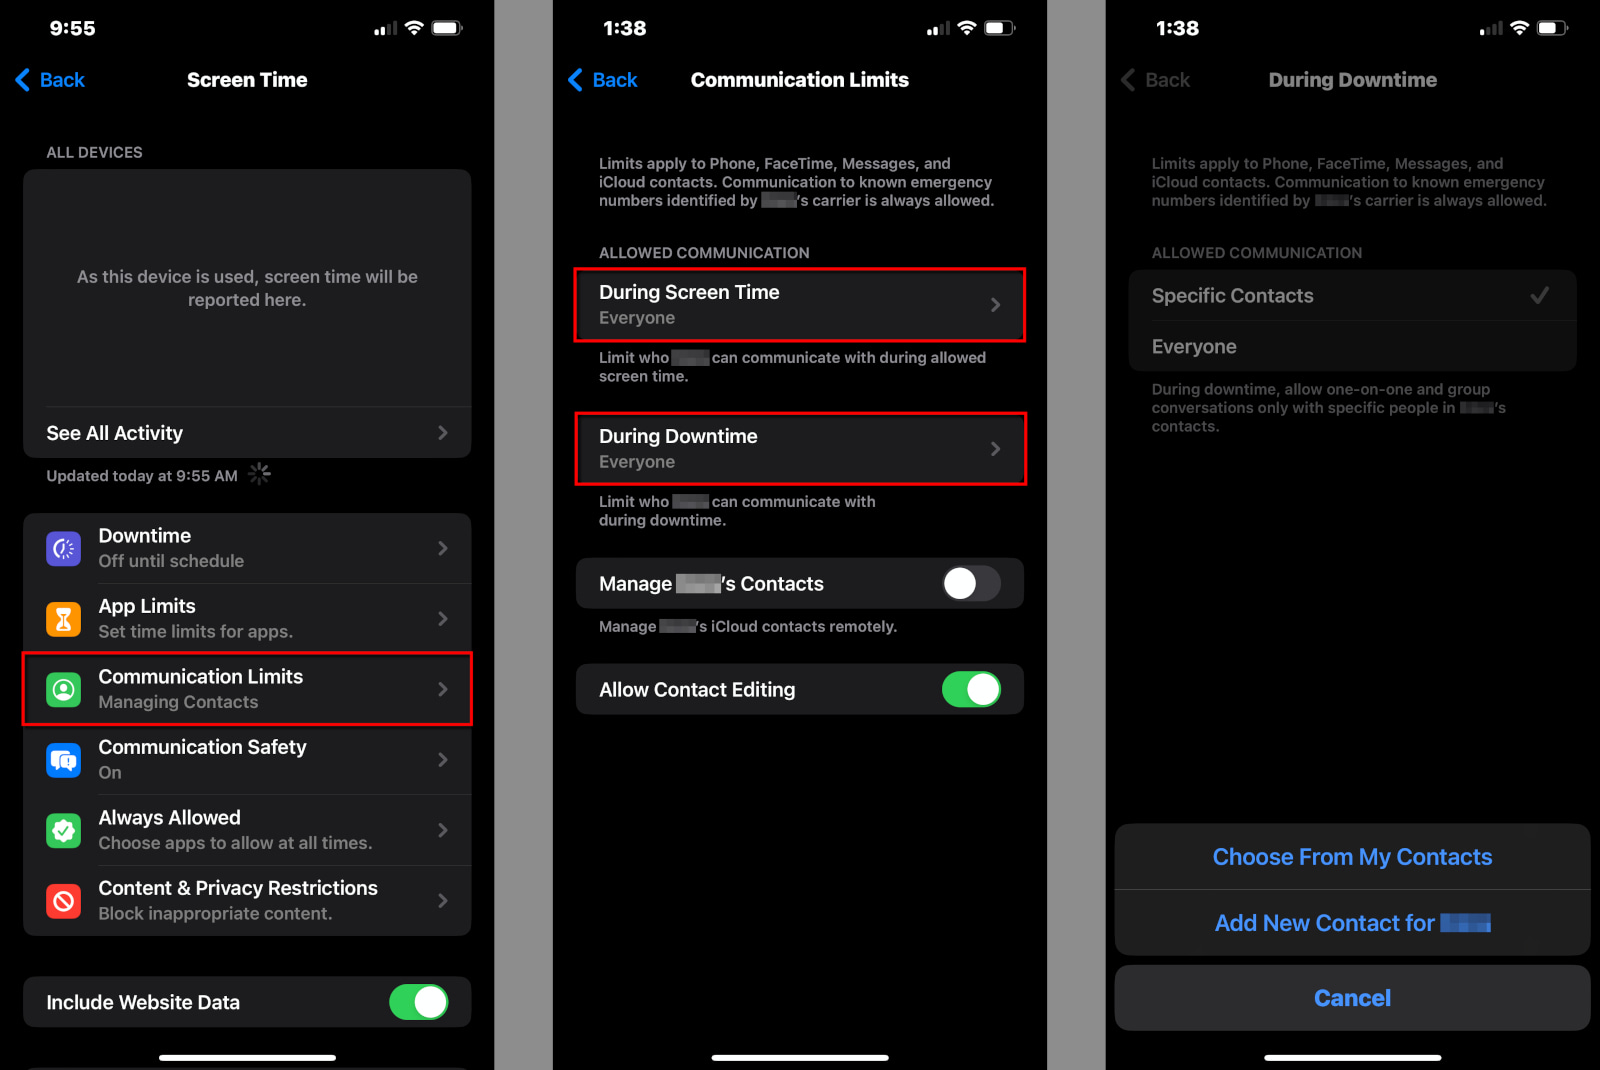
Step 1: Tap or click on Communication Limits.
Step 2: Tap or click on During Screen Time to restrict who your child can communicate with during normal hours.
Step 3: Tap or click on During Downtime to restrict who your child can communicate with during Downtime hours. If you select Specific Contacts, a popup appears for you to select an existing contact or create a new one.
Step 4: Slide the Manage Child’s Contacts toggle into the On position to manage contacts remotely. A popup appears for you to select an existing contact or create a new one.
How to set communication safety
This setting only applies to the Messages app, which detects nude photos before they’re received and seen by your child. To toggle this setting on, follow this path:
Settings > Family > Your Child’s > Screen Time
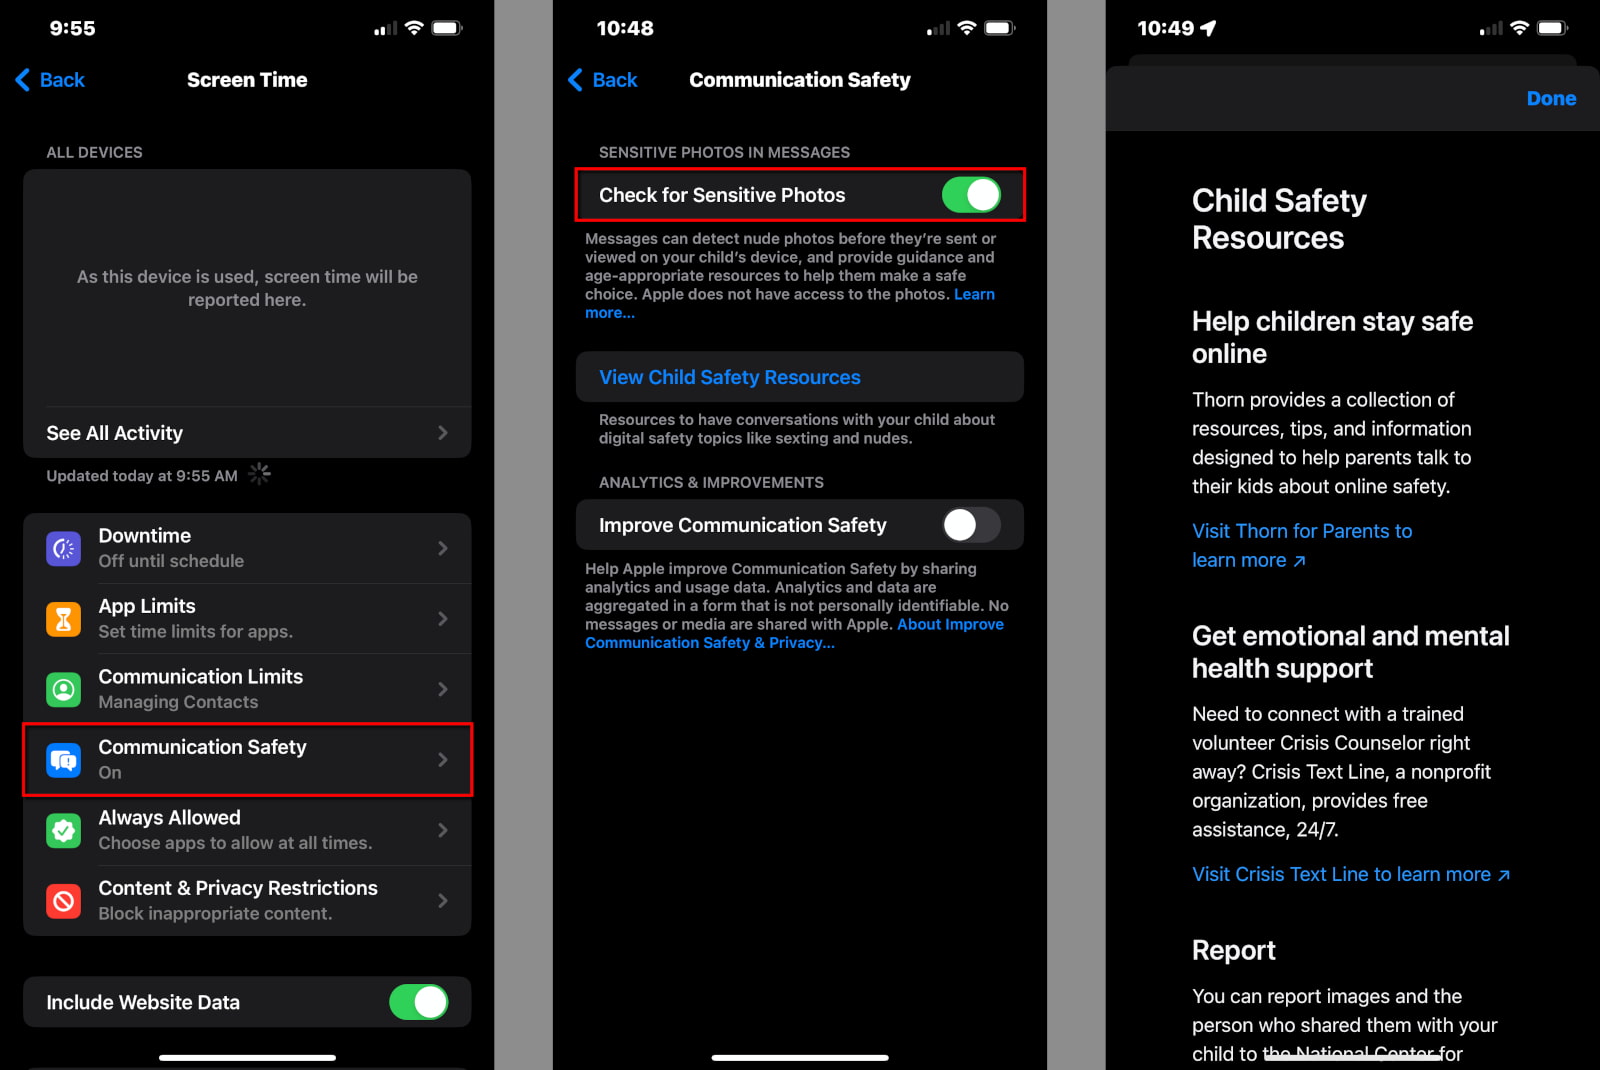
Step 1: Tap or click on Communication Safety.
Step 2: Tap or click on the toggle next to Check for Sensitive Photos. It turns green when you enable this setting.
Step 3: Tap or click on the toggle next to Improve Communications Safety if you want to help Apple improve this tool (optional).
How to set Always Allowed apps and contacts
You can allow your child to use specific apps at all times and who your child can contact during Downtime. To change these settings, follow this path:
Settings > Family > Your Child > Screen Time
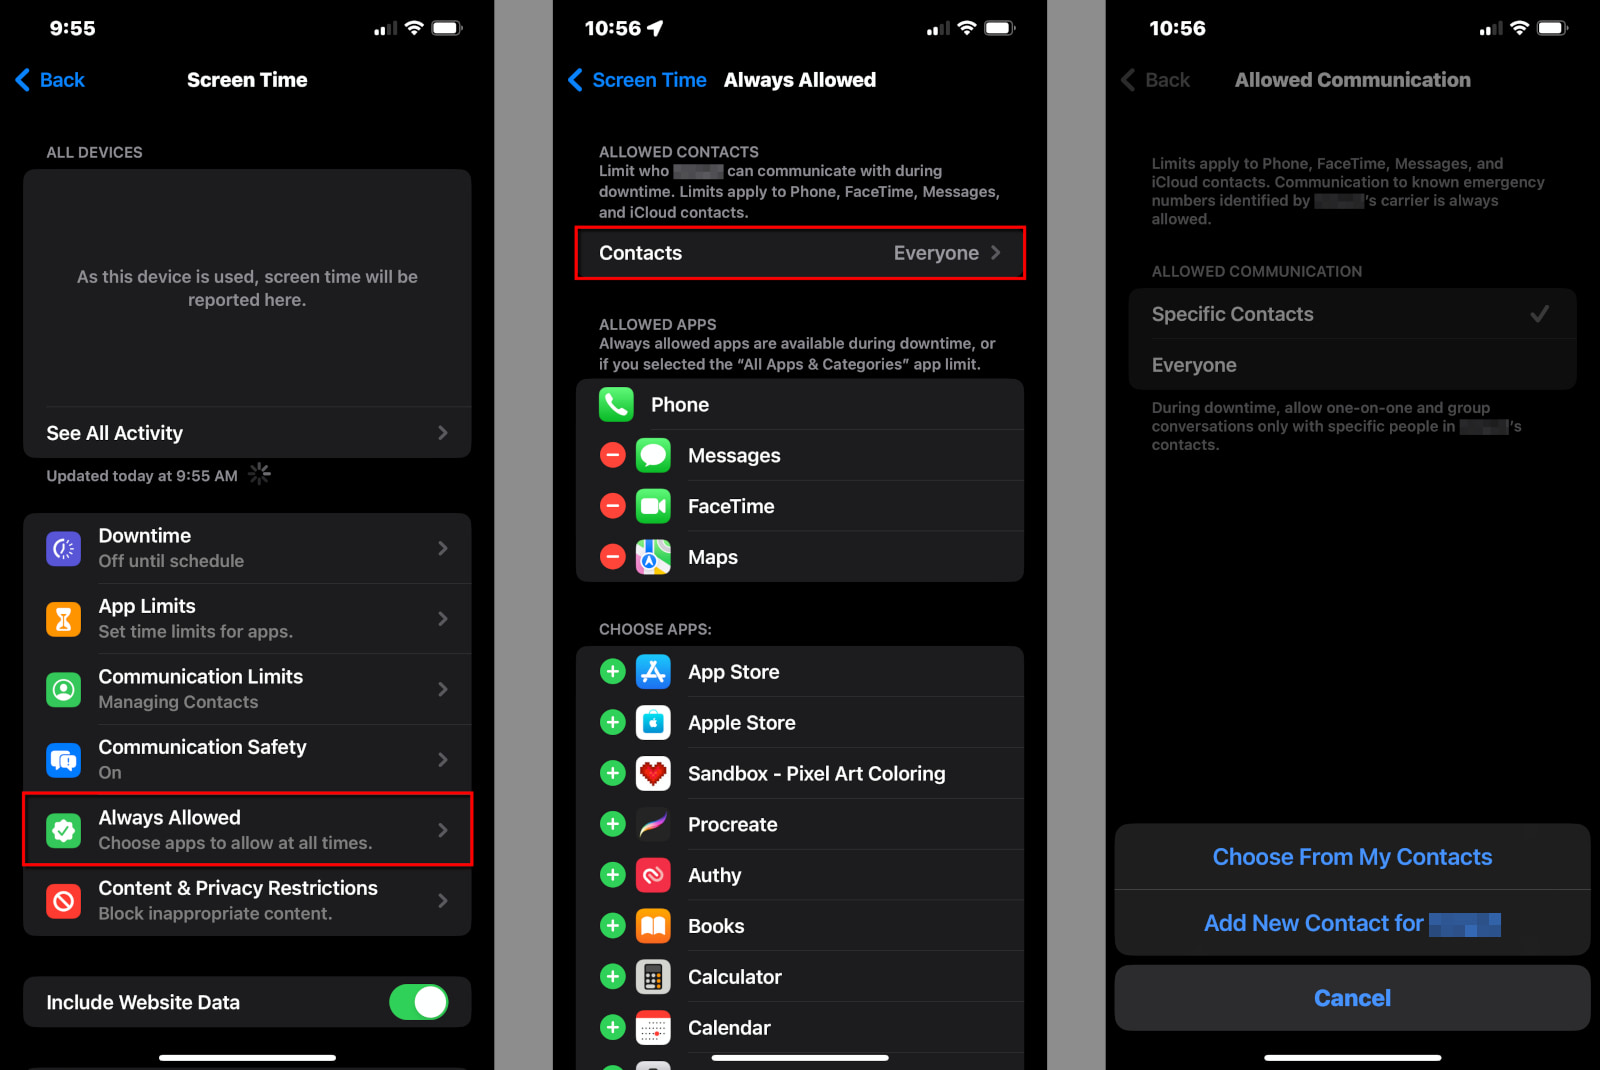
Step 1: Tap or click on Always Allowed.
Step 2: Tap or click on Contacts to select Everyone or Specific Contacts. If you choose the latter, a popup appears for you to select an existing contact or create a new one.
Step 3: Tap or click on any red “minus” icon to remove an app from the Allowed Apps list. Phone, Messages, FaceTime, and Maps are Always Allowed by default.
Step 4: Tap or click on any green “plus” icon to add an app to the Allowed Apps list.
How to change the Content & Privacy Restrictions settings
You need to enable this feature to manage how your child installs apps and makes in-app purchases. Here you can also block Apple-specific apps like Mail and Safari.
However, this section is fully loaded, so I’ll break it all down into six parts. To start, follow this path:
Settings > Family > Your Child > Screen Time
Step 1: Tap or click on Content & Privacy Restrictions.
Step 2: Tap or click on the toggle next to Content & Privacy Restrictions to enable this feature. It turns green when enabled.
iTunes & App Store Purchases | Allowed Apps | Store content | Web content | Siri content | Game Center restrictions
How to modify iTunes & App Store purchases
Here you can control what apps your child installs and deletes. You can also allow or block in-app purchases.
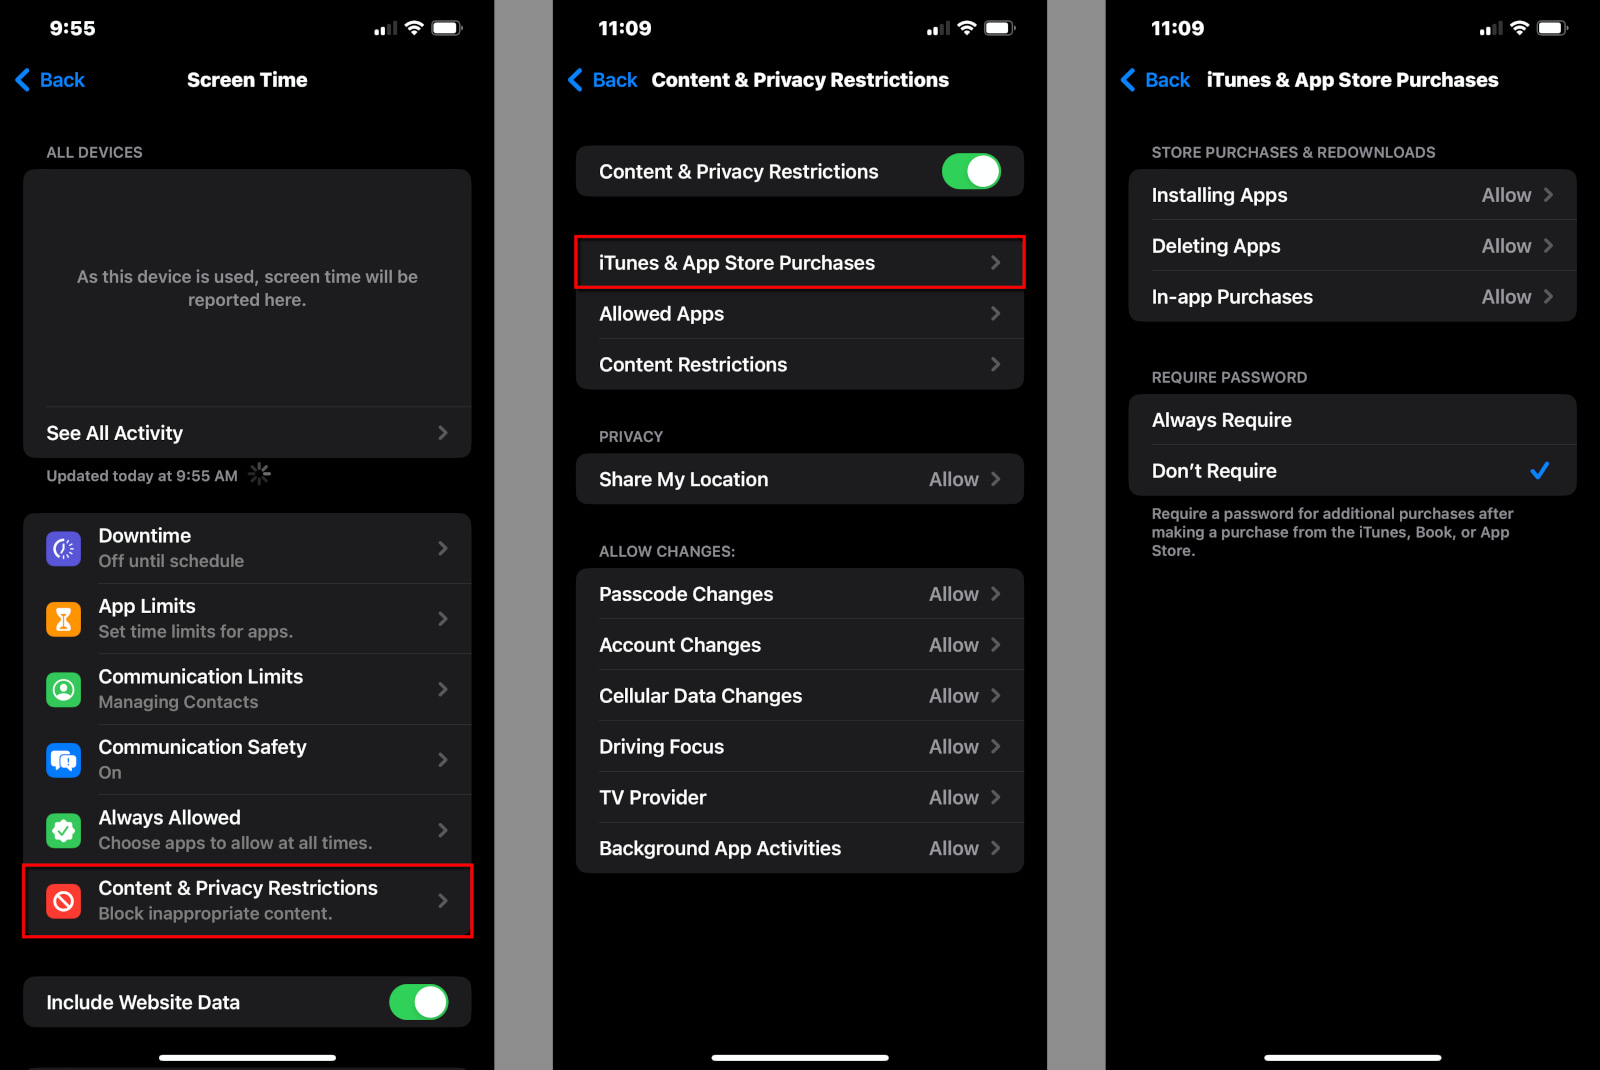
Step 1: Tap or click on iTunes & App Store Purchases.
Step 2: Tap or click on Installing Apps to Allow or Don’t Allow.
Step 3: Tap or click on Deleting Apps to Allow or Don’t Allow.
Step 4: Tap or click on In-App Purchases to Allow or Don’t Allow.
Step 5: Tap or click on Always Require or Don’t Require. If you select Don’t Require, your child isn’t prompted to enter a password again after the first purchase.
Step 6: Tap or click on Done when you’re finished.
How to modify the Allowed Apps list
Here you can enable or disable the built-in Apple apps, like Mail and Safari.
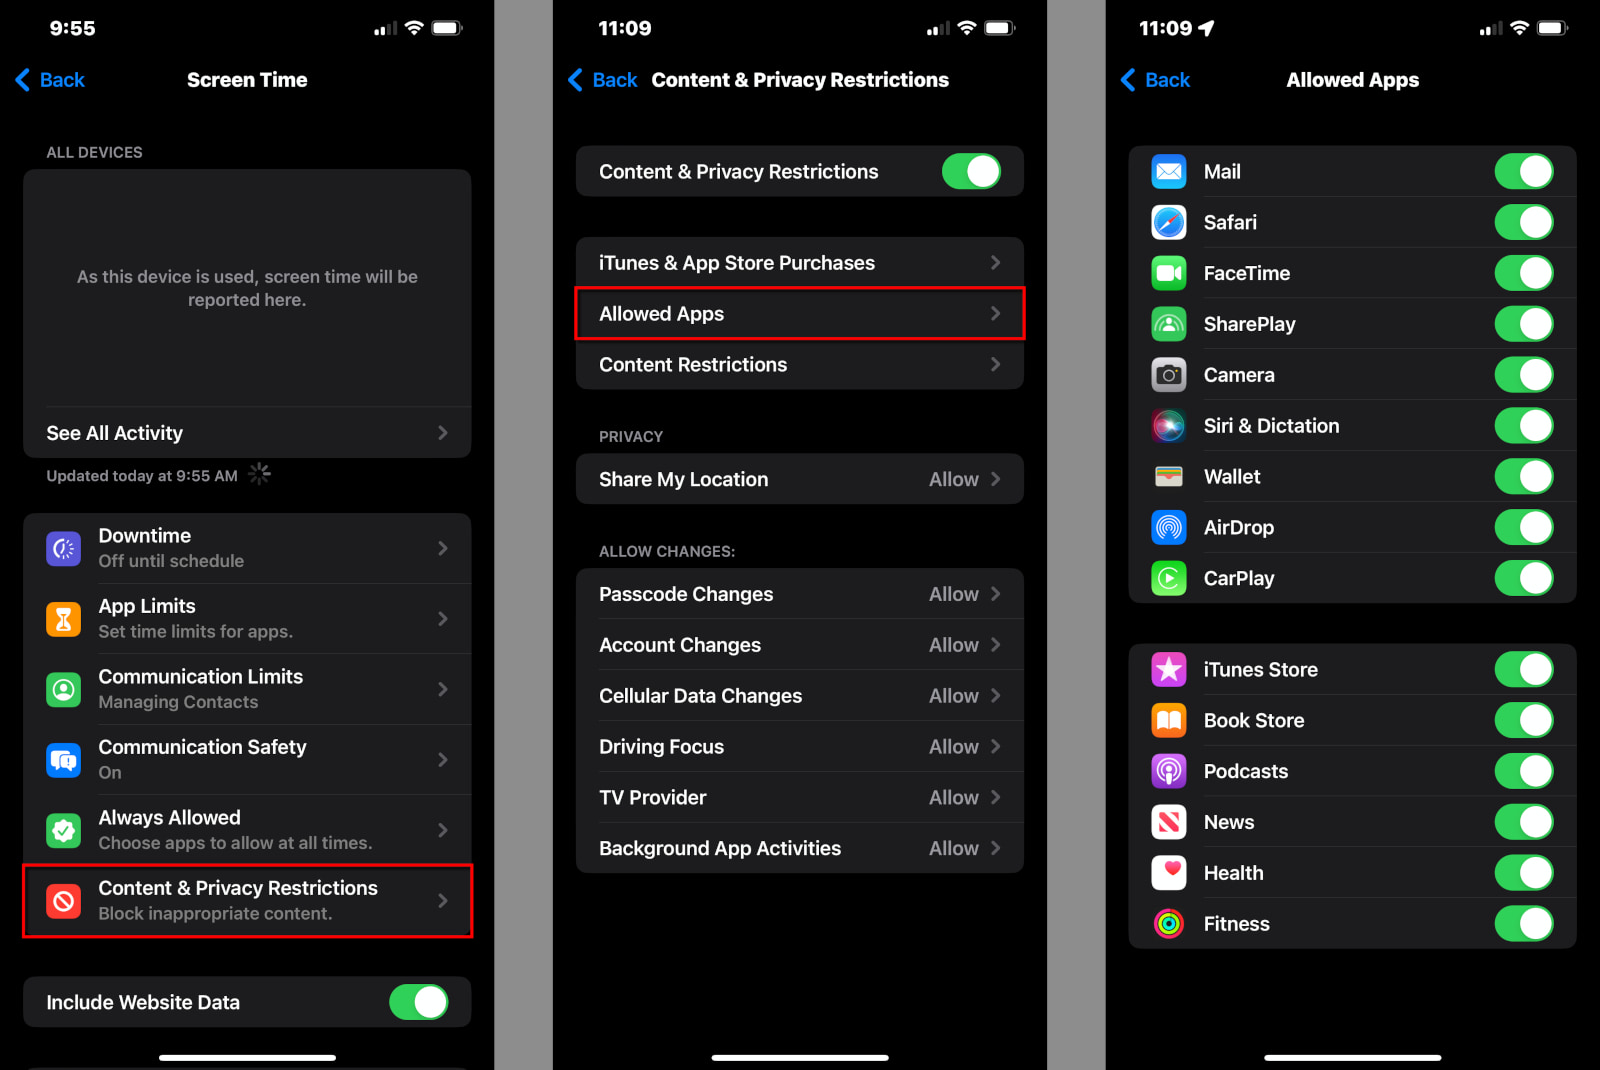
Step 1: Tap or click on Allowed Apps.
Step 2: Tap on the toggle next to any app you wish to enable (green) or disable (gray).
How to set Content Restrictions
This section provides all the settings you need to restrict movies, TV shows, websites, Siri results, and Game Center activity.
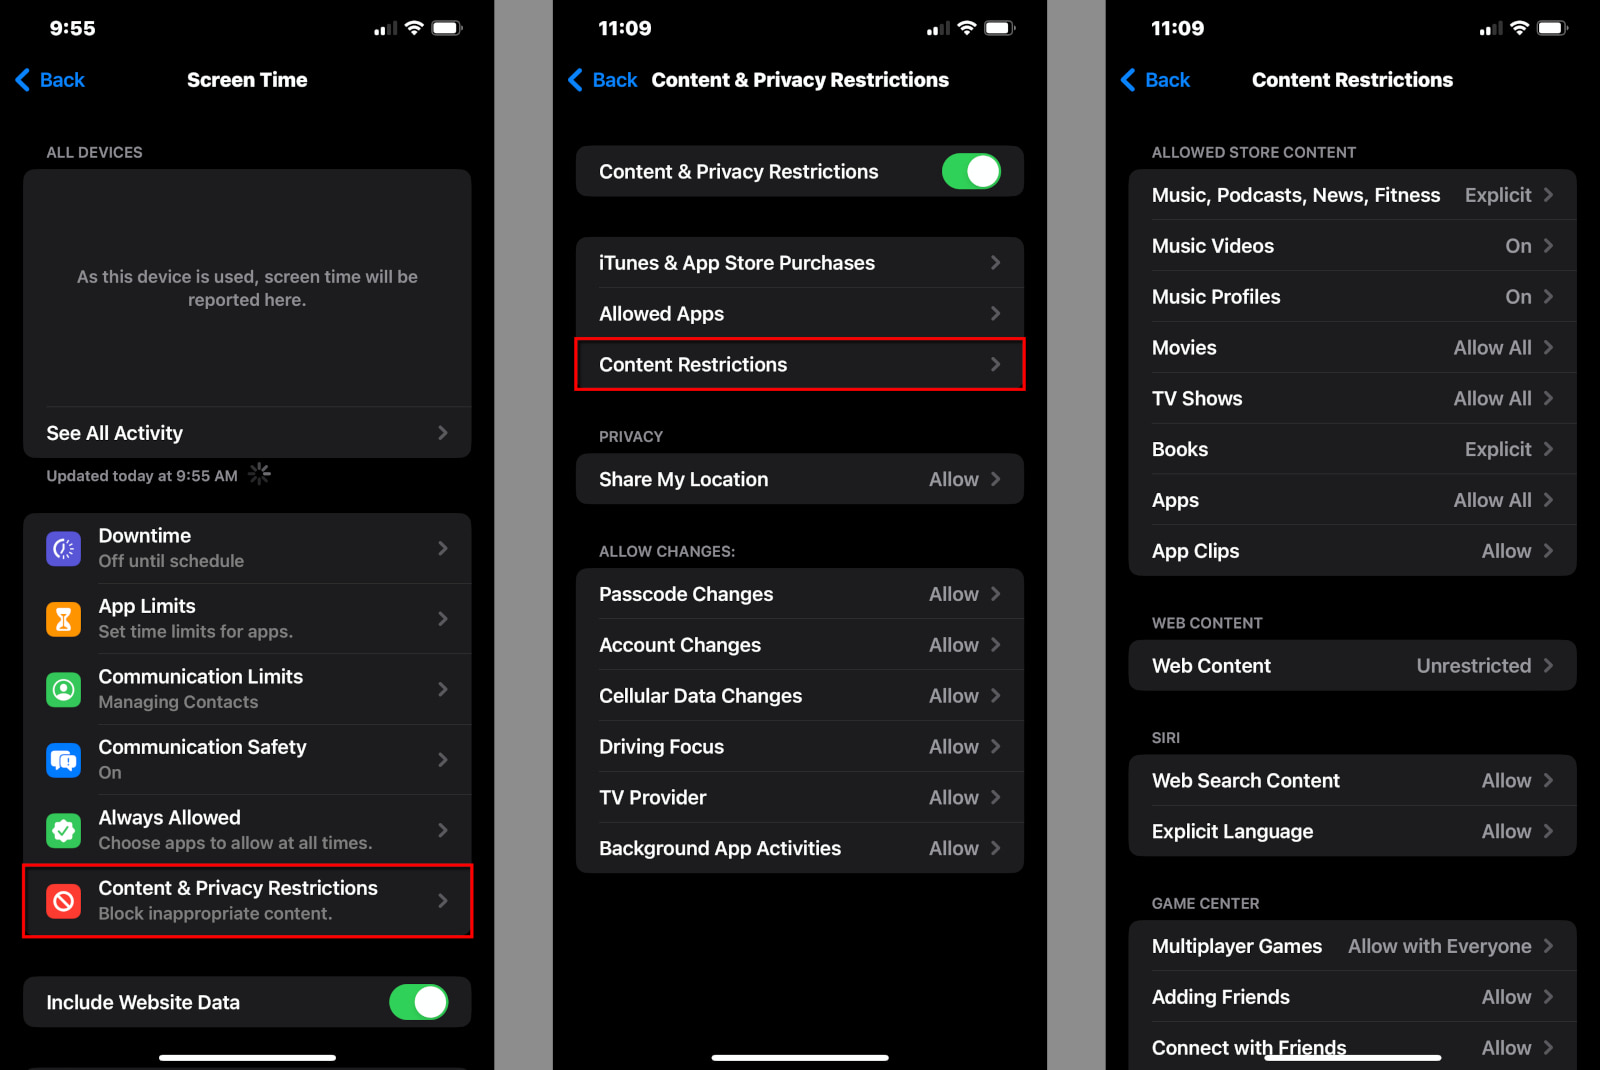
Step 1: Tap or click on Content Restrictions.
Step 2: The following screen breaks down into four cards and their individual settings:
Allowed Store Content
- Music, Podcasts, News, Fitness – Clean or Explicit
- Music Videos – Off or On
- Music Profiles – Off or On
- Movies – Don’t Allow, Not Rated, from G to NC-17, Unrated, Allow All
- TV Shows – Don’t Allow, from TV-Y to TV-MA, Allow All
- Books – Clean or Explicit
- Apps – Don’t Allow, from 4+ to 17+, Allow All
- App Clips – Allow or Don’t Allow
Web Content—Select one of three
- Unrestricted
- Limit Adult Websites – Tap the Add Website link for Always Allow or Never Allow to enable and block specific adult-oriented websites.
- Allowed Websites – Tap the Add Website link to add a website to the preselected list of nine (Disney, PBS Kids, National Geographic Kids, etc).
Siri
- Web Search Content – Allow or Don’t Allow
- Explicit Language – Allow or Don’t Allow
Game Center
- Multiplayer Games – Don’t Allow, Allow With Friends Only, or Allow with Everyone
- Adding Friends – Allow or Don’t Allow
- Connect with Friends – Allow or Don’t Allow
- Screen Recording – Allow or Don’t Allow
- Nearby Multiplayer – Allow or Don’t Allow
- Private Messaging – Allow or Don’t Allow
- Profile Privacy Changes – Allow or Don’t Allow
- Avatar & Nickname Changes – Allow or Don’t Allow
Other restrictions
Finally, on the Content & Privacy Restrictions screen, you can set restrictions to Allow or Don’t Allow for the following settings:
- Share My Location
- Passcode Changes
- Account Changes
- Cellular Data Changes
- Driving Focus
- TV Provider
- Background App Activities
Other spending tools at your child’s disposal
You can use two other tools besides Screen Time to manage your child’s spending.
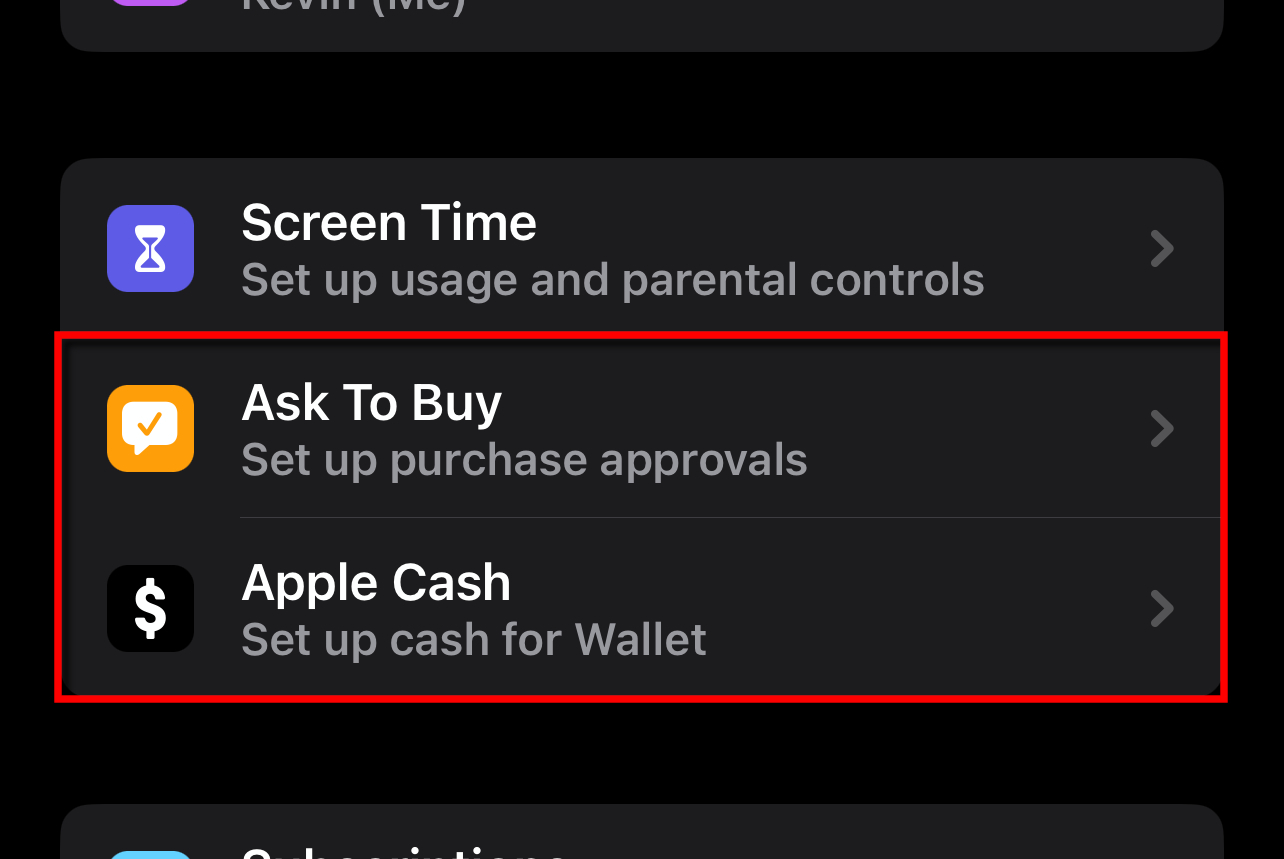
Ask To Buy
All Family members have access to the credit card on file when you allow Purchase Sharing. The Ask To Buy feature gives you more control over how your child purchases apps, in-app items, and media.
When your child selects an app or media to purchase, an Ask Permission prompt appears on the child’s screen. The child taps Ask—the parent approves or denies the purchase directly on their device.
Follow this route to enable Ask To Buy on the child’s account:
Settings > Family > Your Child > Ask To Buy
Ask to Buy purchases apply to App Store, iTunes Store, and Apple Books only.
Apple Cash
Apple Cash is an alternative to your child using the credit card on file. It’s a digital card you create for your child in Wallet and is used with any service that accepts Apple Pay. Your child can receive money through Apple Cash as well.
To get started, follow this path:
Settings > Family > Your Child > Apple Cash
Final call: Keep your guard up
I have lots of kids and oh boy can they be clever, especially young teens and older, who are a bit more resistant to your governing ways. I suggest a three-prong approach to parental controls as a failsafe in case something goes awry and your child streams questionable content until the roosters crow at dawn.
As I’ve shown in this guide, Apple provides an incredible toolset for parents at no extra cost. You can block access to your child’s Apple device overnight, restrict the content they consume, limit app use, and more.
Also, be sure to take advantage of the parental controls built into your router or gateway. Check out my guide on the best routers with parental controls if you need something a bit more secure than what you have now.
Finally, use your mobile provider’s tools to keep your child’s cellular use at bay, like AT&T Secure Family and AT&T Purchase Blocker.
FAQ about iPhone parental controls
Do the parental controls on iPhone, iPad, and Mac require a subscription?
Do I need to set the parental controls for each Apple device my child uses?
Do I need to set the parental controls directly on my child’s device?
Internet issues are just a way of life. There’s always something disrupting your dancing cat videos. Network troubles on your provider’s side. Storms blowing down lines. The speed woes of a tired old router. Kids downloading super-sized game updates. Something.
But what if every device you own loads the same website no matter what you type into the address bar? Or, even worse, you sit at your computer, utterly speechless, as a “ghost” seizes your mouse and opens your bank account?
Not fun.
Those two scenarios alone are good signs of a hacked router. But don’t worry: I’ll clue you in on how to recognize a hacked router, how to fix it, and how to make sure it never happens again.
Are you sure you've been hacked?
You may not have a hacked router but a slow internet plan. Enter your zip code below to find a faster plan in your area.
Signs that someone hacked your router
There are many signs of a possible router hack that can throw up a red flag. Some are general and could apply to other router-related issues. Others are a sure sign that someone else now controls your network.
Sign #1—You can’t log in to your router
First, let’s be clear that your inability to sign in to your router or gateway doesn’t always mean you’ve been hacked. There have been plenty of times when I returned to a router I previously tested, and it (rather rudely) denied me access to the settings. This is not an uncommon problem. It usually means you’re entering the wrong password, you misspelled the password, or something on the router side is corrupt. Case closed.
With that said, there’s also the slim possibility that someone hacked your router. The attacker may have figured out the credentials, logged in, and changed the password to lock you out. After that, the attacker has free reign to change additional settings and make your life miserable.
But why did the attacker target you? Perhaps you clicked on a clever email or message link, and now the hacker has full control of your home network. Hackers also probe the internet for vulnerable routers they can use to create botnets, steal your bank login info, and so on.
Welcome to the modern-day World Wide Web.
So, whether you’re hacked or just having password issues, the only remedy is to reset your router to its factory defaults.
Immediate action: Follow our instructions on how to reset your router.
Sign #2—All internet browsers lead to the same site
Browser hijacking is a sure sign that you have a hacked router or gateway.
In this case, a hacker logged in to your router and changed its Domain Name System (DNS) settings—the system that matches numeric IP addresses with the alphanumeric ones we see and easily remember, like google.com.
By doing so, the hacker can redirect all your internet traffic to a malicious DNS server. This server will lock you to specific websites that can steal your information and install malicious software on every internet-connected device you own.
Immediate action: Log in to your router and change the DNS settings and password. If you can’t log in, reset your router. You should also scan every device with antivirus software to make sure there’s nothing on your devices that’s hijacking your browser.
Sign #3—There’s strange software on more than one device
If you see new, unfamiliar software on more than one device—especially if you didn’t download it intentionally—there’s a good chance someone hacked your router and remotely installed malware onto your devices.
Strange, uninvited software includes browser toolbars, fake antivirus clients, and other programs that will generate random popups on your screen or within a browser.
If you have multiple computers, this uninvited software may be on all of them. Malware can replicate on a single device and spread across wired and wireless connections, similar to how a virus spreads from person to person.
Immediate action: Log in to your router and change the password. If you can’t log in, reset your router. Afterward, make sure your router has the latest firmware. Be sure to uninstall the strange software from your device(s) and run an antivirus client.
Sign #4—You receive a ransomware message
Ransomware messages can be a sign that you have a hacked router. These attackers can seize control of the router and demand money in return for its release. The message may appear in the form of an email, instant message, text, or a popup generated by uninvited software installed on your device.
But also remain skeptical. Ransomware messages don’t always mean you’ve been hacked. Some are designed to instill fear and convince you of a hack that never happened. But if you see popup threats on your screen or your mouse suddenly opens your bank account, then yes, you’re under attack.
Immediate action: Don’t pay a dime, and follow my instructions on how to reset your router. Be sure to create a unique password that hackers can’t guess.
Sign #5—You see unrecognized devices on your network
You can use the router’s web interface or mobile app to see a list of devices connected to your home or office network. For example, the Linksys Smart Wi-Fi interface provides a network map—just click on a device to see its assigned address.
When you look at the map, all local devices have a derivative of the router’s private IP address. If your router’s address is 192.168.1.1, for example, then all device addresses should start with the first three numbers (192.168.1).
However, a device remotely accessing your router won’t have an address that matches the first three numbers of your router’s private address.
Immediate action: Kick the unknown device(s) off your network and change the password. Disable remote access if you never use it.
Sign #6—You can’t control your device
If you sit in front of your computer and watch an uninvited, unseen guest move the mouse and access your banking information, you definitely have a hacked router.
In this scenario, the hacker has remote access to your device and can open any file or online account using the passwords you store in the operating system or browser.
Immediate action: Unplug your devices and disconnect your router from your modem. After that, follow my instructions on how to reset your router. Change your passwords, too.
Sign #7—Your internet speeds are slower than snails
Slow internet speeds aren’t uncommon. There may be issues with your provider, too many devices downloading at one time, and so on. But if you experience extremely slow speeds along with other symptoms on this list, chances are you have a hacked router.
Your speeds could be slow because the hacker seized your full bandwidth for the following:
- Botnet activity
- Distributing malware to other networks
- Remote connections to your devices
- Cryptojacking
- General internet piggybacking
Immediate action: First, use our tips on how to speed up your internet to see if the problem is just a connection issue. If you think that someone hacked your router, try to change the password. If you can’t, follow my instructions on how to reset your router.
How to fix a hacked router or gateway
You can easily and quickly fix a hacked router. There’s no need to throw it out the window and purchase a new one.
Step 1: Disconnect the router or gateway
If you have a standalone router, disconnect the Ethernet cord to avoid communicating with the modem. If you have a gateway, disconnect the internet connection instead.
In both cases, disconnect all other wired and wireless devices.
Step 2: Power cycle your router or wireless gateway
In some router hacking cases, a simple power cycle (reboot) works as a quick fix. This method clears the memory of any malicious code and refreshes your public IP address. Just pull the plug, wait 30 seconds, and then plug the cord back into the outlet.
In other cases, you may need to reset your router to its factory settings. A power cycle cannot remove severe infections like VPNFilter.
Step 3: Change the password
Once you power cycle the router, log in and change the password. You can use one of the best password managers to create one and retrieve it from your account when needed.
Actually, I suggest you create a passphrase instead of a password. It’s a long string of unrelated words filled with symbols and numbers. Make it something you can remember but isn’t easily guessed.
Do the same with your Wi-Fi network, too.
Immediate action: Read my guide on how to change your Wi-Fi network name and password.
Step 4: Update the firmware
Set your router to update its firmware automatically if it’s not already. And if your router doesn’t give you the option to update automatically, set yourself a reminder to check every month or so.
But carry out either method with caution, as faulty firmware can render your router useless. Check the manufacturer’s notes to make sure the latest firmware is stable. You shouldn’t have any issues with new firmware, but it doesn’t hurt to be cautious and proactive. Routers aren’t cheap.
Immediate action: Read my guide on how to update the firmware on routers from several popular brands.
Step 5: Reset your router
if an infection persists or you can’t log in, then a router reset is your only solution (outside buying a new one). A reset restores the factory default settings, clearing out any possible malware. You’re essentially rebuilding your home network and creating new passwords for the router login and Wi-Fi.
For more information, consult my guide on how to reset a router from ASUS, Linksys, NETGEAR, and more.
How to prevent a router hack
Use the following suggestion to safeguard your devices and sensitive data against hackers.
Stay on top of firmware updates
Your router is a miniature computer with a processor, system memory, and storage that houses the operating system (firmware). Unfortunately, firmware is never bulletproof, as there can be bugs in the code and security holes. Attackers will utilize these unpatched flaws and access your router with ease.
Manufacturers distribute firmware updates regularly to squash these bugs and patch vulnerabilities. Generally, we suggest you enable automatic firmware updates if the feature isn’t toggled on already and you never manually install new firmware. Log in to your router and toggle on automatic updates if they are not already.
However, be aware that things can happen. Bad firmware uploaded to a manufacturer’s distribution server can brick your router. Malware-infected firmware distributed to a router can lock you out. Auto-updates are convenient, but there’s a rare chance the update can go awry and leave you with a $300 paperweight. For this reason, some manufacturers don’t support auto-updates.
Read my guide on how to update the firmware on routers from several popular brands.
Use a secure password
Every router I’ve tested forces you to create an administration password during setup. There’s usually no “default” password that hackers can pass around. Some routers even require you to create two security questions for accessing the router when the admin password doesn’t work (corrupt, forgotten, etc.). The password normally requires a mix of upper- and lower-case letters, numbers, and symbols.
Likewise, every router I’ve tested ships with a unique passphrase for Wi-Fi printed on a label. You’re prompted to change it as you move further into the setup, but it’s not mandatory like the administration one.
Some routers require a cloud account prior to starting the setup process, like mesh networking systems. That means you must create a username and password to use the service and router.
Overall, never use an easily guessed password with your router or Wi-Fi network—even if it’s full of upper- and lower-case letters, numbers, and symbols. These include names of pets, children, other family members, and anything that links to your interests. Believe it or not, the two most used passwords are still password and 123456. Like, really?
So, what’s the big deal? Why can’t we use easily remembered passwords? Because a hacker can use free online tools to carry out a brute-force attack—a trial-and-error method that continuously enters every possible password until one works. Hackers can also use a library attack, which uses words pulled from a dictionary. These attacks can quickly crack an easy eight-character alphanumeric password.
The bottom line here is use a passphrase instead of a password. It’s a string of unrelated words with symbols and numbers that’s harder to crack than any password you create.
Schedule routine reboots
A monthly reboot is good for the router, as it can clear the system memory and refresh all connections.
Additionally, your internet provider assigns a public IP address to your router. It usually refreshes every 14 days anyway (unless you pay for a permanent “static” address), but a reboot gives you an extra refresh if hackers obtained one of your previous addresses.
Disable remote access
Remote access is a feature for changing the router’s settings when you’re off the network, like from a hotel room. Most routers now have two methods, but the one you should be concerned about lies within the web interface. It’s an easy entry point for attackers, especially if you use a weak password.
Based on the routers I’ve tested, this feature is disabled by default in favor of cloud-based access through mobile apps. Still, you should check to see if it’s disabled, and if not, turn it off immediately. Only use this version of remote access if the app doesn’t have the settings you need to change off-network—and only do so sparingly.
Be sure to use strong passwords or passphrases when you set up a cloud account (if you choose not to use the complex ones supplied by Android and Apple devices). Also, enable biometrics so you’re not manually entering login credentials out in public.
Disable WPS
Wi-Fi Protected Setup (WPS) has good intentions. It allows users to connect their devices to a wireless network without a password. Simply press the WPS button on the router, or enter an eight-digit PIN provided by the router.
But the convenience has a major drawback. Hackers can use a brute-force attack to figure out the PIN in 4 to 10 hours—they don’t need access to the physical button. You can easily disable WPS through the router’s backend and instead use our guide on how to share your Wi-Fi network’s password to any device.
If you have a Linksys router, for example, you can disable WPS by doing the following:
Step 1: Select Wi-Fi Settings displayed under Router Settings.
Step 2: Click on the Wi-Fi Protected Setup tab.
Step 3: Click the toggle so that it reads OFF.
Step 4: Click on the Apply button. You must click this button so that WPS and its related PIN are completely disabled—clicking on the toggle without applying the change isn’t enough.
Change the network name
The Service Set Identifier (SSID) is your wireless network’s name. All routers broadcast the manufacturer’s name by default, like Linksys_330324GHz or NETGEAR_Wi-Fi. Anyone within range can see this name, know who built your router, and search the internet for the default login credentials if they’re available.
However, the router prompts you to rename the wireless network during the setup process for that very reason. If you ignored the router’s request, now is a good time to return to the settings and change the network name. Use whatever you want, just don’t advertise anything that can help attackers infiltrate your home network.
If you have band steering turned on, you’ll only need to change one SSID. If band steering is turned off, you’ll have at least two Wi-Fi connections to rename. I normally add a “2” or “5” suffix to distinguish between the different bands, like “clearlink2” and “clearlink5” as seen in my router reviews. At home, I use different NSFW names to annoy my neighbors.
Finally, network names can be up to 32 characters long.
Want to keep hackers off your network?
We suggest one of the best routers for security.
How to protect your devices from hacks
There’s more to protecting your network against hackers than securing your router. You need safeguards in place to protect your devices and personal data, too, should an attacker take control of your router.
Computers and mobile devices
Lock your device with biometrics or a passcode
Use facial recognition and fingerprint scanning to lock your devices and accounts in addition to using the main login password. Passcodes and patterns are better than passwords, too, but you run the risk of someone guessing them correctly by viewing the smudges on your screen.
Keep all software current
Device manufacturers like Apple and Lenovo release system updates to squash bugs in the code, optimize performance, and fill security holes. Software developers do the same, so be sure every platform, desktop software, and app you use is current.
Never install questionable software
If the desktop software or app—or even the website that hosts it—looks shady, then don’t install it. Always get your apps and software from verified sources versus back-alley repositories lurking in the dark corners of the internet.
Never connect to an unsecured public network
An unsecured public network means the Wi-Fi connection doesn’t use any security. The data you send and receive from an unsecure Wi-Fi access point isn’t protected from eavesdropping hackers eager to steal your info.
Use a VPN service
Many modern routers now support OpenVPN, a free VPN service you can use to hide your online activity. All you need is to enable the server on your router and install the client software on your devices. We also provide a list of the best VPN services if your router doesn’t include a VPN server.
Turn off Bluetooth
Bluetooth is another form of wireless communication. Device manufacturers like Apple say to keep it turned on “for the best experience” but the Federal Communications Commission suggests you turn it off when not in use, as hackers can access your device by spoofing other Bluetooth devices you use. If you must enable Bluetooth, use it in “hidden” mode.
Use Two-Factor Authentication
Always, always enable two-factor authentication on every account you use. It’s a pain, we know, but that added layer of security keeps hackers at bay should they somehow get your login credentials. For example, Microsoft Authenticator requires you to verify a login request in the mobile app before you can log in to your Microsoft Account on any device, including the Xbox consoles.
Never click or tap on strange links
Malware you unintentionally download to your computer or mobile device could lead the way to a hacked router. Here are several ways you can get unwanted malware:
- Click on a link in a phishing email or chat message
- Connect an infected flash drive
- Access a malicious website
- View infected ads
Computers only
Keep your antivirus current
Apple macOS doesn’t include built-in antivirus because hackers rarely ever target the platform. Microsoft Windows is a different story, however, and includes antivirus protection for free. Be sure to keep it and any third-party antivirus software you have installed on Mac or Windows up-to-date, so you stay protected against the latest threats.
Never ever disable your firewall
All computing devices have a firewall that monitors your network traffic flow but you can disable it on Mac and Windows. This is a bad idea, as you remove all restrictions and open the door for hackers to slip in and infiltrate your device. I provide instructions on how to re-enable your firewall on Windows and Mac if, for some reason, it’s disabled.
From one parent to another: Don’t leave your kids unchecked online. The internet can be far more unsafe than the neighborhood they play in. Inappropriate content. Malicious software. Unsavory strangers. All of it makes me want to trash their devices and kick ’em outdoors (go get some sun, dangit).
The good news is that Microsoft Family Safety has your back if you own Windows, Xbox, and Android devices. This free service packs a slew of parental tools for keeping your kids’ content consumption and activities in check. Find out how to set up Microsoft’s parental controls and put restrictions in place.
In this guide:
What do you need? | Supporting platforms | Features | Create the parent account | Create a family group | Add a child | Settings and spending | Devices and Microsoft apps | Third-party apps | Block unwanted installs | Bottom line
In this guide:
- What do you need?
- Supporting platforms
- Features
- Create the parent account
- Create a family group
- Add a child
- Settings and spending
- Devices and Microsoft apps
- Third-party apps
- Block unwanted installs
- Bottom line
What do you need to use Microsoft Family Safety?
You need the following two things to get started:
- A free Microsoft Account for the parent
- A free Microsoft Account for the child
You also need a browser or Microsoft’s app to manage and use the parental controls.
| Browser | Windows | Android | iPhone/iPad |
|---|---|---|---|
| Online dashboard | Microsoft Store | Google Play | App Store |
What platforms support Microsoft Family Safety?
You can use Microsoft Family Safety to manage the following platforms:
- Windows
- Xbox (which is really Windows with a controller-friendly interface)
You can also use Microsoft Family Safety to view activities on the following platforms:
- Android phones
- iPhone
- iPad
What can you do with Microsoft Family Safety?
Here’s what you can do with Microsoft Family Safety at no extra cost to you:
- Set device screen time limits on Windows and Xbox
- Set Microsoft app and game screen time limits on Windows, Xbox, and Android
- Filter out inappropriate apps and games
- Filter out inappropriate websites and content search in Microsoft Edge (blocks all other browsers)
- Allow/deny screen time requests (Windows, Xbox)
- Allow/deny content filter requests (Windows, Xbox, Android)
- Manage spending through a Microsoft Account
If you have a Microsoft 365 subscription, the following features are also available to you:
- See location alerts (iPhone, Android phones)
- View a teen’s driving habits (iPhone, Android phones)
- View a teen’s driving history (iPhone, Android phones)
Now, let’s get started!
Create the parent’s Microsoft Account
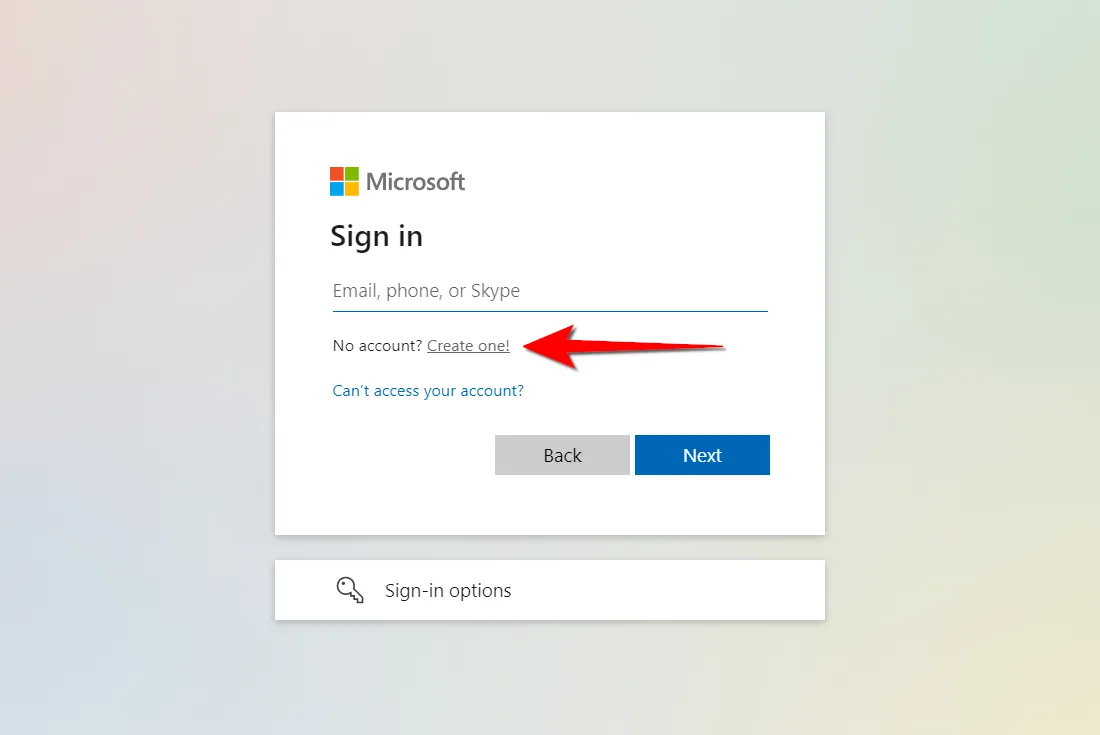
You need a Microsoft Account to use Windows and Xbox anyway, so skip this section if you already use these platforms and see how to create a family group.
If you’re new to the Microsoft family, you must have a Microsoft Account to activate and use Windows and Xbox.
The following instructions apply to everyone who will be managing the family group once it’s created. These are also web browser directions.
Step 1: Go to account.microsoft.com.
Step 2: Select the Sign in button in the top right corner.
Step 3: Select the Create one link on the following screen (shown above).
Step 4: Enter a valid email address, and then select Next (or create a new you@outlook.com address).
Step 5: Set your password and then select Next.
Step 6: Retrieve the security code sent to you, enter it into the required field on your screen, and then select Next.
Step 7: Solve the CAPTCHA to prove you’re not a robot, and then select Next.
Create a family group
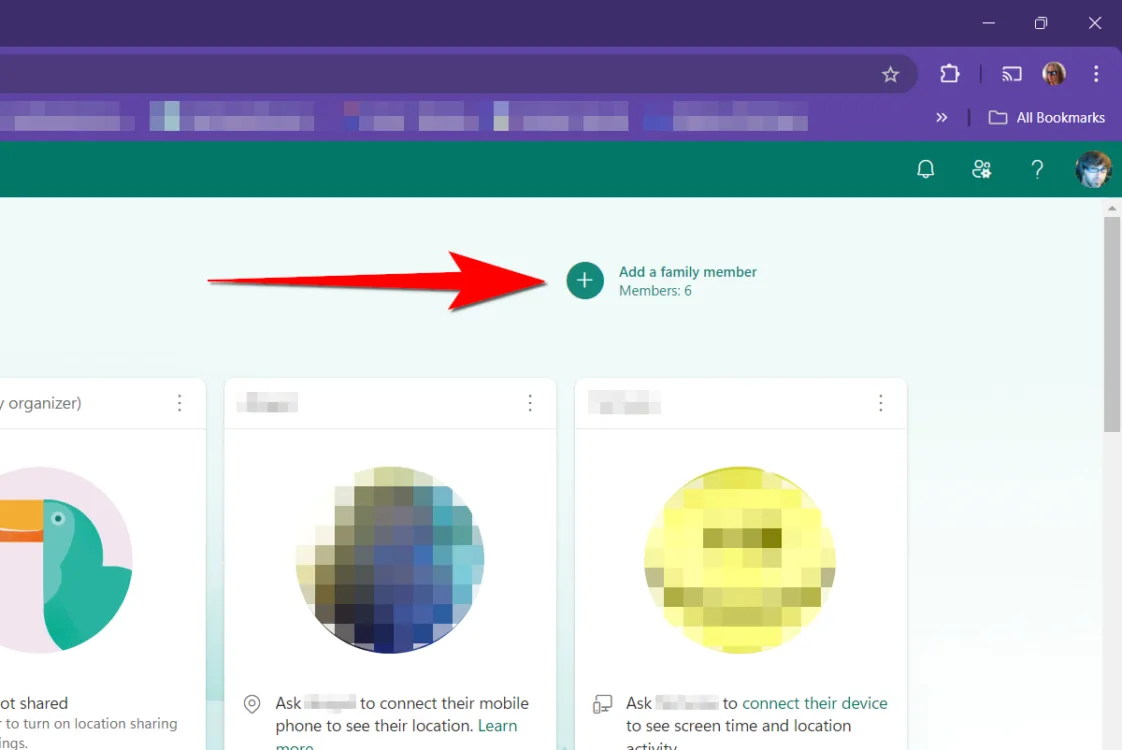
Now that you have a Microsoft Account, it’s time to create the family group and add your child.
Step 1: Sign in to the Family Safety dashboard.
Step 2: Select the plus icon next to Add a family member in the top right corner (shown above).
Step 3: Select Organizer and then select Next.
Step 4: Enter your email address and then select Next.
Step 5: Solve the CAPTCHA and then select Invite.
Step 6: Open the Microsoft Family Safety email sent to you and select Join Now.
Add a child to the family
With the family group organizer set, you can now add a family member. For this set of instructions, let’s assume you need a new email address for your child.
Step 1: With the Family Safety dashboard open, select the Add a family member tile.
Step 2: Select Get a new email address on the following screen.
Step 3: Enter a username and select @outlook.com or @hotmail.com and then select Next.
Step 4: Create a password for the new account and then select Next.
Step 5: Enter the first and last name of your child and then select Next.
Step 6: Select the country/region and the child’s birthdate, and then select Next.
Step 7: Solve the puzzle and then select Next.
Step 8: Give consent for your child’s new Microsoft Account by entering your signature and selecting Yes, I agree.
Step 9: Give your child permission to use non-Microsoft apps with the account you created, and then select Continue.
Step 10: Set the age limits on apps and games, enable/disable activity reporting, enable/disable web and search filters, and enable/disable Ask to buy.
Step 11: To finish, select the Family Safety button.
Manage your child: Part 1
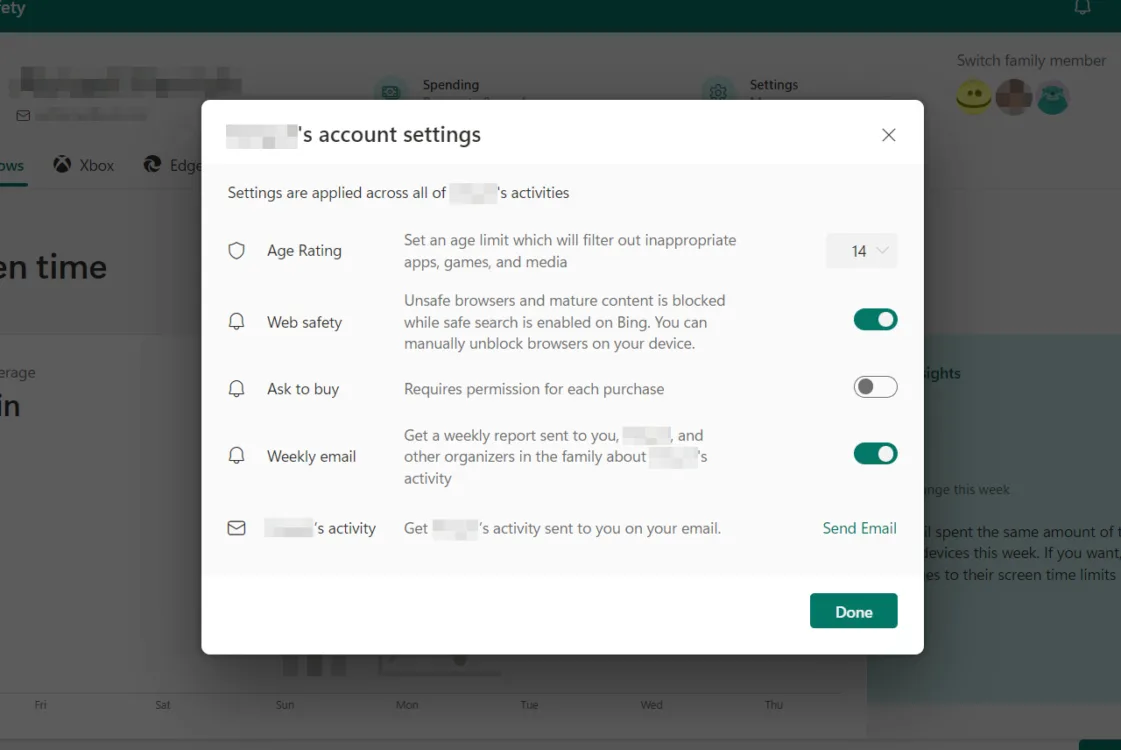
So, you have an organizer managing the family group, and your first child has been added. Everyone in the family group is displayed in tiles under Your family. As seen in the previous section, you already set restrictions. Now, you can go in and tweak the settings.
When you click on a child’s tile, you’re presented with two options and four tabs. First, I’ll cover the two options from left to right. I cover the tabs in the next section.
Spending
This section speaks for itself: Your child’s spending through Microsoft. At the top is a toggle for getting notifications about spending—I suggest you turn that on.
Here’s a brief rundown of what to expect on this screen:
Microsoft account balance: You can see what’s available and add money as needed.
Credit cards: Add a card for the child to use. Be sure to toggle on Require approval for every purchase to prevent an unwanted spending spree (it will happen).
Spending activity: This is a summary of all spending activity in the family group, not just the child’s activity.
Account settings
Although you already set the restrictions when you added the child, here is where you can modify them as they get older. Trust me: Your 14-year-old will complain if they’re still locked to Y7 content. (Stop all that growin’, dangit.)
Age Rating: Select an age from 3 to 20, or choose Any Age.
Web safety (on or off): Unsafe browsers and mature content are blocked. Safe search is enabled in Bing.
Ask to buy (on or off): Turn this on to prevent unwanted spending sprees.
Weekly email (on or off): Get a weekly report about the child’s activity for the week.
Child’s activity: Get a report about the child’s current activities. Select the Send Email link to get the report.
Now, let’s talk about the tabs.
Manage your child: Part 2
Windows and Xbox
The Windows and Xbox tabs have identical parental controls, so let’s take a look.
Screen time
Here, you’ll see a chart showing your child’s screen time on Windows 10 and Windows 11 (or Xbox).
At the bottom of the page, you’ll also see an Activity reporting toggle under Windows Settings (or Xbox Settings). Switch it on if you want to see your child’s app and game-related activities on every Windows device (or Xbox) they use.
Devices: Setting the time limits
At the top of this section is Lock Devices. Select it to lock and unlock each Windows-based device your child uses.
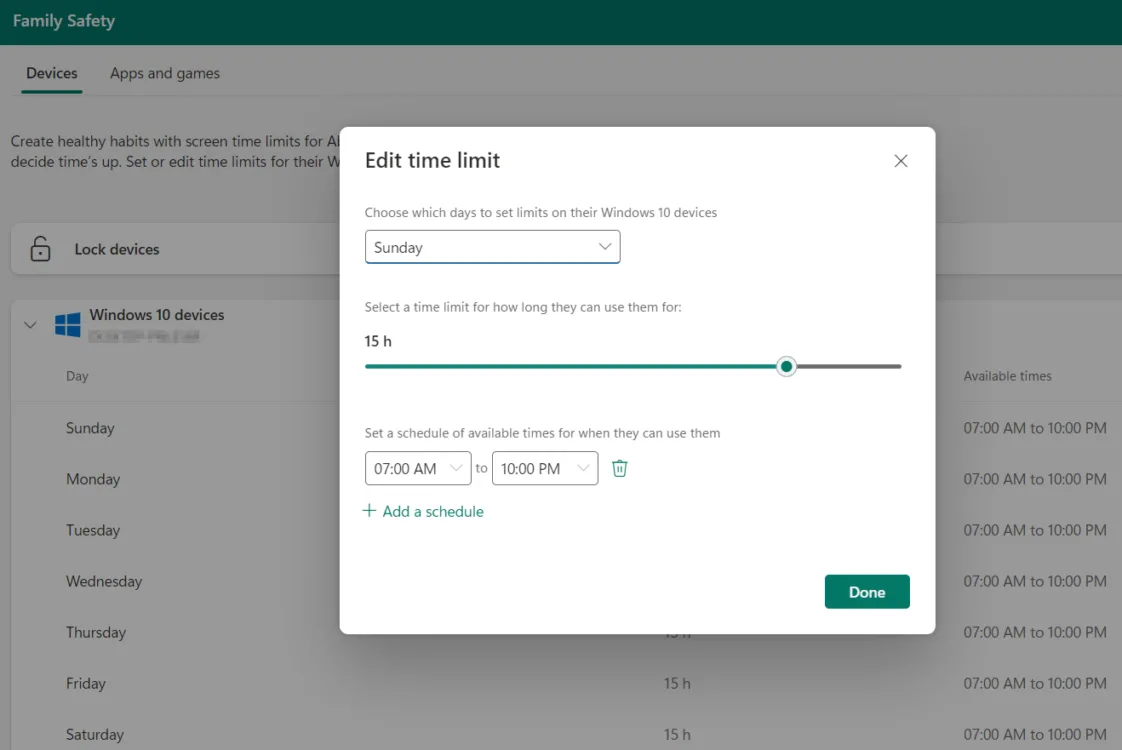
Below the Lock Devices setting is a chart that shows the daily time limits set for each Windows device (or Xbox) your child uses, as shown above. This is where you can set different or identical time limits throughout the week. For example, you may want to limit time during the week and give more time for the weekend. Here’s how:
Step 1: Select any day on the chart to edit the time limit.
Step 2: In the first field on the pop-up window, select up to six days you wish to enforce time limits or select Every Day.
Step 3: Move the slider to select up to 23 hours or choose No limit.
Step 4: Set the time when your child can use Windows. Select Add a schedule if you want to allow multiple time allowances during the day. A good example would be allowing screen time after school and later in the evening.
Step 5: Select Done.
Apps and Games: Setting the limits
At the top of this tab, you’ll find the App and Game limits toggle—turn it on. You’ll see a list of Microsoft apps and games installed on your child’s Windows device (or Xbox). Select one to see the user stats, block it, or set a time limit (similar to the instructions above).
To block third-party apps and games, refer to my instructions further down the page about managing consent.
Microsoft Edge
At the top of this tab you’ll see your child’s recent search queries and website activity. Everything you need to control what your child does through Microsoft’s browser is located under Filter Settings:
- Filter inappropriate websites and searches (on or off)
- Only use allowed websites (on or off)
- Add a blocked website
- Add an allowed website
- Activity reporting (on or off)
Mobile
iPhone/iPad and Android are managed by Apple and Google, respectively, so there’s very little you can do using Microsoft Family Safety on these devices. However, you can install the Microsoft Family Safety app (App Store, Google Play) and sign in with your child’s account on Apple devices and Android phones to see some activities.
| Android | iPhone/iPad | |
|---|---|---|
| Screen time | Yes | No |
| Apps and games activity | Yes | Yes |
| Location sharing | Yes | iPhone only |
Block third-party apps and games—the hidden setting
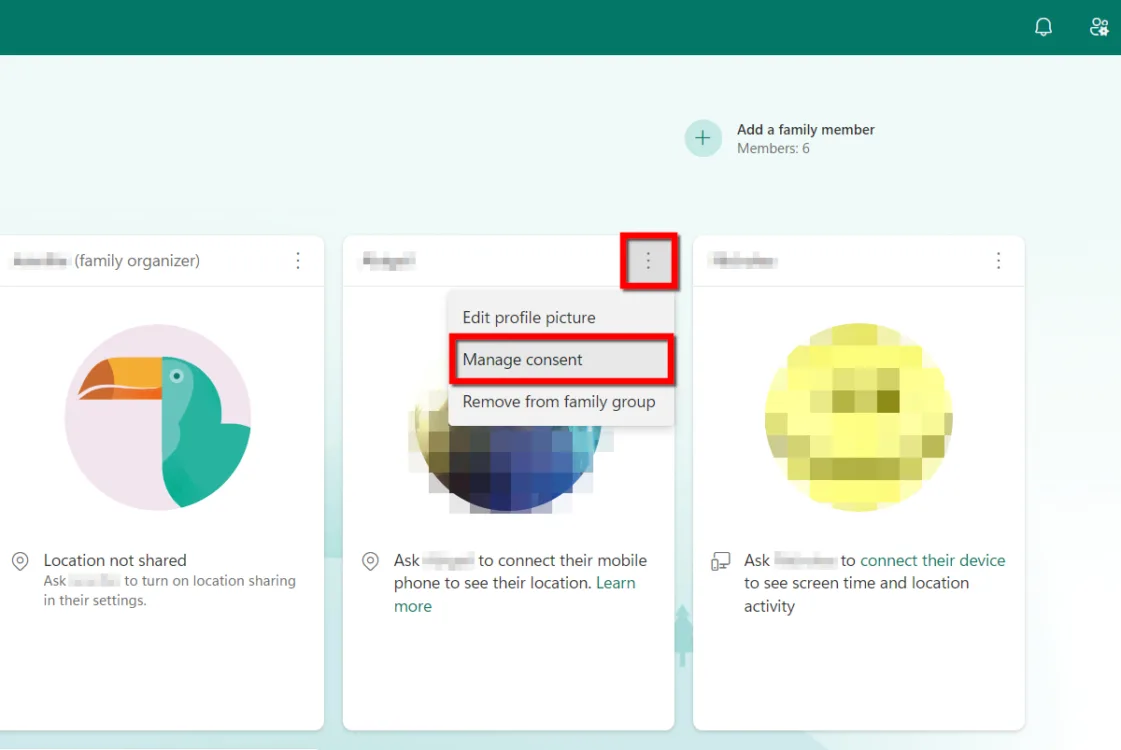
Once upon a time, you could just block apps and games no matter where they originated, but now it seems Microsoft has chosen to let you block individual Microsoft apps and games in your child’s family group profile.Third-party app and game permission settings are buried elsewhere. Here’s how to block third-party software:
Step 1: On the Your Family page, select the three-dot button next to your child’s name on their tile.
Step 2: Select Manage Consent on the drop-down menu (shown above).
Step 3: Select Manage this child’s access to third-party apps.
Step 4: To block third-party apps and games, select Disable Access. Return here and select Enable Access to allow your child to use third-party apps and games later.
Block unwanted installs on Windows
Just in case, make sure your child’s account listed in Windows is set to Child or Member. This setting prevents your child from making changes to Windows, rebooting into Safe Mode, and more.
The following instructions are based on Windows 11, so they may be slightly different from Windows 10.
Step 1: On the child’s PC, select the Start button, followed by the Settings icon on the Start Menu.
Step 2: Select Accounts.
Step 3: Scroll down and select Family.
Step 4: Select the child followed by Change Account Type.
Step 5: Set the account type as Child or Member if it’s not already.
Bottom line: Microsoft Family Safety is but one solution
Look, I’ve been using Microsoft Family Safety to keep my youngins in check for years, but it’s only one piece of my parental control arsenal. My family uses different platforms and different devices, so I need various tools to make sure my kids remain safe from inappropriate content and applications.
However, your approach should start at the router. I’ve tested and reviewed quite a few and compiled the ones with the best parental controls in a list (see below). I go with the free parental controls because I’m cheap, but you may find premium controls are worth the cost. Honestly, you don’t need content filtering at the router level—you really only need the ability to block devices and maybe create profile-based schedules. But if you can get some extra tools for free, the more the merrier, right?
Here are a few guides to get you started:
The second arm in your parental approach should be the operating system, and that’s where Microsoft Family Safety comes in. I’m still working on other guides for Google, Amazon, Nintendo, and PlayStation, but if you own Apple devices, here’s my guide to using parental controls across its three device types:
The U.S. experienced over 3,000 data breaches in 2023, the largest of which affected over 30 million individuals. Cybercriminals found their way into some of the most secure institutions in the country, including banks and the nation’s largest internet service providers (ISPs). With our most sensitive information now living on the web, it’s on you to secure your personal data and devices. And this is no longer as simple as installing an antivirus and calling it a day. That doesn’t mean keeping your online activity secure needs to be expensive or time consuming, but you do need to cover all your bases.
“There’s no silver bullet with cybersecurity; a layered defense is the only viable option.”
— James Scott, Federal Cybersecurity Advisor and Co-Founder of the Institute for Critical Infrastructure Technology
There are three main areas to focus on when evaluating your internet security:
- Online accounts
- Devices and home network
- Online activity
Securing your accounts and hardware is fairly straightforward. Once you set up a decent defense, it runs itself with little maintenance—we’ll show you how to do this. But your online activity is a different story. It’s the only part of your online security you can’t automate and it’s the area most commonly exploited by cyber criminals. We’ll show how to develop good online practices to keep your data safe from bad actors.
Top 5 ways to improve your internet security
We go over, in detail, how to set up a robust defense against cyber criminals for all your online accounts, your devices, and your home network. But here’s a quick breakdown of the most crucial elements for your online security:
Your passwords are literally the key to your most sensitive data, and poor security practices like using personal details in your passwords and using the same password for multiple accounts introduce unnecessary risk. The fastest, easiest, and most effective way to secure your online accounts is by using a password management tool.
Multi-factored authentication requires an additional login credential before providing access to your account, usually in the form of a code sent to your phone or email. With two-step verification, cybercriminals can’t access your accounts even if they get your passwords, unless they also get access to your second verification method. Multi-factored authentication isn’t available for every account, but you should enable it for every account that offers it.
Automatic updates allow you to keep up with the nearly constant stream of security updates that keep your devices secure. Updates patch up new security threats as they are found, so it’s crucial to take advantage of these new securities as soon as possible, without any extra effort on your part.
- Don’t allow downloads from untrusted sources
Initiating a download is as simple as clicking on a link on a website or in an email. When you download anything from the internet you’re letting code through your security firewall. Make sure you only download from reputable sites.
Phishing scams pretend to be reputable or familiar contacts to get you to let your guard down. On the surface, these communications can look very legitimate, so avoiding them takes more than going with your gut. A few solid security practices, such as checking the sender’s actual email address, go a long way in keeping your network and data secure.
A little loose data can cause a lot of damage
Before we get into the nitty-gritty of setting up your cyber defenses, it’s important to acknowledge that all of your data and devices are worth protecting. Cybercriminals don’t need something really juicy, like your banking password or social security number to exploit you; you might be surprised at just how far someone can get with seemingly insignificant data.
As an experiment, I took a quick look at the account page of one of my video streaming accounts, just to see what someone could access if they obtained my login credentials for this account.
Right off the bat, the streaming profiles identify every member of my household, so they can see the names or nicknames of everyone I live with. Do you use any of those nicknames in your passwords?
One click away, the account page gives up a wealth of very scammable data: my subscription details, email, gender, birth date, payment history, and even my payment method. They wouldn’t have the payment account number, but they’d have the email attached to it. While this isn’t enough data to directly access anything else, it’s more than enough for a pro to work with. Not convinced? Let’s walk through how vulnerable each one of these mundane data points makes you.
Your name: Knowing your name gives scammer communications another level of authenticity which helps convince you a phony email, phone call, or text message is coming from a legitimate source.
Your family member’s names: A lot of scammers and cyber criminals impersonate family members to get you to act quickly before you have a chance to realize you’re being scammed. It might be something dramatic, such as a family member in trouble who needs quick cash, or something mundane, like a message from a family member saying they forgot a password.
Birthdays: This is perfect password-cracking fuel. With details like names and birthdays, a password-cracking program can make quick work of your security measures if you use any of these details in your passwords.
Subscription details and payment history: Knowing what subscriptions, plans, or products you have and how much you pay for them helps scammers make more convincing phishing emails. These emails might say your payment failed, or offer a free upgrade, among countless other scammer tricks. A savvy scammer might even add that you’ll lose your lower rate or get a late fee if you don’t act quickly. Clicking a link in one of these phony emails could be all it takes to infect your device and subsequently your entire network.
Payment account method and email: Any details attached to a financial account are like hacker gold. Even if they don’t have the password to your payment account, many accounts use the email as the username—so the criminal already has half the keys to your finances. Pair this with the password-cracking tool and the info above, and it’s a homerun for the thief. A hacker could also just sell this information to the highest bidder on the dark web.
Bad actors will take any advantage they can get in their efforts to exploit you. This is why it’s important secure everyone of your online accounts, and not just the obviously sensitive ones like your online banking and email.
Luckily, most devices and online accounts come with security tools you can use to protect yourself. We’ll show you how to set those up. But first, let’s go over how most cybercrimes happen.
“The wonderful thing about the Internet is that you’re connected to everyone else. The terrible thing about the Internet is that you’re connected to everyone else.”
— Vinton Cerf, Vice President and Chief Internet Evangelist for Google
The most vulnerable part of your network
When you think of cyber criminals, you might imagine a hooded assailant fervently tapping away at lines of computer code, but most cyber crimes take a simpler approach. According to the FBI’s latest Internet Crime Report, social engineering attacks are, by far, the most common, accounting for three of the FBI’s top-five cybercrime complaints. Social engineering hacks you, not your computer, conning you into giving up your sensitive info, providing access to your network, or even directly sending money.
“The weakest link in the security chain is the human element.”
— Kevin Mitnick, former hacker turned renowned cybersecurity expert
FBI’s top 5 cybercrimes of 2023
| Cybercrime Type | Number of complaints | Description |
|---|---|---|
| Phishing | 298,878 | The use of unsolicited email, text messages, and telephone calls purportedly from a legitimate company requesting personal, financial, and/or login credentials. |
| Personal Data Breach | 55,851 | A leak/spill of personal data which is released from a secure location to an untrusted environment. Also, a security incident in which an individual’s sensitive, protected, or confidential data is copied, transmitted, viewed, stolen, or used by an unauthorized individual. |
| Non-payment/non-delivery | 50,523 | Goods or services are shipped, and payment is never rendered (nonpayment). Payment is sent, and goods or services are never received, or are of lesser quality (non-delivery). |
| Extortion | 48,223 | Unlawful extraction of money or property through intimidation or undue exercise of authority. It may include threats of physical harm, criminal prosecution, or public exposure. |
| Tech support impersonation | 37,560 | Subject posing as technical or customer support/service. |
Data from the FBI 2023 Cybercrime Report.
One social engineering hack in particular, phishing, accounted for more reported cybercrime complaints than any other. Phishing is when a cybercriminal tricks you into providing sensitive information (like login credentials) with a phony email, text, or phone call. These fraudulent communications insist on urgent action with severe consequences if you don’t act immediately. The goal here is to get you to click and type faster than you think because, if you study these cyber traps for just a minute or two, you usually can tell something’s up.
Learn how to protect yourself against phishing.
Types of hacks
While phishing attacks are the most common, here are some other ways hackers exploit weaknesses in your cybersecurity.
“Never underestimate the determination of a kid who is time-rich and cash-poor.”
― Cory Doctorow, author and former European director of the Electronic Frontier Foundation
Viruses
Viruses are self-executing programs that infect your devices and spread to other devices. Once a virus gets access, it may steal or destroy data, impair crucial systems, or even render your device inoperable.
Tojans
Trojans are disguised malware that sneaks through your security by appearing to be legitimate programs or data.
Adware
Adware is covert marketing software that burrows into your system and bombards you with ads. Some adware even tracks your online activity to display personalized ads.
Bots and botnets
Bot viruses steal and redirect your computer’s processing power and networking capabilities toward a hacker’s agenda. Hackers use botnets to assemble entire armies of user’s computers without their knowledge to carry out cyber attacks.
Spyware
Spyware accesses your device’s activity and reports data back to the hacker. One of the most common instances of spyware is keyloggers, which capture user input and relay everything you type and click to bad actors. Spyware may also capture your communications or view your computer screen.
Password cracking
Hackers use password-cracking programs to essentially guess millions of passwords in seconds. If your passwords use common word and number combinations, password crackers can be an effective way for hackers to access your online accounts.
Malware
Malware is a catch-all term used to describe any malicious software. Every hack in this list is a form of malware.
Zero-day attacks
Cybercriminals are constantly discovering and exploiting new vulnerabilities; these discoveries are called zero-day attacks, and despite the rigorous efforts of cybersecurity professionals, it’s always a threat. Like a brand new biological virus to which there’s no existing immunity, zero-day attacks have a field day with our security measures. Cybersecurity experts then patch up these vulnerabilities, and all is well, until the next hits.
Protecting your online accounts and data
Usually, cybercriminals are after your accounts and data. A hacker may want to access your financial accounts to steal money or your shopping accounts to make fraudulent purchases. Sometimes the data itself is the prize, as the hacker sells your critical info to the highest bidder.
Your data doesn’t live in your home or on your devices; it’s in the cloud. This means that security measures on the home network level, like anti-virus software and high-tech routers, won’t necessarily help protect your data. Your best defense here is a robust set of login security measures and a watchful eye for social engineering attacks. Let’s go over how to protect your accounts and data in more detail.
Use strong passwords
Tough passwords are your main defense against unauthorized access to your accounts. While it’s easier to remember passwords with familiar terms and numbers, such as a pet name and birthday, these are the easiest passwords for hackers to crack. The tools used by hackers can guess millions of passwords in seconds, but that’s usually not good enough to crack even slightly complicated passwords.
The real danger comes when a hacker combines these tools with your personal information, like the password-crippling personal details we’ve mentioned above. Once the password-cracking program has some terms to latch onto, it’s much more effective at guessing the right password.
Pro-Tip: Change your router password
You’re probably familiar with Wi-Fi passwords, but did you know your router has a password too? Your router login credentials allow access to your router’s settings— that’s definitely somewhere you don’t want strangers snooping. A lot of routers come with very insecure default passwords. You’re supposed to change these, but many of us forget. For some help with this, check out our guide on how to log in to your router.
How to create strong passwords
The short answer here is that you should create and manage your passwords with a password manager app, as this single step provides you with an endless supply of highly secure passwords for all your online accounts with effortless recall. With that said, let’s get into what makes up a really tough password.
The strongest passwords are long, randomly generated, and complex containing letters (upper and lower case), numbers, and symbols. For length, a 2010 cyber security study by the Georgia Technical Research Institute found that 12 characters is the magic number to obtain a reasonable level of security.
The use of numbers, lower case, and upper case letters, as well as symbols in your passwords increases complexity, driving up the number of possible combinations to such a high number that it makes it very unlikely that a password-cracking program would land on the right guess. And be sure to leave out personal details, such as birthdays, address details, area codes, and zip codes.
See the table below to learn how skimping out on any of these requirements dramatically reduces the security of your passwords.
| Character Count | Numbers | Letters (upper and lower case) | Symbols | Time to hack |
|---|---|---|---|---|
| 8 | ✔ | ✖ | ✖ | Less than 1 min |
| 8 | ✔ | ✔ | ✖ | 8 months |
| 12 | ✔ | ✔ | ✔ | 164 million years |
Data from Hive Systems 2024 Password Table.
Measurements assume passwords are randomly generated. Passwords created by humans using phrases and terms are significantly less secure than the estimates above.
Why you should use a password manager
Creating and remembering a 12-character-long password with a completely random assortment of numbers, letters, and symbols is a tall order, especially when you factor in a different password for each of your online accounts. This is where password manager apps come in. These programs automatically generate a unique and extremely robust password for each account—this is one of the single most powerful tools at your disposal for securing your data. Let’s review the benefits in greater detail.
Randomly generated passwords vs user-created passwords
A password you create using familiar terms or anything easy to remember will never be as secure as one created by a password manager. By throwing out grammatical rules, and recognizable words, and introducing long lengths, randomly generated passwords establish a level of complexity making it next to impossible for a hacker to come up with the right guess. These passwords aren’t vulnerable to common dictionary attacks because they don’t contain any words, and they’re too long for brute-force hacking attacks to have any reasonable odds of success.
Use a different password for every account
Using the same password for every account places only one point of failure between you and complete data intrusion. Even an extremely complex password is a potential security risk if reused for multiple accounts. With a password manager, you can generate a unique hyper-secure password for every account with little effort.
Effortless recall
The reason people use weak passwords is because they are easy to remember. Password managers remove this risky motivation entirely by storing and recalling your passwords whenever you need them.
Password manager apps compared
| Password Manager | Free Options | Platforms | Features |
|---|---|---|---|
| NordPass | Yes | Windows, Mac, iOS, Android, & Linux |
|
| 1Password | No | Windows, Mac, iOS, Android, Linux, ChromeOS |
|
| Bit Warden | Yes | Windows, Mac, iOS, Android, & Linux |
|
Enable multi-factor authentication (a.k.a. two-step verification)
Multi-factor authentication takes your security to the next level by requiring both your password and an additional credential, often a temporary code sent via text or email. This extra step goes a long way to increasing your security, as a cybercriminal won’t be able to log in to your accounts without access to your second verification method, even if they have your password.
You should enable multi-factor authentication on every account that offers it. This may be an extra step when accessing your accounts, but you get a lot of added protection in return.
Don’t fall for phishing emails, texts, or phone calls
As we explored earlier, phishing attacks are by far the most common method used by cybercriminals to access your data. Be very skeptical of urgent emails asking you to do anything out of the ordinary. Big services like Amazon or Walmart will never outright ask you for your login credentials or sensitive information. They have more secure ways of confirming your identity.
You can often detect a phishing email by looking at the sender’s email address. Make sure to view the actual email address and not the contact name which can be very easily spoofed. Look for numbers, misspelled words, and odd phrasings, like Amazonsupport2334@[public domain].com.
Securing your home network and devices
Protecting your accounts and data is paramount to your online security, but home Wi-Fi hacking does happen. Luckily, securing your home network is much easier. After initial setup, most of the following security measures manage themselves.
Use WPA3 or WPA2/WPA3 Wi-Fi security settings in your router
| Security Standard | Encryption | Authentication | Public networks | Wi-Fi certification | Compatible devices |
|---|---|---|---|---|---|
| WPA-3 | AES/GCM (more robust) and individualized device encryption | Dragonfly Protocol (stronger defense against password guessing) | (OWE) Device communications are encrypted even on open networks | 2020 |
|
| WPA-2 | AES-CCMP and all devices share the same encryption key | PSK | No OWE | 2004 |
|
Wi-Fi Protected Access (WPA) are the security standards that protect access to your router and Wi-Fi traffic. WPA-3 is the newest and most secure version of WPA, with several substantial improvements over WPA-2. But to use WPA-3, you need both a WPA-3 capable router and devices that support WPA-3. So, if you’re running older devices, it’s possible they aren’t compatible with WPA-3. After July 2020, all Wi-Fi-certified devices are required to have WPA-3 compatibility, but Wi-Fi certification is an optional standard, so there’s a chance even a brand-new device doesn’t support WPA-3.
To get around WPA-3 incompatibilities, many routers use a WPA-2/WPA-3 split mode that will default to WPA-3 for compatible devices but still use WPA-2 on devices without WPA-3 support. You should enable the WPA2/WPA3 mode on your router if possible. If your router only has WPA-2, this setting is still far superior to WEP. See our router login guide to learn how to log into your router and access its settings.
Disable WPS in your router settings
WPS allows devices to connect to your Wi-Fi network without using a password. Instead, WPS uses either a PIN or a touch button. Pin WPS is far less secure as it’s susceptible to brute force hacking attacks that can guess every possible pin combination to gain access. WPS that uses a button on the router is more secure as it can only be initiated with physical access to the router, but hackers can find ways around this. At the minimum, a WPS-enabled router means you need to trust everyone with potential access to your router.
While WPS isn’t necessary for connecting devices with screens and keyboards, like phones and laptops, it’s very handy for connecting smart devices without displays or cumbersome data entry methods. One workaround is to enable WPS to connect smart devices and disable it once you’ve connected the device to your network.
Use a guest Wi-Fi network
Guest Wi-Fi networks provide a separate network you can share with visitors. This keeps all your devices protected on your main network. It’s a good practice, even if you trust your guest. It’s also a no-brainer if you ever need to share Wi-Fi with people you don’t know well. You can’t predict everything, but with a guest Wi-Fi network, you don’t have to.
Put IoT devices on a separate network
Internet of Things (IoT) devices are notoriously insecure, so it’s a good idea to keep these devices on a network separate from your computers, phones, and other main devices with access to your sensitive data. Some routers allow you to create separate virtual networks (VLANs) specifically for this purpose. By setting up a separate Wi-Fi network for your IoT devices, your computers, tablets, and phones will still be protected even if someone is able to break through the weaker security of an IoT device.
Keep all your devices updated
Cybersecurity is a constant battle between security experts and hackers. Hackers find vulnerabilities to exploit and security experts quickly move in to close the gaps with software and firmware updates. This makes it extremely important to install the newest security updates onto your devices. This is usually as simple as enabling automatic updates on every one of your devices. We know the constant updates and restarts get tedious, but it’s one of your best defenses against the latest cybersecurity threats.
How to enable automatic updates on all your devices
Access Windows update settings:
Automatic security updates are not an option on Windows 10 and Windows 11, so your Windows PC should be set. You can pause updates for seven days and configure when your computer restarts to finish an update. You may also check that you have the latest updates.
Step 1: Click the Start button and select Settings.
Step 2: Select Windows Update.
From here, you can view if your computer has the latest updates, check for new updates, and pause updates.
At the top of the update window, you’ll see a message indicating your device is up-to-date, or it needs to install updates. Click Check for updates if you want to be 100% positive you have the latest updates. This is where you can check that updates are paused or initiate an update pause if needed, though we don’t recommend it.
Access update settings on Mac:
Step 1: Click the Apple menu button in the top left corner and select System Settings in the drop-down menu
Step 2: Click General from the settings sidebar in the pop-up window.
Step 3: Select Software Update.
Step 4: At the top, click the “i” info icon next to Automatic updates.
Step 5: Toggle on Install Security Responses and system files.
Access Android (Samsung) update settings:
Samsung Android phones have automatic updates turned on by default, so you probably don’t have to do anything. Here’s how to make sure automatic updates are enabled:
Step 1: Open the Settings app.
Step 2: Select Security and privacy.
Step 3: Select Other security settings and the Hexagonal gear icon.
Step 5: Toggle on Install Galaxy System Update. Note: This setting is on by default, so make sure you don’t toggle it off if it was already on.
Access iPhone iOS update settings:
Step 1: Open the Settings app.
Step 2: Select General.
Step 3: Select Software Update.
Step 4: Make sure automatic updates are set to On.
Activate your computer’s firewall
Your computer’s firewall is its main defense against external cybersecurity threats. Both Windows and Apple computers have a robust firewall built in, but you need to keep these features activated to stay protected. Here’s how to make sure your firewall is enabled:
Activate firewall on Windows 10:
Step 1: Select Settings from the Start menu.
Step 2: Select Update & Security. Then, from the left-hand menu, choose Windows Security.
Step 3: Under Protection areas, select Firewall & network protection.
Step 4: You’ll see a menu displaying three networks: Domain network, Private network, and Public Network. The firewall status is displayed beneath each network name.
Step 5: If your firewall is off, select the network, and under Microsoft Defender Firewall, toggle the switch to On.
Activate firewall on Windows 11:
Step 1: From the Start menu, select Settings.
Step 2: Under Privacy & Security, select Windows Security, then choose Firewall & Network Protection.
Step 3: You’ll see three networks: Domain network, Private network, and Public network.
Step 4: To turn on the firewall for a network, select the network, and under Microsoft Defender Firewall, toggle the switch to On.
Activate firewall on Mac:
Step 1: From the Apple menu, select System Settings.
Step 2: From the pop-up window’s sidebar, choose Network, then click Firewall.
Step 3: Toggle on the firewall (if it’s off).
Do you need third-party Antivirus software?
You probably already have all the antivirus software you need built right into your computers and devices. Most cybersecurity experts agree that third-party antivirus software isn’t any better than the security measures companies like Microsoft and Apple supply with their products. Programs like Windows Defender do a fine job of protecting your computer as long as you keep them updated.
Decades ago, built-in security like Windows Defender had trouble keeping up with hackers, creating opportunities for third-party security companies like McAfee and Norton to offer products that filled in significant security gaps. Large tech entities like Microsoft have since significantly stepped up their cybersecurity game.
“We test it regularly (Windows Defender), and it’s one of the top products we’ve seen. It has improved a lot,” cybersecurity expert Simon Edwards, told NBC in 2021.
In response, third-party security companies have been bundling additional services with their products, such as identity theft scanning, enhanced email security, and security extensions for popular web browsers. You may gain some additional protection from these add-ons, but you still need to be vigilant and practice good cybersecurity hygiene, like using strong passwords, timely updates, and avoiding phishing emails.
Keep your guard up
The challenges of cyber security are always evolving, as evidenced by the constant stream of security updates that seem to pour into our devices on a daily basis. Internet security is a marathon, not a sprint. To stay secure, you must maintain good cybersecurity practices over time. Don’t get lazy or complacent, as it’s easy to normalize constant threats.
“Security is always excessive until it’s not enough.”
— Robbie Sinclair
When you get a new device, make sure auto-updates are enabled. Don’t use the easy but risky password habits of yesteryear, keep up on your updates (which mostly means not disabling auto-updates), and be careful about what you click in your inbox and on the web.
If your home Wi-Fi is slower than it should be, someone might be stealing your bandwidth. Fortunately, there are ways to detect and remove uninvited guests on your home network and make sure they don’t come back.
Is your connection slower than it should be? Take our speed test to find out.
Download speed
000 Mbps
Upload speed
000 Mbps
Latency (ping)
00 ms
Jitter
00 ms
How can someone steal my Wi-Fi?
Wireless networks make it easy to connect all your devices to the internet, but it also makes it easier for other people to use your connection. This has been true since the earliest days of wireless transmission. The first wireless hack occurred in 1903 when Nevil Maskelyne hacked Marconi’s wireless telegraph in order to send a rude poem during a public demonstration.
Perhaps unsurprisingly, wireless hacking became common in the early days of Wi-Fi, when security protocols were lax and most people were new to the technology. At this time, hackers would go “wardriving,” driving through neighborhoods looking for unsecured wireless networks that they could use to connect to the internet for free. While this might conjure images of shadowy agents in high-tech surveillance vans, all it really took was a college kid with a laptop, some hacking software, and a “cantenna”—a signal amplifier antenna made out of a tin can.
Although most wireless routers have security features enabled by default, many network attacks still begin with a hacker wardriving through a neighborhood, looking for network vulnerabilities (often still using a cantenna). Having hackers on your network is bad for several reasons. They can do any of the following:
- Use your connection for illegal activities
- Use packet sniffers to steal passwords and other information
- Redirect your browser to fake sites to steal your information
- Install malware on your devices
Of course, while lax security might be an open invitation to hackers, Wi-Fi thieves are more likely to be neighbors trying to get free internet access. This is especially common if you live in a large apartment building, since your router signal is probably strong enough to be picked up from almost anywhere in your building and probably several of the surrounding buildings as well.
Your neighbors probably aren’t trying to steal your credit card numbers, but freeloaders will slow down your connection speed. So unless you gave them permission to use your Wi-Fi, kick them off.
How to check for Wi-Fi thieves
If you think someone is stealing your Wi-Fi, the first step is to check. Some methods are simple, while others require a bit more technical savvy.
Check the lights on your router
Most routers have a series of indicator lights that let you know when the router is powered on or connected to the internet. It should also have a light that shows wireless activity. A quick way to see if you have freeloaders is to turn off all your wireless devices and see if the light is still blinking. If it is, someone else is on your network.
This method isn’t very practical if you have a lot of devices in your home—everything from your phone to your fridge could be trying to connect. But if your computer is the only device that should be connected to the internet, this is a quick way to catch Wi-Fi thieves in the act.
Check the lights on your router
If you think someone is stealing your Wi-Fi, the first step is to check. Some methods are simple, while others require a bit more technical savvy.
Check the lights on your router
Most routers have a series of indicator lights that let you know when the router is powered on or connected to the internet. It should also have a light that shows wireless activity. A quick way to see if you have freeloaders is to turn off all your wireless devices and see if the light is still blinking. If it is, someone else is on your network.
This method isn’t very practical if you have a lot of devices in your home—everything from your phone to your fridge could be trying to connect. But if your computer is the only device that should be connected to the internet, this is a quick way to catch Wi-Fi thieves in the act.
Use an app
There are apps for both mobile and desktop computers that can be used to detect unwanted devices on your network. There are also web-based apps like this router checker from F-Secure that will look for indications that someone has hacked into your network.
Check wireless client list
Although it’s a bit more complicated, the surest way to see if an unauthorized user has broken into your network is to check the list of current devices in your router’s settings. Here’s how to do this:
- Log in to your router.
- Find the list of current wireless clients.
- Look for unknown devices.
Every phone, computer, and smart device you own will show up in this list as a unique MAC address. If you know for a fact that you have only five wireless devices and there are six active devices in the list, you definitely have a freeloader. You can also look up the MAC address (a type of network identification number) for each of your devices and see if there are any on the list that don’t match. MAC addresses are often listed in a device’s settings alongside its IP address.
Check router logs
If you didn’t find anything when checking the active client list but still believe someone’s been getting on your network, you can check your router’s logs. You can access past activity logs from the same menu in your router settings where your current wireless clients can be found.
The downside is that it’s a bit of a needle in a haystack. It’s not easy to look at a huge list of numbers and determine which one doesn’t belong.
The advantage of going to the logs is that your moocher doesn’t have to be logged on to your network for you to catch them. Also, if you have an idea of when the problems started, you can see if any new MAC addresses started popping up around those times.
How to secure your wireless network
Once you know that someone is stealing your Wi-Fi, you need to kick them off your network. The first step is to change your network name and password. If the internet thieves are just freeloading neighbors, this is usually enough to get rid of them. But it’s also a good idea to make sure that you’re using the most secure settings on your router.
There are several protocols used to secure wireless networks and most routers give you several options. The oldest and least secure of these is WEP (Wired Equivalent Privacy), which was created in the late ‘90s. Don’t use WEP.
WPA stands for Wi-Fi Protected Access and was created to fix the major security flaws in WEP.2 The newest version of this standard is WPA2, which also incorporates the Advanced Encryption Standard, also known as the AES encryption protocol. This is why, on some devices, this feature is called AES instead of WPA2. You should always enable WPA2/AES security on your router if it’s available.
If your router doesn’t offer WPA2 security, you might want to buy a more secure router.
Using a secure password on your wireless network is the most important thing you can do to keep your Wi-Fi secure, but there are lots of other steps you can take. For more information, check out our guide to keeping your router secure.
If it’s not thieves, why is my Wi-Fi so slow?
If you’ve gone through your router logs with a fine-toothed comb and haven’t found any unauthorized devices, people probably aren’t stealing your Wi-Fi. So, why is your Wi-Fi still slow? There are a couple possible reasons.
Is it just the Wi-Fi?
Before you spend an entire afternoon on the phone with customer service, try plugging your computer directly into your router. Did that fix your speed problems? If it did, then the problem is with your router. You can always buy a new router, but there are a few tricks you can try first. To find out how, check out our step-by-step guide to improving your Wi-Fi speed.
If plugging in to your router didn’t resolve your speed issues, the problem isn’t just your Wi-Fi. It’s your entire internet connection.
When does it slow down?
If your network slows down at peak hours (usually in the evening when everyone is getting home from work), then this might be normal slowdown due to internet traffic. Cable connections share bandwidth between houses in the same neighborhood, so you can get lower-than-advertised speeds if you and your neighbors are all trying to use the internet at once. The only way to avoid this is to avoid peak hours or switch to a more reliable connection like fiber.
If your internet slows down for a few days or weeks every month, your internet service provider (ISP) might be throttling your speed once you pass your monthly data cap. This can often be fixed by upgrading to a more expensive monthly plan or by purchasing additional data from your provider.
Is it always slow?
If your connection is constantly slower than your provider’s advertised speed, it could be a problem on their end. Contact your provider’s customer service department to ask why your speed is so slow and when it will be back up to speed. Every network experiences occasional slowing and outages due to maintenance. But if customer service can’t tell you when your speeds will be back up to normal, it might be time to find a new provider.
Looking for a faster connection?
See providers available in your area.
Protect your internet connection
It’s easy to take Wi-Fi safety for granted. Almost every coffee shop and fast food restaurant offers its own public Wi-Fi, and we can see the names of our neighbors’ home networks just by pulling out our phone.
These days, a vulnerable home network may not exactly be a jackpot for hackers, but it is low-hanging fruit for freeloaders. Using proper network security is a good habit to get into and a good way to get the most out of your internet plan.
More resources
Having your bandwidth stolen by freeloaders is frustrating, but there are lots of other security threats that can affect your home network. If you want to find out more about how to keep your network and devices secure, check out some of our other articles on internet security.
Updating your browser to the most recent version gives you access to the newest features, but most importantly, it protects your computer from attacks. Most browsers update automatically by default, but if your browser is out of date for any reason, you can manually update it by doing the following:
- Open your browser menu.
- Find your browser’s About page and select it.
- Click the update button.
- Close your browser and relaunch it.
Most modern browsers follow similar steps, but there are some minor differences in the menus and buttons. To learn more about the how and why of updating your browser, read on as we go into specific details.
Why should I manually update?
Ideally, you probably don’t want to be doing updates manually. In general, it’s a good idea to set your browser to download and install updates automatically in order to keep it protected from any recently discovered vulnerabilities or exploits. There are, however, a few situations where you might want more control over when these updates are downloaded. For example, some satellite plans give you extra data during low-traffic hours that you can use for downloading software updates and other large files.
Users might also want to manually update their browser proactively. Some browsers make new updates available days or weeks before they roll them out as automatic updates. If you want to know about updates as soon as they become available, you should follow your preferred browser’s developer blog, such as the Chrome Dev Blog.
In any case, find the method that works best for you to keep your browser as current as possible to avoid security threats online.
How to update Chrome
To update your browser when using Google Chrome, follow these steps:
- Open Chrome.
- Open the Menu (three dots in the top right corner).
- Select Help > About Google Chrome from the menu.
- Check to see if Chrome is up to date. If not, click Update Google Chrome.
- Close your browser and relaunch it to apply the update.
How to update Firefox
To update your browser when using Firefox, follow these steps:
- Open Firefox.

- Open the Menu (three dots in the top right corner).

- Select Help > About Firefox

- Click Restart to Update Firefox.
How to update Internet Explorer
Microsoft officially ended support for Internet Explorer 11 on June 15, 2022. That means that there will be no more official updates to the browser and thus you can’t update it, even if new security flaws are found. If you’re one of the last holdouts still using Internet explorer, it’s finally time to switch to another browser.
If any site you visit needs Internet Explorer, you can reload it with Internet Explorer mode in Microsoft Edge.
How to update Microsoft Edge
To update your browser when using Microsoft Edge, follow these steps:
- Open Microsoft Edge.

- Open the Menu (three dots in the top right corner).
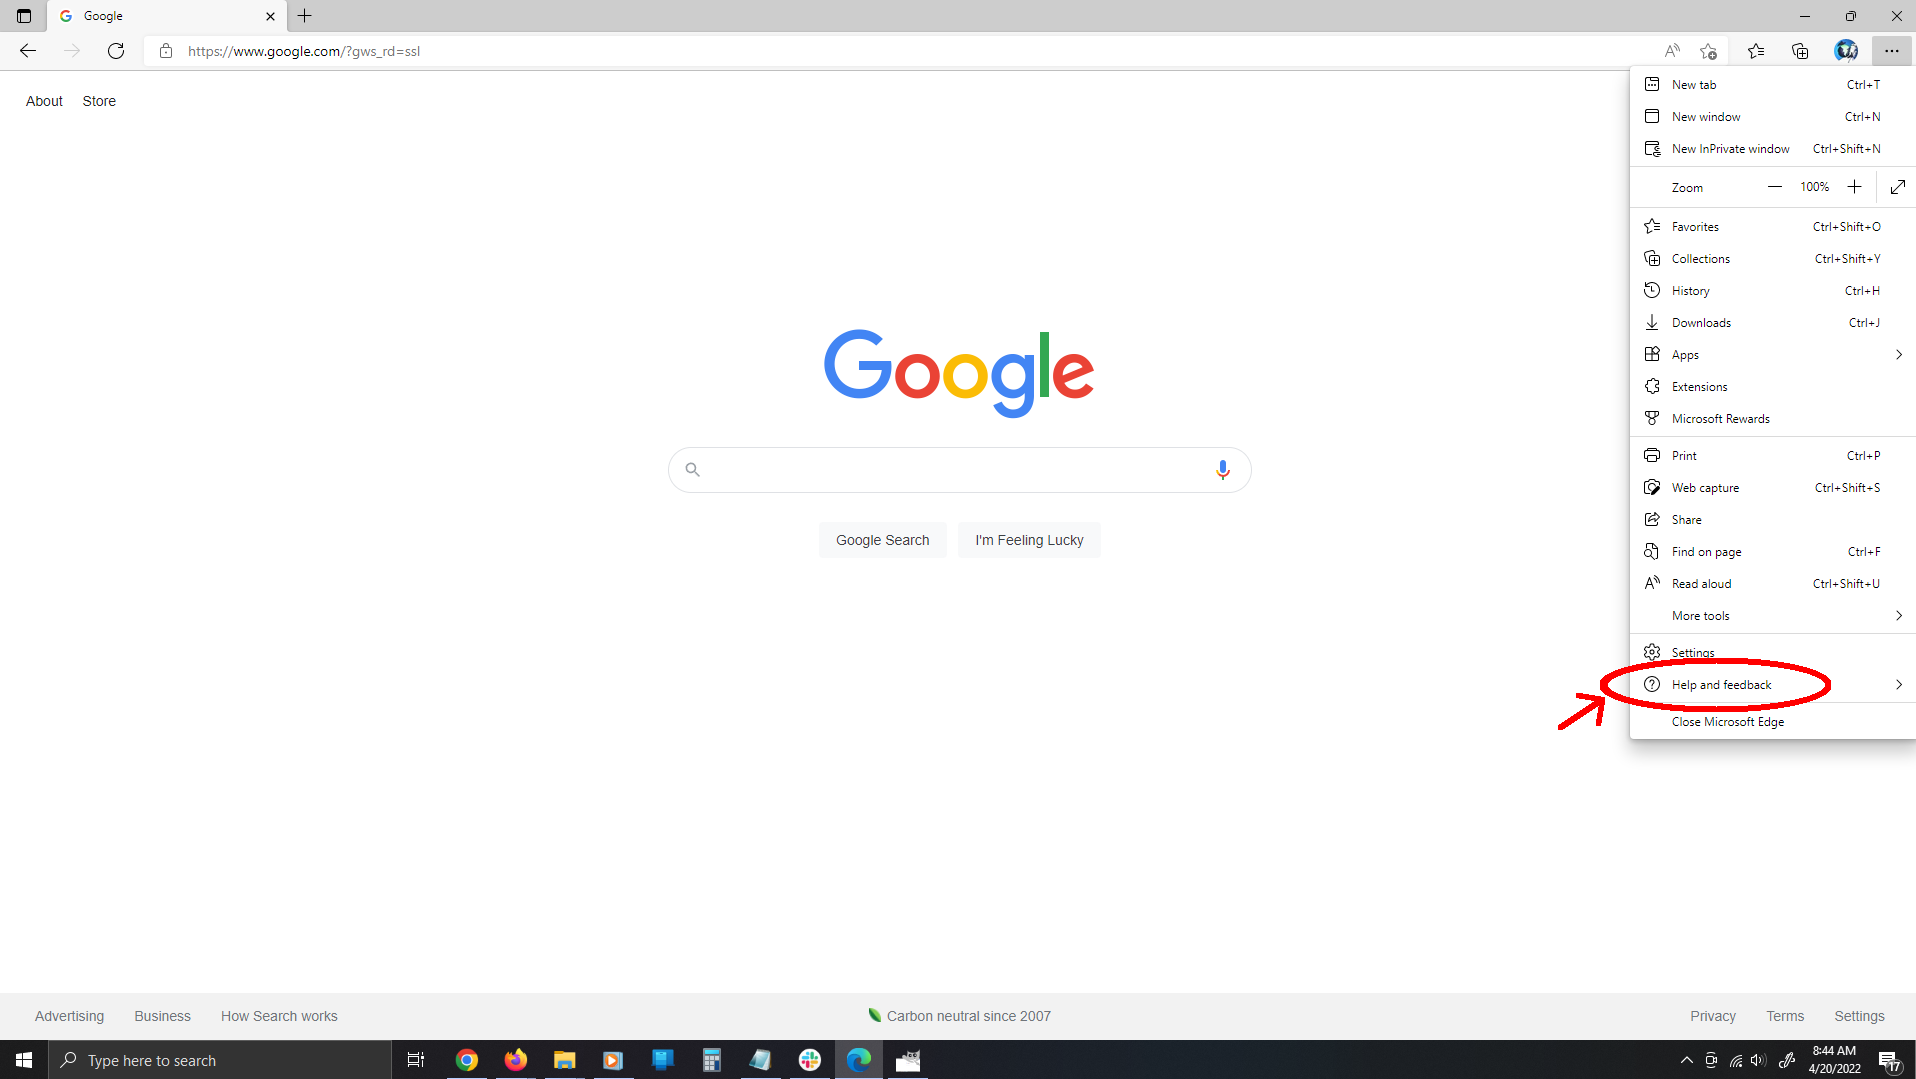
- Select Help and Feedback > About Microsoft Edge.
- If an update is available, it will begin updating automatically.
How to update Safari
Apple has discontinued support for versions of Safari on non-Apple devices, so updating Safari is now integrated with upgrading your OS. To update your OS, follow these steps:
- Open the Apple menu in the top left corner of your screen.
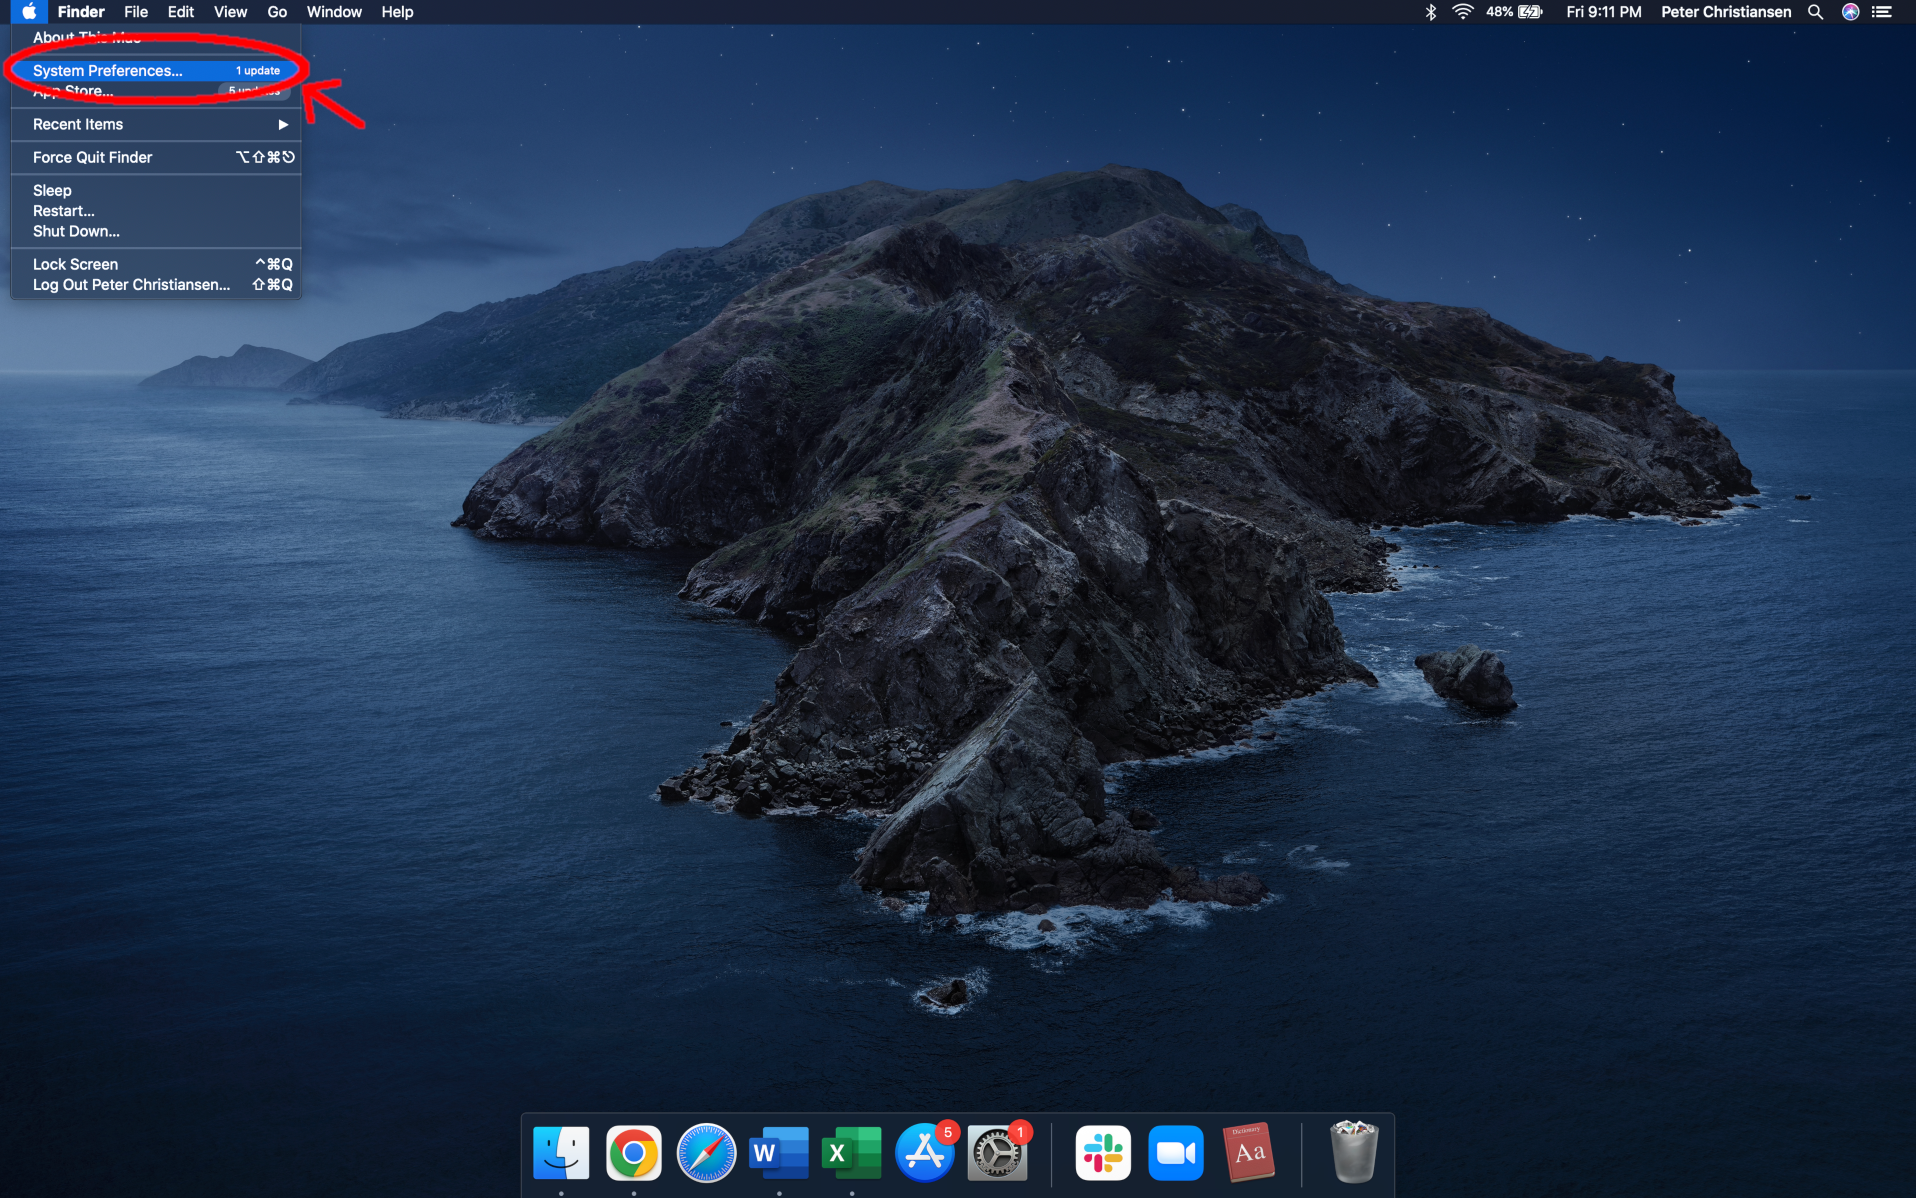
- Select System Preferences.
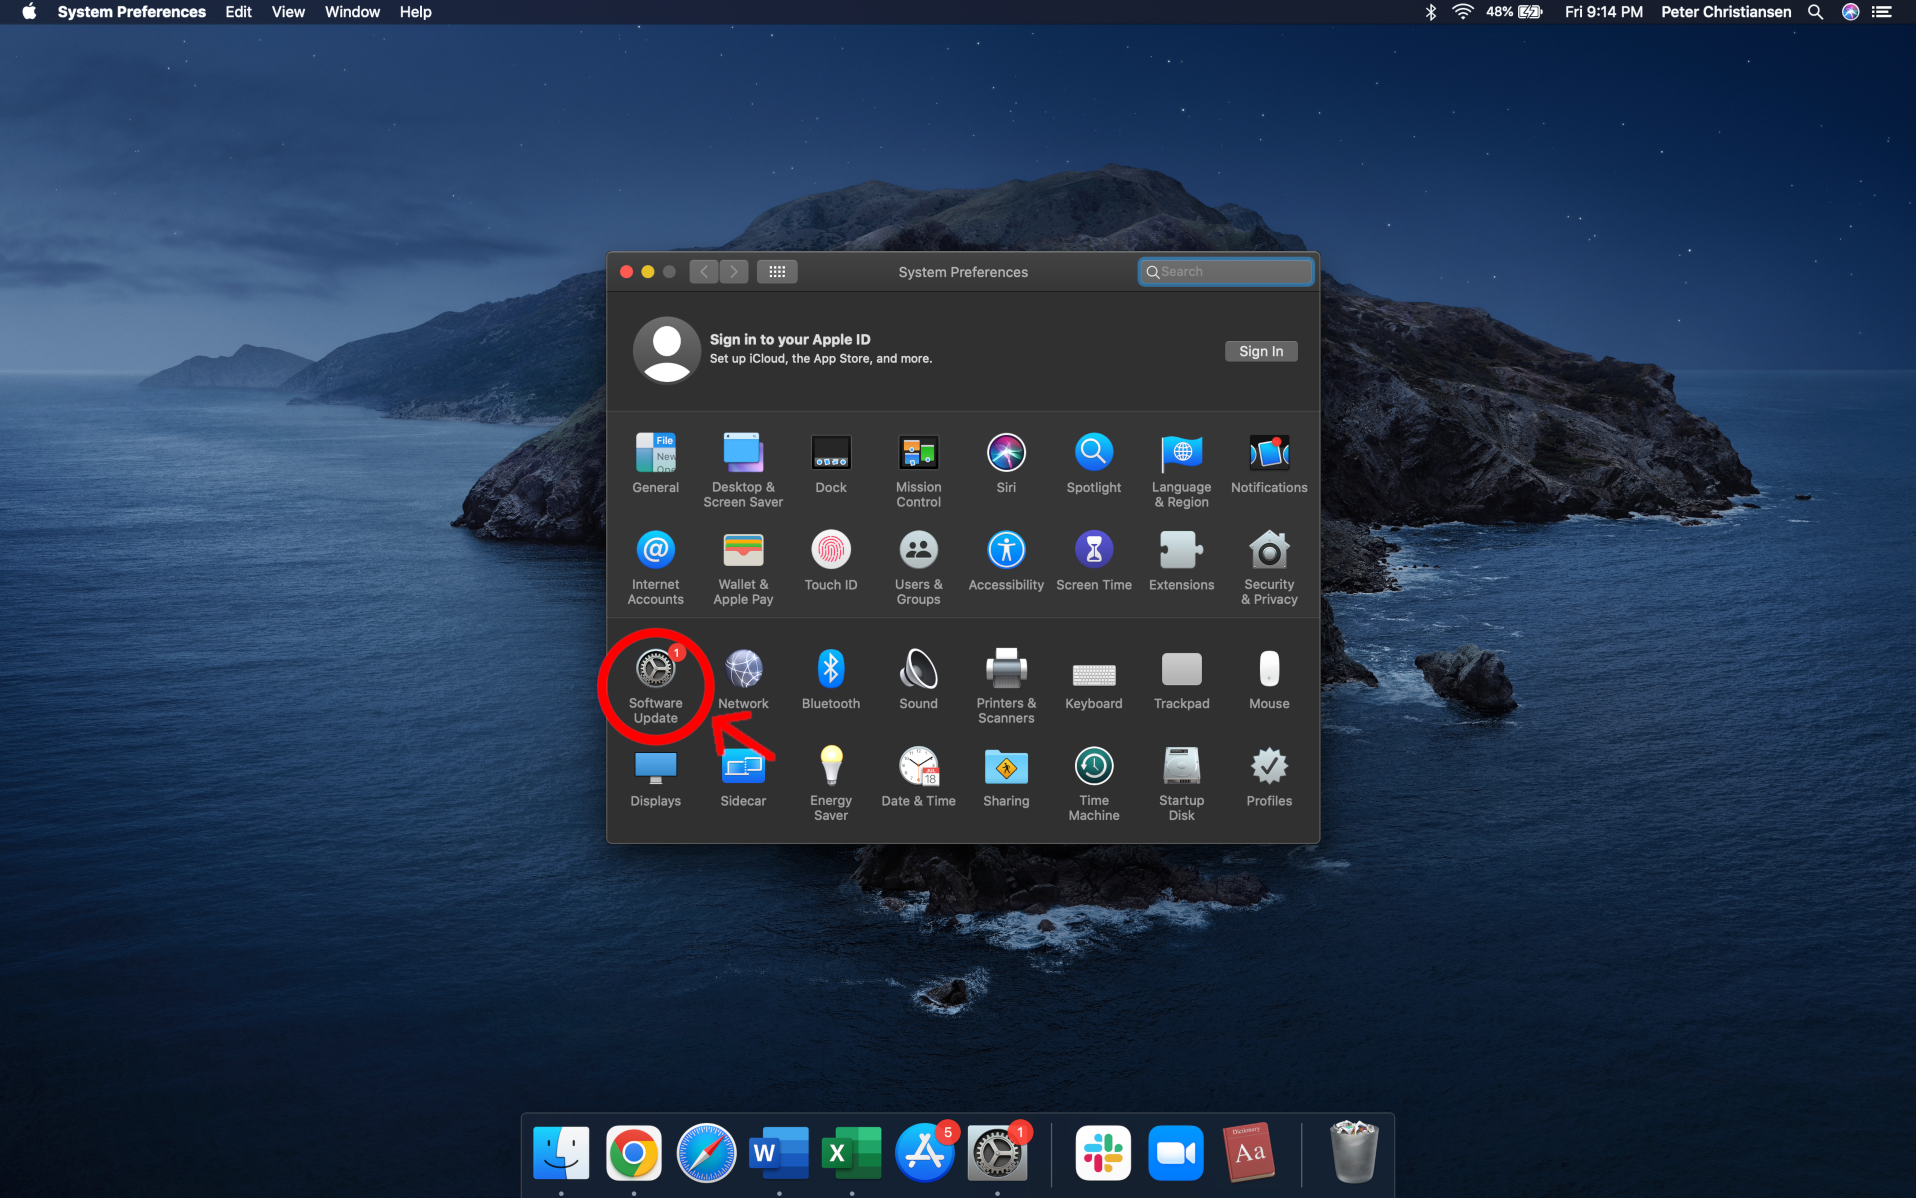
- Click on Software Update.
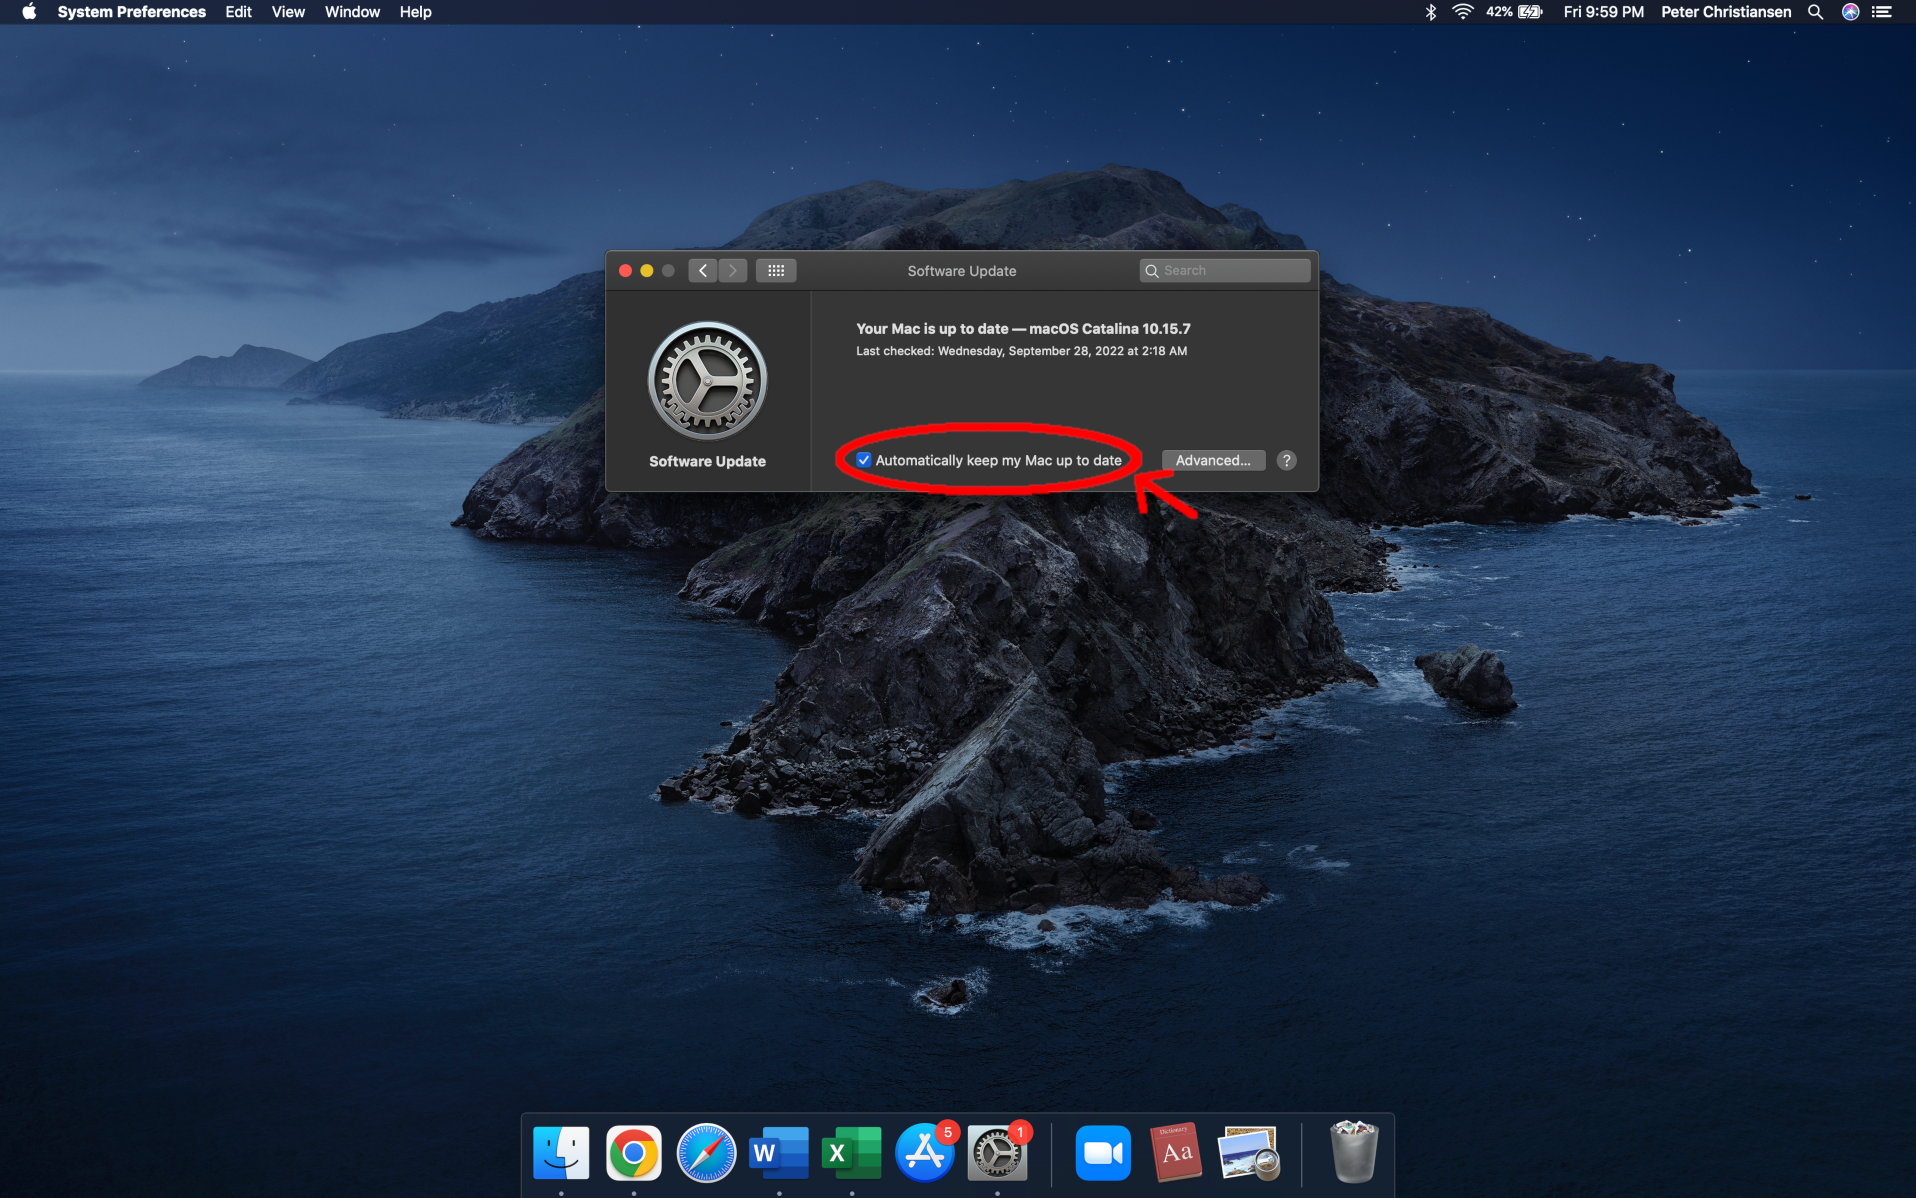
- Click Upgrade now to update your OS, including Safari, or select Automatically keep my Mac up to date to turn on automatic updates to keep it updated in the future.
Stay one step ahead of threats
Keeping your browser up to date is one of the easiest things you can do to stay safe online. Automatic updates are the best way to keep on top of new versions, but it’s good to keep an eye on updates and manually update if you have to.
For more information, check out these additional resources:
-
Best overall
 LastPass
- One-to-one sharing
- Secure notes
- Basic customer support
-
Best for Apple devices
 1Password
- Travel mode
- 365-day item history
- 24/7 email customer support
-
Best for usabilityDashlane
- Password sharing
- Personalized security alerts
- 50-password limit
Data effective 9/26/23. Offers and availability may vary by location and are subject to change.
Our pick: Which password manager is best?
LastPass is our go-to solution for the best password manager. It checks all the right boxes: desktop and mobile support, password sharing, file storage, family management, dark web monitoring, a password generator, and more. It feels more complete overall, thanks to a good balance of free and premium features.
Get the best internet to complement your password manager
Many internet providers now include a free security suite when you sign up for new internet service. If it doesn’t, enter your zip code below to see what else is available in your area.
Compare password manager features and prices
| Best for | Service | Price* | Best features | Get it |
|---|---|---|---|---|
| Best overall | LastPass | Free–$48.00/yr. | View on LastPass | |
| Best for Apple devices | 1Password | $36.00–$60.00/yr. | View on 1Password | |
| Best for usability | Dashlane | Free–$60.00/yr. | View on Dashlane | |
| Best for business | Keeper | $35.00–$75.00/yr. | View on Keeper | |
| Best for budgets | RoboForm | $16.70–$83.50/yr. | View on RoboForm | |
| Best free option | Bitwarden | Free–$40.00/yr. | View on Bitwarden | |
| Best no-cloud password sync | Sticky Password | Free–$20.00/yr.; $100.00/life | View on Sticky Password |
*Non-business prices as of 9/25/23.
What should you look for in a password manager?
The best password manager should generate long, unique passwords that are nearly impossible to crack. It’s essential for day-to-day use across all accounts because passwords are often reused, too short, and easily guessed.
A password manager should also support multiple operating systems, like Windows and Android. Be sure to pick a password manager that is in active development and offers end-to-end encryption, if possible.
Finally, a password manager should list “zero knowledge” somewhere on its product page. That means the developer doesn’t have access to your data. If a password manager advertises device synchronization (most do), that data should reside on the developer’s cloud servers as an inaccessible encrypted blob.
For a more in-depth look at the essential features to consider in a password manager, jump ahead to our expanded section below.
Best overall: LastPass

Pricing
- Free
- Premium: $36.00/yr. (1 user)
- Families: $48.00/yr. (6 users)
- Teams: $48.00/yr. (per user)
- Business: $84.00/yr. (per user)
Features
- Password generator
- Password autofill
- Secure vault
- Password sharing
- Encrypted notes
- Two-factor authentication
Availability
- Desktop: Windows, Mac, Linux
- Browser extensions: Chrome, Edge, Firefox, Opera, Safari
- Mobile: Android, iPhone, iPad
View on LastPass
LastPass is an excellent password manager for storing everything you need, from login credentials to addresses to credit cards.
The free version offers up the basics, such as unlimited passwords, password sharing with a friend or family member, two-factor authentication, a password generator, and password autofill.
The drawback, however, is that the free service locks users into one device type—a computer or a mobile device, but not both. Users can switch between the two device categories, but only three times.
The Premium and Family plans, naturally, remove the device type limitations. The Premium plan targets a single user and adds 1GB of cloud storage, dark web monitoring, fingerprint and YubiKey support, a security dashboard, and the ability to share passwords with more than one friend or family member.
The Family plan targets six users and builds upon the Premium plan with unlimited shared folders and family management.
 Pros:
Pros:
- Unlimited password storing
- Password sharing
 Cons:
Cons:
- No monthly payment option
- Only one device type supported on the free version
Best for Apple devices

Pricing
- Individual: $36.00/yr. (1 user)
- Families: $60.00/yr. (5 users)
- Teams Starter Pack: $19.95/mo. (10 users)
- Business: $84.00/yr. (per user)
Features
- Unlimited devices
- Unlimited passwords
- Password generator
- Custom vaults
- 365-day password retrieval
- Password sharing
Availability
- Desktop: Windows, Mac, Linux
- Browser extensions: Chrome, Firefox, Edge, Brave, Safari
- Mobile: Android, iPhone, iPad
- Command-line options
View on 1Password
1Password launched in June 2006 and is similar to LastPass in terms of features.
Like its competitor, 1Password allows you to store login credentials and other sensitive data like credit cards. However, because there is no free edition, you have premium features right from the start. These include 1GB of storage, support for an unlimited number of devices, technical support, and a Travel Mode that temporarily removes data from your devices when you travel to other countries.
The Family plan builds on the Individual plan by adding support for up to five individuals. Users can set permissions and create vaults for each individual without the need for separate subscriptions. Item history backup allows users to recover deleted or changed passwords up to one year before the current date.
You can add additional people to the Family plan for $1 per person per month.
 Pros:
Pros:
- Supports Face ID
- Allows you to create and share custom vaults
 Cons:
Cons:
- No free version
- No live chat or phone support
Best for usability: Dashlane
Pricing
- Free
- Premium: $60.00/yr. (1 user)
- Friends & Family: $90.00/yr. (10 users)
- Starter: $240.00/yr. (10 users)
- Business: $36.00/yr. (per user)
Features
- Password sharing
- Two-factor authentication
- Dark web monitoring
- Built-in VPN
- Autofill
- Unlimited passwords and devices on Premium plans
Availability
- Desktop: app.dashlane.com
- Browser extensions: Chrome, Chromium browsers, Firefox, Safari
- Mobile: Android, iPhone, iPad
Dashlane has been around since 2012. It’s not much different than the other password managers on our list, offering password storage, form and payment autofill, two-factor authentication, password generation, a digital wallet, and so on.
The Friends & Family plan allows users to add up to five other individuals. You can create a private account for each member and manage them all—along with the billing—through the dashboard. This plan costs $90 per year, although you can make monthly payments of $9 per month (unlike the other password managers on our list). The same goes with the Premium plan: $60 annually or $6.50 monthly.
All new accounts start users with a 30-day Premium subscription trial, expanding the services to unlimited passwords and devices. The Premium model also adds dark web monitoring and unlocks the built-in VPN feature to protect your data from eavesdroppers as it travels down the internet highways.
Dashlane still has a free version, from what we can tell, but you wouldn’t know it by looking at the website. You can find the features list buried in the support articles, which includes unlimited passwords, a password generator, two-factor authentication, and more.
 Pros:
Pros:
- Monthly plans
- Built-in VPN (Premium)
 Cons:
Cons:
- Storage for only 50 passwords on the free plan
- High price for families
Best for business: Keeper
Pricing
- Personal: $34.99/yr. (1 user)
- Family: $74.99/yr. (5 users)
- Business Starter: $24.00/yr. (per user)
- Business: $45.00/yr. (per user)
- Enterprise: Get a quote
Features
- Private vaults
- Team management
- Shared team folders
- SSO integration
- Two-factor authentication
Availability
- Desktop: Windows, Mac, Linux
- Browser extensions: Chrome, Firefox, Safari, Edge, Opera
- Mobile: Android, iPhone, iPad
While Keeper Security does provide password manager plans for individuals and families, Keeper Business and Keeper Enterprise are great solutions for offices and corporations. They not only increase productivity by eliminating manual password entries but also help prevent password-related security breaches.
With Keeper Business, each user has a private encrypted password vault. All confidential information—whether it’s a file or a password—is stored as a record, each with a built-in password generator to create unique, stronger passwords as needed. Other features include shared team folders, team management, and activity reports.
Meanwhile, Keeper Security doesn’t provide pricing online for its Keeper Enterprise solution. This plan includes everything offered in Keeper Business along with automated team management, email auto-provisioning, SSO authentication (G Suite, Azure, Okta), developer APIs, and more.
 Pros:
Pros:
- SSO integration
- Two-factor authentication
 Cons:
Cons:
- Add-ons can be costly
- Dark web monitoring is extra
Best for budgets: RoboForm
Pricing
- Free
- Premium: $16.70/yr. (1 user)
- Family: $33.40/yr. (5 users)
- Business: $39.95/yr. (per user)
Features
- Unlimited passwords
- Password generator
- Password audit tool
- Emergency access
- One-click logins
- Cloud backup (Premium)
Accessibility
- Desktop: Windows, Mac
- Browser extensions: Chrome, Edge, Firefox
- Mobile: Android, iPhone, iPad
Siber Systems’ RoboForm has been around since 2000, although the Premium plan didn’t emerge until 2010.
The big selling point of this password manager is its fast account logins that use a single click or tap. It’s also inexpensive, making it one of the cheapest password managers on our list.
The free version is robust, supporting unlimited passwords, cloud backup, bookmark management, login shares, and more. RoboForm Premium builds upon the free version with priority live customer support and synchronization across an unlimited number of devices. A shared folder is tossed into the premium plan, while the emergency access component allows users to grant access to their accounts. The free model only enables users to receive emergency access.
The Family plan simply expands RoboForm Premium to five users.
 Pros:
Pros:
- Offers a free version
- Has one-click logins
 Cons:
Cons:
- No dark web monitoring
- No Linux desktop app
Best free option: Bitwarden
Pricing
- Free
- Premium: $10.00/yr. (1 user)
- Family: $40.00/yr. (6 users)
- Teams: $3.00/mo. (per user)
- Enterprise: $5.00/mo. (per user)
Features
- Unlimited passwords
- Password generator
- Self-host capability
- Two-step login
- Device synchronization
- Emergency access (Premium)
Accessibility
- Desktop: Windows, Mac, Linux
- Browser extensions: Chrome, Safari, Firefox, Opera, Edge, Vivaldi, Brave, Tor Browser, DuckDuckGo for Mac
- Mobile: Android, iPhone, iPad
- Command-line options
- Web app
If you’re looking for a great, free password manager, Bitwarden is the one to get. It’s open-source software, meaning you’ll see many more features in the free version than others on our list while keeping the Premium and Family plans highly affordable.
Unlike other password managers on our list, this solution syncs across all devices without needing a paid subscription. Moreover, it has a self-host component, meaning you can ditch Bitwarden’s cloud service and create your own local server to store and synchronize your encrypted data blob across devices.
The Premium plan adds 1GB of cloud storage and file sharing, emergency access, vault health reports, the Bitwarden Authenticator, encrypted file attachments, and support for additional two-step solutions like YubiKey. The paid Family plan increases the user limit to six.
 Pros:
Pros:
- Text sharing
- Self-host component
 Cons:
Cons:
- No monthly plans for personal accounts
- No biometric 2FA option
Best no-cloud password sync: Sticky Password
Pricing
- Free
- Premium: $20.00/yr. (1 user)
- Premium: $50.00 for life (1 user)
- Teams Premium: $29.99/yr. (per user)
Features
- Unlimited passwords
- Password generator
- Biometrics support
- USB portable version for Windows
- Secure notes
- Wi-Fi sync (Premium only)
Accessibility
- Desktop: Windows, Mac
- Browser extensions: Chrome, Chromium browsers, Firefox, Brave, Opera, more
- Mobile: Android, iPhone, iPad
The big selling point with Sticky Password is the ability to synchronize your encrypted data blob with other devices without the need for the cloud. Everything is synchronized locally using your local network, keeping your data off cloud servers for better peace of mind.
The free model includes unlimited passwords, an autofill tool, a password generator, two-factor authentication, secure notes, biometrics support, and a tool for creating a portable USB password manager for Windows devices. This latter feature allows users to install the password manager on a USB stick or memory card and access their encrypted login credentials on any Windows PC—no cloud access is required. That means no more saving passwords in a text file on your external storage device.
The Premium model adds the Wi-Fi sync component, although you can still use the cloud for backup and synchronization. Password sharing is another Premium ingredient, along with priority customer support. Finally, Lamantine Software will donate a portion of each Premium subscription to the Save the Manatee Club. Unfortunately, there is no Family plan made available at the time of this writing.
 Pros:
Pros:
- Wi-Fi sync option
- Biometric support
 Cons:
Cons:
- No Family plan
- No Wi-Fi sync in free model
Do you have the fastest, most secure internet connection?
If your internet provider doesn’t have the security options you need, enter your zip code below to see what’s available to you.
Password manager features
Password managers, in general, have identical core features. We go more in-depth with some of these basics so you have a better understanding of why they’re important.
Password generator
While having a password vault is great, chances are many of those passwords are repeated across services, are too easily guessed, or were unearthed in a data breach. A password generator is essential because it can create a strong, random password based on absolutely nothing. It’s just a long string of letters, numbers, and symbols that don’t link back to your favorite pet or TV show.
Of course, the iPhone, iPad, and Android will generate a password for you. However, using a universal password generator found in a password manager allows you to quickly apply new passwords across all devices.
Item sharing
Item sharing is an essential tool if you plan to share account credentials. A good example here is a streaming service like Netflix or Disney+, where someone inside or outside the household wants access to the service. Item sharing doesn’t just apply to passwords either: you could share notes, credit cards, and so on—any data you don’t want to transmit openly and unsecurely.
Dark web monitoring
The dark web is a part of the internet that is accessible only by specific web browsers. Search engines do not index these sites, so you won’t find them using traditional browsers like Chrome and Safari. It’s a place where users conduct activities behind the public-facing side (the open web).
That doesn’t mean these activities are instantly nefarious, but stolen user credentials are typically broadcasted, sold, and purchased on the dark web. The monitoring process scans these websites for anything related to end-users, like email addresses, passwords, credit card numbers, and so on.
Cloud storage
There are two aspects to this feature to consider. First, data is synchronized across devices using cloud storage. Developers don’t have access to this data—it’s just an encrypted data blob that’s uploaded and downloaded as needed.
As shown above, Sticky Password has a Wi-Fi option, while Bitwarden has a tool to create a local service. Regardless, uploading and downloading data is required for multidevice synchronization, whether it’s local or in the cloud.
Second, premium services typically provide general online storage to back up sensitive documents and send them as encrypted attachments. Examples would be tax forms, scanned personal ID cards (like your driver’s license), a Social Security card, a passport, and so on.
Emergency access
Being able to grant someone access to your password manager account is actually a good thing.
For example, you have accounts with Netflix, Hulu, Disney+, MAX, and so on. You’re presently tethered to a hospital bed, one of your kids wants to binge-watch the latest Marvel TV show at home, and Disney+ has signed you out. You can’t remember the password, and you now fear the Hulk-sized wrath you’re about to hear over the phone.
By granting access to your password manager, your adult significant other can sign in and obtain the service login(s) they need. LastPass allows you to give one individual access to your password manager. 1Password is different: It has a tool to create a PDF with the master password stashed inside.
Zero knowledge
When choosing a password manager, documentation should list this feature. “Zero knowledge” means that your data is inaccessible by the password manager developer, even if said data resides on their cloud servers. Because the encryption key resides on the end user’s device, there is no unpacking the data on the server-side. Cloud-based data is used only to synchronize multiple devices and is nothing more than a pile of digital junk for hackers.
As for master passwords, they’re stored locally on your device. When entered, passwords convert into a key that unlocks a data key that decrypts and encrypts the password vault. All of this happens on the device side, so developers have “zero knowledge” of unlocking and retrieving your data on both ends.
That doesn’t mean these activities are instantly nefarious, but stolen user credentials are typically broadcasted, sold, and purchased on the dark web. The monitoring process scans these websites for anything related to end-users, like email addresses, passwords, credit card numbers, and so on.
Our verdict
LastPass has been our favorite password manager for some time, and that likely won’t ever change even though developer LogMeIn discontinued multidevice synchronization in the free version.
Overall, LastPass is a solid pick as a free password manager, but it’s even better through its paid tiers, thanks to cloud storage, multidevice support, dark web monitoring, and emergency access.
Still, you really can’t go wrong with any of our recommended password managers. Just weigh your exact needs against what you’re willing to pay. If you want a free client, stick with Bitwarden. If you don’t mind an annual fee, LastPass is your best option, although 1Password comes in at a close second.
Sign up for our newsletter. Get more from your internet.
Have a better, faster, more secure experience with your internet.
By signing up, you agree to our Privacy Policy & Terms and Conditions.
FAQ about password managers
Why should you use a password manager?
How does a password manager work?
Are password managers safe to use?
Go free or premium: Which is best?
Seriously, what is a data blob?
Even on secure networks, cybercriminals still find ways to get in, and once they do, they potentially have access to anything and everything you do online. They use these vulnerabilities to steal your money, peer into your personal life, and perhaps even access live video feeds of your home. It sounds like a horror story, but it’s a reality of having so much of our lives integrated into technology.
The upside is Wi-Fi security is constantly improving, giving you some big guns to defend your home network. Once you combine your network’s built-in security tools with good network safety practices, you have a fairly robust defense against cybercriminals.
In this guide, we’ll go over some of the ways hackers break into your network and show you what to look for in case of a security breach. Then, we’ll go over some essential preventive measures you can take to build up your own personal Fort Knox of Wi-Fi security.
New internet providers have arrived!
Recent developments in internet tech have given millions of people access to new providers. Enter your zip code to see the best ISPs in your area.
How hackers break into your network
Phishing
Phishing is a scam tactic used by hackers that tricks you into clicking on a malicious link or attachment that either installs malware on your device or persuades you to provide sensitive information, like login credentials.
Phishing often comes in the form of an email or text message disguised as a communication from a reputable source that you’re familiar with, like Amazon or Microsoft, with urgent language designed to get you to act fast.
It might say there’s an issue with your account, payments, or even a malicious login attempt, and the only way to fix the problem is to follow a link or download an attachment. The links usually lead to bogus forms asking you to fill out sensitive information. Phishing attachments often contain malware that immediately infects your device and searches for your private information or simply wreaks havoc on your system.
Since phishing usually relies on you taking the bait, all you have to do is avoid clicking that fateful link or attachment. You need to maintain a general skepticism of any link or file attachment in an email, instant message, or text message. Develop the habit of checking the sender’s email address for anything suspicious, such as typos or use of a public domain, like Gmail. Red flags should go up whenever you encounter pushy language emphasizing urgency and immediate action. Taking a little extra time processing your inbox can go a long way in keeping your network secure.
Malware
Malware, short for Malicious Software, is any software designed to extract private information or harm your devices. These programs come in a variety of nefarious forms. Some record everything you type into your keyboard, searching for passwords. Others may intercept your web traffic, while some take pictures of your screen and send those back to the criminal. Some malware acts as a passageway for more malware. And sometimes, Malware is designed to simply mess up your computer.
You get malware by downloading files or clicking on links. Don’t download files from untrusted sources, and keep an eye out for disguised websites and emails. If you’re unfamiliar with a source, think long and hard before you let it through your network defenses.
Brute Force Attacks
Brute force attacks involve using a program to guess your password until it finds the right combination of characters. For a person, this is usually impossible without some type of hint, but computers can cycle through thousands of attempts without breaking a sweat.
How to protect your home network from hackers
There are many tools and practices at your disposal to protect yourself from malicious network attacks. Most are really easy to implement in your home network.
Create strong passwords
Your first line of defense is robust passwords that are not easily cracked by hackers. Many of us are guilty of creating simple passwords based on personal information like birthdays or names; it makes sense, as these are easy to remember, and being locked out of your accounts seems to happen at the worst times. But these passwords are also easy for criminals to decipher.
Sometimes, it doesn’t even take the use of malicious programs to break these passwords. Identifying information, like birthdays, pet names, and other personal details is often easy enough to find through a person’s public social media posts or profile information.
Best practice: The most secure passwords mix character types (numbers, letters, and symbols), contain at least 10 characters, and are not based on personal details (such as birthdays or pet names).
Change your router’s default login credentials
Router login credentials are not the same thing as your Wi-Fi name and password. Your router login credentials allow you to change your home network’s settings. These settings include your Wi-Fi password and your security settings.
Many routers come with default login credentials that are laughably insecure. In fact, the login credentials are usually something like “Admin” for the username, and the password is literally set as the word “password.” Even worse, the login page is almost always a universal URL web address or IP address. This lack of security makes it extremely easy for anyone on your Wi-Fi network to access your router settings if you haven’t changed the default credentials.
Best practice: To change your router login credentials, you’ll need to access your router’s settings; we detail the process in full in our guide on logging into your router.
In short, all you have to do is connect to your router via Wi-Fi or using an Ethernet cable and navigate to the settings page in a web browser using the router’s login URL; this is usually printed on a sticker along with the default username and password. Once logged in, you’ll be able to change the password. Alternatively, some routers use a mobile app instead of a web interface.
Some routers prompt you to change the login credentials when you first set up the router. If you can’t remember if you changed them already, it’s best to double-check.
Keep your router security enabled
Aside from limiting access to your network with a Wi-Fi password, your router also has built-in security measures. These should be on by default, so all you need to do is keep them running. Also, if you have a stand-alone modem and router, don’t connect to the modem directly via Ethernet, as this bypasses your router’s built-in security features. Instead, connect your devices to your router via Ethernet or Wi-Fi.
Upgrade to a WPA3 Router
WPA3 is the latest security protocol used in all Wi-Fi certified routers and devices since 2020. WP3 introduced many improvements in Wi-Fi security, notably better encryption and defense against brute force password-cracking attacks.
Best practice: If you don’t have a router that can use WPA3, it might be time to shop for a new one—which could even help your Wi-Fi speeds if your router is older. If your router was released after 2020, you should already have a WPA3 router. If your router was released earlier, it may use WPA2, which is not as robust as WPA3. WPA3 was announced in 2018, so if your router was made before then, it’s definitely not taking advantage of WPA3’s enhanced security.
Keep your computer and devices updated
Like most tech fields, cybersecurity advances at an extremely fast pace. So, while security tools are always improving, so are the methods of cybercriminals. Keeping your OS updated ensures you have the latest protections installed.
Best practice: Regularly update your devices and apps and consider turning on automatic updates to help you avoid forgetting.
Set up a Wi-Fi guest network
A guest Wi-Fi network allows others to use your Wi-Fi network while still protecting the most vulnerable parts of your network. For example, someone on the guest network may be able to browse the internet, but they can’t log in to your router and start changing network settings. This is a nice way to share your Wi-Fi without as much risk.
Best practice: Set up a guest network for when someone you don’t know well visits or accesses your Wi-Fi for any reason. You can follow our guest network guide to get your setup started.
Use antivirus software
No matter how diligent you are, sometimes malware still finds its way into your home network. Luckily, you can prepare for such occasions with antivirus software. Antivirus software not only works to keep malware and viruses off your computer and devices, but it scans and erases malicious programs that make their way through your other defenses.
Best practice: Find an antivirus software that fits your budget and needs. You can set your software to regularly scan your devices and make sure your personal data stays secure.
-
Best overallFirefox
- Free
- Blocks cryptominers
- Prevents fingerprinting
- Stores passwords locally
-
Best for anonymityTor Browser
- Free
- Conceals your identity
- Encrypts browser data
- Prevents fingerprinting
-
Best for customizationVivaldi
- Free
- Provides high customization
- Protects against phishing
- Syncs data between devices
Our pick: Which internet browser is the most secure?
Firefox is our top pick as the most secure browser because it’s completely open source and contains no hidden or proprietary code. As a result, it can be examined by any security expert to confirm that it doesn’t secretly track you across the internet and sell your browsing habits.
In contrast, Google Chrome, Apple Safari, and Microsoft Edge are only partially open source, as they include proprietary components security experts can’t thoroughly inspect.
Need a great internet plan to complement your secure internet browser?
If you’re looking to switch, enter your zip code below to see if a better plan is available in your area.The 6 most secure browsers
- Best overall: Firefox
- Best for anonymity: Tor Browser
- Best for customization: Vivaldi
- Best for blocking ads: Brave
- Best for extreme privacy: Epic Privacy Browser
- Best for VPN use: Opera
Compare secure browser features and availability
| Best for | Browser | Availability | Best features | Get it |
|---|---|---|---|---|
| Best overall | Firefox | Desktop, mobile | Get Firefox | |
| Best for anonymity | Tor Browser | Desktop, Android | Get Tor Browser | |
| Best for customization | Vivaldi | Desktop, Android | Get Vivaldi | |
| Best for blocking ads | Brave | Desktop, mobile | Get Brave | |
| Best for extreme privacy | Epic Privacy Browser | Desktop, mobile | Get Epic Security Browser | |
| Best for VPN use | Opera | Desktop, mobile | Get Opera |
What should you look for in a secure browser?
You want a web browser that blocks everything that can identify you. While some cookies are necessary for websites to function, others are intrusive and intentionally collect your information to track you across the internet.
A web browser should also verify that every destination you visit is safe so you’re not unintentionally loading a site full of malware or one that secretly runs scripts in the background to mine digital currency at your expense.
Lastly, a browser should offer secure connections. For example, the Tor Browser offers triple encryption, while Opera has a built-in virtual private network (VPN) component. Most web browsers support HTTPS connections.
Best overall—Firefox
Features
- Blocks cryptominers
- Prevents fingerprinting
- Stores passwords locally
Availability
- Windows / Mac / Linux
- Android / iPhone / iPad
Base code
- Quantum
Data this browser collects from you
- Contact info
- User ID
- Device ID
Firefox is now faster and prettier than ever. But, as Mozilla admits, you spend more time looking through Firefox than at it. Mozilla has always placed security at the forefront, like blocking cross-site cookie tracking by default, isolating websites into separate processes, blocking third-party fingerprinting, and more.
The big takeaway is that Firefox is open-source software. For you, that means anyone can examine the code, whether by a security researcher, someone from the Firefox community, or just a curious coder. There’s no place for Mozilla to hide secret code that tracks you across the internet and sells your browsing habits for profit.
Firefox is just one of two browsers on our list that is not based on Chromium.
 Pros:
Pros:
- Protects against spyware
- Blocks almost all pop-ups
 Cons:
Cons:
- Consumes high memory
- Falls behind Chrome in speed
Best for anonymity—Tor Browser
Features
- Conceals your identity
- Encrypts browser data
- Prevents fingerprinting
Availability
- Windows / Mac / Linux
- Android
Base code
- Tor
Data this browser collects from you
- No data collection
If you’re feeling adventurous and want to explore the dark web, this is the browser to use. It’s the second of two browsers on our list that is not based on Chromium.
What makes Tor Browser stand out is how it works. It passes your internet traffic through three random servers residing on the Tor network. When your data exits the network, it doesn’t include your information—not even your public IP address.
This triple-layer method isn’t exactly perfect. The Tor Project admits if the first and third servers are compromised—whether by hackers or on purpose by the owner—they could see where your encrypted traffic is coming from or where it’s going.
Still, it’s an excellent browser for blocking pesky trackers, avoiding surveillance, and eliminating fingerprinting.
 Pros:
Pros:
- Provides triple encryption
- Prevents fingerprinting
 Cons:
Cons:
- Loads slow due to connecting through the Tor network
- Falls behind Chrome in speed
Best for customization—Vivaldi
Features
- Provides high customization
- Protects against phishing
- Syncs data between devices
Availability
- Windows / Mac / Linux
- Android
Base code
- Chromium
Data this browser collects from you
- User ID
- Device ID
Vivaldi is the most customizable browser on our list. You can create a custom theme and use any image as your background. Even more, you can shift the panel’s location, customize your start page, change the Vivaldi Button menu, and so on. It’s fun and breathes new life in the tired, repetitive browser design.
On a security level, Vivaldi uses Google Safe Browsing to protect you against phishing and malware. It blocks ads and trackers by default, but you can add exceptions and manage blocking levels per site. It also blocks ads on “abusive” sites by default, although you need to manually enable its “not to track me” feature.
 Pros:
Pros:
- Offers plenty of customization
- Syncs data across devices
 Cons:
Cons:
- Lacks iPhone, iPad versions
- Consumes high memory
Best for blocking ads—Brave
Features
- Blocks social media
- Uses the Tor network
- Supports the BAT platform
Availability
- Windows / Mac / Linux
- Android / iPhone / iPad
Base code
- Chromium
Data this browser collects from you
- No data collected
The default settings block most ads on websites except those that fall under the Brave Rewards umbrella. These Brave Ads use a system that pays you in virtual Basic Attention Tokens you earn in exchange for your attention—70% of the ad’s revenue. Around 1.5 million content creators accept these tokens as payment.
With Brave, you can block trackers, scripts, and fingerprinting. You can disable Google login buttons, Facebook logins and embedded posts, embedded tweets from X (formerly Twitter), and embedded LinkedIn posts. There’s also an option to open a private window and surf the internet using the Tor network.
 Pros:
Pros:
- Provides a cryptocurrency wallet
- Blocks social media logins and embeds
 Cons:
Cons:
- Consumes high memory
- Loads some sites incorrectly
Best for extreme privacy—Epic Privacy Browser
Features
- Blocks everything by default
- Blocks address bar tracking
- Deletes everything when closed
Availability
- Windows / Mac
- Android / iPhone / iPad
Base code
- Chromium
Data this browser collects from you
- No data collected
Epic’s pitch is that private browsing should always be enabled, not a “mode” you must toggle on. Unfortunately, Epic spun off two of its major privacy features as extensions to make the browser more customizable, so you will need to install the one-click encrypted proxy and AdBlock components to get the complete “extreme privacy” benefits.
While Epic Privacy Browser is based on Chromium, there are no ties to Google. It prevents address bar tracking, local address bar autocompletes, fingerprinting, third-party cookies, and DNS prefetching. It deletes all local databases when closed, along with your history, cache, all data related to tabs, and more.
 Pros:
Pros:
- Deletes everything when closed
- Includes a built-in video downloader
 Cons:
Cons:
- Requires extensions to use proxy and ad blocking
- Limits plugins library to just 10
Best for VPN use—Opera
Features
- Includes a built-in VPN
- Blocks cryptominers
- Verifies all websites
Availability
- Windows / Mac / Linux
- Android / iPhone / iPad
Base code
- Chromium
Data this browser collects from you
- Device ID
- Location
- Diagnostics
Opera provides a built-in VPN component you can enable in the settings. It routes your traffic through one of Opera’s servers to encrypt your transmission and mask your public IP address. The VPN applies to only the browser itself, so you’ll need to use a third-party VPN service like ExpressVPN and Hotspot Shield to protect everything else.
 Pros:
Pros:
- Protects against spyware
- Blocks almost all pop-ups
 Cons:
Cons:
- Consumes high memory
- Falls behind Chrome in speed
Secure browser features
All web browsers generally do one thing: download data from a remote server and piece it all together into a web page. They all offer a similar list of basic security features, although each one aims to provide additional components to make them stand out against the competition.
Ad blocking
Advertisements on web pages are understandable: they generate money to pay the bills. The problem is these ads extend the page’s loading time. Moreover, many websites cover most of their white space with ads, resulting in an overly clunky and slow-loading design.
While ad blocking can increase load times, it also stops malicious ads. For instance, malvertising is an attack that injects malware into an online advertising network. Because you download these ads when accessing web pages, they may contain malware that will redirect your browser to malicious websites.
Malvertisements are not to be confused with adware, however. The latter is obtained through other software and will redirect search requests when installed. Adware also displays popups and collects your data for tailored advertisements.
Tracker blocking
Your information is a valuable resource, and cookies provide a treasure trove. They’re tiny files stored locally on your device, created by the browser to cache information for each site. The information consists of the links you clicked, specific pages you accessed, and so on.
And while cookies are harmless on a security level, they can be used to track you across the internet. “Cross-site tracking” is a popular term to label how companies collect your browsing data from multiple websites.
Accounts can be tracked too. Facebook is a perfect example, which released a free tool in 2019 that lets you see what data it collects from businesses and organizations that use its tools.
The bottom line is that you need a browser with a Do Not Track component because your surfing habits are your business.
HTTPS support
A good, secure web browser should always support Hypertext Transfer Protocol Secure (HTTPS). This connection uses the Transport Layer Security (TLS) protocol, which is based on asymmetric encryption.
Compatible browsers will display a lock symbol in the address bar when you load a website that offers HTTPS connections. If the website doesn’t support HTTPS, the browser will display a “not secure” message or something similar.
You may find browsers that include an HTTPS-Only Mode. Firefox, for example, can force all connections to use HTTPS when you enable this setting. Conversely, if the website does not use HTTPS, Firefox will block access with a warning page containing “Continue to HTTP Site” and “Go Back” buttons.
Malware prevention
A secure web browser should check with a trusted database to verify that a website is safe to use.
For example, malware may secretly infect a legitimate website, or a website may appear official but is instead a “spoof” to fool you into downloading unwanted software. Both situations are typically reported and listed in a database that the browser downloads and updates frequently.
A browser should also verify that the file you are downloading is legitimate. For instance, Firefox will verify the site’s integrity against a database provided by Google Safe Browsing. If Google blacklists the site for malware, Firefox will block the download. This verification also helps prevent unwanted files too, like automatic downloads, when you visit a website.
So, where are Chrome, Safari, and Edge on this list?
On a security level, we don’t recommend using browsers provided by Apple, Google, and Microsoft.
Google Chrome
Google makes a big chunk of revenue from advertising and data collection. Those two factors alone should be enough reason to shy away from Google Chrome. The browser is undoubtedly convenient given its native ties to Google’s services, and it’s one of the fastest based on our tests, but Chrome collects an alarming amount of data—more than any other browser on our list.
Apple Safari
Apple is a “device first” company. Its most significant source of revenue is sales from Macs, iPhones, iPads, and so on. Safari is undoubtedly the better native option over Google Chrome on these devices, and its security and privacy aspects have improved over the last few years.
But Safari isn’t completely transparent in terms of code, nor is it available on any other platform outside the Apple ecosystem. It’s also had its share of eye-opening security and privacy issues in the past.
Microsoft Edge
Finally, the new Microsoft Edge ditches the previous in-house EdgeHTML engine for Chromium. It collects data about the websites you visit, and there’s no option to turn this data collection off. Moreover, Microsoft Edge shares details regarding web pages visited, whether you use the search autocomplete function or not.
The bottom line
You can’t expect total security and privacy from companies that have other agendas. All three browsers listed above provide operating systems that already know what you do and where you go every day.
What you need is a browser provided by a developer with one single, razor-sharp mission: to give you the best, most secure window to the internet.
Our verdict: Firefox is the best for security
Firefox is our top pick for two reasons. First, it’s not based on Chromium, so there are no traces of Google in the code. Google’s primary business is data collection and advertising, so you know Firefox doesn’t include secret Google bits that harvest and sell your data.
Second, the browser is truly open-source, meaning any security expert can inspect the code. There are no proprietary components buried deep within the foundation that could prevent full transparency.
Firefox has been around for 18 years, rising from the ashes of Netscape in the early 2000s. Mozilla wanted to build a standalone browser for a safer internet, and its efforts clearly show. Firefox makes privacy and security management easy to use and easy to understand. Sure, Chrome has improved over the years, but it collects more data than any browser on this list.
If you are looking for features like a built-in VPN or high levels of customization, you can’t go wrong with Opera or Vivaldi. However, Firefox is the best, well-rounded browser you should use on all your devices.
FAQ about secure browsers
What is Incognito Mode?
Also known as Private Mode or something similar, Incognito Mode keeps your browser history private. In Firefox, for instance, the browser deletes all cookies when closed. It also blocks tracking cookies by default. For more information, read our explanation about what Incognito Mode actually does to protect you online.
What is fingerprinting?
Fingerprinting is a form of data collection that pieces information together to identify you. Data is collected through the web browser or through apps or programs installed on your device.
Websites use third-party trackers to continue collecting data (shopping habits, frequented websites) and create a larger snapshot of your internet presence. This “fingerprint” includes your device, operating system, preferred browser, and so on.
What is the Tor network?
The Tor network consists of over 7,000 volunteer-operated relay servers located around the globe that perform as “onion” routers. Here’s what happens when you access a website using a Tor client:
Step 1: The Tor client determines the best path to the destination and generates three encryption keys.
Step 2: The client sends the three-layer encrypted data to the first Tor server, the Entry Node.
Step 3: The Entry Node decrypts the first layer, discovers the second server’s location, and relays the two-layer encrypted data.
Step 4: The second server, or Middle Node, decrypts the second layer, discovers the third server’s location, and relays the single-layer encrypted data.
Step 5: The third server, or Exit Node, decrypts the final layer and relays the plaintext data to the destination.
In a nutshell, the Tor client creates a “circuit” between you and the destination that remains open for around ten minutes. Once that window expires, Tor creates a new circuit to prevent eavesdroppers from tracking your activities. A new circuit is also created when you visit another website.
“Tor” is an acronym for The Onion Router.
What is a virtual private network (VPN)?
A virtual private network is a secure, private connection that works over the internet.
VPN software you install on your device encrypts your data and then establishes a direct, encrypted connection (or “tunnel”) between you and the VPN server. Once the server receives your encrypted data, it decrypts the data and then sends it in plaintext to the destination.
This way, the destination cannot collect your information, such as your IP address, web browser, and operating system.
How does cryptocurrency mining work in a browser?
Cryptocurrency mining within a browser works by using JavaScript code. Every web page you view on the internet is downloaded to your device as cache, including JavaScript code that quietly runs in the background to run basic web components.
In this case, the JavaScript code runs complex mathematical calculations to create digital currency. Mining requires heavy processing and will slow your device to a near crawl as the CPU computes the heavy math. You could see your browser use 90% or more of your CPU’s total processing capacity.
Some websites, however, use cryptocurrency mining in the browser as a form of “payment” for consuming their content. This payment is typically voluntary on your part.
What is phishing?
Phishing is a method of obtaining your personal information through a link embedded in an email, text message, instant message, and so on. The attackers pose as a person, company, or service you trust and attach a link. The resulting website looks legitimate, but it’s a “spoofed” site created to steal your information.
What is address bar tracking?
Address bar tracking is a method of obtaining your browsing habits through the autocomplete function. When you type a search query or URL in the address bar, the browser analyzes that data to provide suggestions. The browser may also send that information to remote servers. As a result, companies like Google and Microsoft know where you’re going and where you’ve been.
What is a Device ID?
A Device Identifier (ID) is a unique string of numbers that identifies your device, whether it’s a computer or smartphone. It’s stored on the device and is derived from other hardware-identifying numbers, like the IMEI number or MAC address.
What is a User ID?
Web browsers typically create a user identifier profile upon installation that includes information like your processor, storage, screen resolution, and operating system. This profile is assigned a unique identifier that the browser stores locally in a cookie.
What is Chromium?
Chromium is a free and open-source browser “foundation” developed and maintained by Google. Developers can compile the code “as is” and distribute it as a basic Chromium browser or compile it to include proprietary components and unique designs. The latter group includes Brave, Epic Privacy Browser, Google Chrome, Microsoft Edge, Opera, and Vivaldi.
What is Google Safe Browsing?
Google Safe Browsing is a service provided by Google. It contains a database of known websites containing malware and phishing content. This database is available to internet service providers and used by Chrome, Firefox, Safari, and Vivaldi. According to Google, this service protects over 4 billion devices each day.
All wireless devices encrypt their connections by default. Well, usually. Some public Wi-Fi networks may not use encryption even if your device does, which is why you should use the best VPN tools in that case or tether from a mobile internet connection instead.
But at home or in the office? We connect our devices to Wi-Fi and think nothing more of it. It’s super secure, right? Right??
Maybe. Maybe not.
Your connections are encrypted, sure, but is your gateway or router fully secure? Are all the security holes patched to keep hackers out? Did you create an uncrackable password? If you can’t say “yes” to any of these questions, then your network is in dire need of a security check. Like, pronto. We walk you through a list of security flaws and tell you how to fix them.
Do you have the most secure internet you can get?
All internet providers generally stay on top of security, but if you think your current provider fails to keep you safe, enter your zip code to see what else is available to you.
Flaw #1: Outdated firmware leaves you vulnerable
Firmware is another name for the router’s operating system. It’s software that manages the hardware, and like any other operating system, it’s never fully bulletproof—there are always gaps in the code that can give unwanted hackers access to your network.
The good news is software engineers continuously fill these holes with new updates. The bad news is your router may not automatically update the firmware to the latest, most secure version, leaving your network wide open for a possible remote attack.
Solution
Nearly all standalone routers, gateways, and mesh systems enable automatic firmware updates by default. You’re normally required to enable this feature during the setup, or it’s already enabled, and the router checks for new updates before you can use it.
But there are exceptions. We’ve tested a few ASUS routers that don’t have auto updates enabled out of the box. Yes, the possibility of a failed update is real and could leave your router as an expensive paperweight, but the chances of that happening are extremely rare.
That said, we provide a separate guide on how to update your router’s firmware to the latest and greatest version.
Flaw #2: Easy Wi-Fi passwords invite strangers and hackers
Creating an easily guessed Wi-Fi password based on something familiar—like a child’s name, a pet, or your address—is convenient for sure, but it also leaves your Wi-Fi network vulnerable to hackers lurking nearby.
Solution
Unlike the admin password, most modern routers, gateways, and mesh systems don’t force you to create a unique Wi-Fi password. The supplied one is already unique to that device—which wasn’t the case in years past—but you should change it to be safe. The complexity of it depends on you, but remember, you can always share the Wi-Fi login credentials using a QR code or another method supported by the router’s mobile app. We provide a separate guide on how to share your Wi-Fi password from your phone.
Still, we suggest using a passphrase with letters (upper and lower), numbers, and symbols. For example, “Ch!ck3nP33k@b00” uses unrelated words and is much harder to guess and crack than “h0m3n3tw0rk.” You can also use a password manager to create your password or allow your mobile devices to make one for you, which is usually just a string of numbers and letters you’ll never remember but is easy to retrieve from your device’s settings.
Check out our guide on how to change your Wi-Fi password for more information.
Flaw #3: Using the router’s default login can leave you open to hackers
Your router has a public side (the internet) and a private side (your home network). That means anyone can access your router—whether it’s remotely or locally—if you have the worst router login credentials ever created. An easily cracked password allows hackers to infiltrate your router, gateway, or mesh system and control your entire network—including your wired and devices.
Solution
This issue really only applies to older routers that accept commonly used login information like admin/password. Modern routers, gateways, and mesh systems now force you to create a unique administration password during the setup using letters (upper and lower), numbers, and symbols—there’s no getting around it.
But if you have an older router or gateway and you never changed the login username and password, do so now. Consult our guide on how to log in to your router using a web browser (or an app if your router supports it)—the setting you want is usually found under Advanced > Administration. Most mesh systems don’t have a web interface you can use, so you can change the info only in the app.
Flaw #4: WPS opens your network to hackers
Wi-Fi Protected Setup (WPS) helps devices connect to your wireless network upon first use without the need for a password. You either press a button on the router or use an eight-digit PIN.
But there’s a consequence for that ease of use: WPS is vulnerable to brute-force attacks, which is a trial-and-error method to determine login info.1 A hacker could discover the PIN’s first four digits—there are only 11,00 possible combinations—and then uncover the next four. Free tools you can easily download from the internet can crack the PIN in 4 to 10 hours.
Solution
Your best defense is to update your firmware and disable WPS (if possible). The method of disabling WPS depends on the manufacturer, but here we’ll use the NETGEAR Nighthawk RAX80 as an example.
Using the web interface
Step 1: Connect to the router’s Wi-Fi.
Step 2: Open a browser and type in routerlogin.net.
Step 3: Click on the ADVANCED tab displayed on the left.
Step 4: Click on WPS Wizard listed on the left and follow the instructions to disable this feature.
Flaw #5: Guests can download illegal content
There’s nothing wrong with giving friends and external family members access to your home’s network, but you also don’t want them downloading questionable content using your internet connection. You certainly don’t want the FBI knocking at your door, and that could happen if guests download anything they want.
Solution
Create a second “guest” connection for everyone who lives outside your home. This virtual network keeps visitors off your primary connections and limits the number of devices that have access. Plus, you’re not sharing your main network’s password.
With a guest network, you can limit bandwidth, block websites, set connection times, and more per device. We provide a separate guide on how to set up a guest Wi-Fi network.
Flaw #6: Children have unlimited access to explicit content
The internet is both a blessing and a curse for parents. On one hand, kids and teens can find the information they need. They can play games online with friends and take remote classes. Unfortunately, they can access inappropriate and unwanted content with just a single URL.
Solution
We provide a guide on how to set up parental controls on a router to protect your kids and teens. Here, you can block and allow specific sites, block and allow specific devices, and set hours of use.
Some routers handle parental controls through a specific section within the router’s interface. You can also click on a device to manage the connection, use profiles to set the parental controls for each child, and manually block websites you don’t want the entire house or office to access.
Parental controls aren’t just for children
You can use parental controls to restrict devices used by adults so you can limit the content they can access, the websites they can visit, and when they can connect.
Flaw #7: Remote access invites hackers
Remote access allows you to load the router’s interface over the internet, like from a hotel room in another state. Combined with a default or lousy password, anyone can gain access from anywhere and change its settings to route all your internet traffic to nefarious websites.
Solution
Old-school remote access through the web interface really isn’t a thing anymore. Many routers still include it, but it’s disabled by default since it’s such a security risk. You can typically find Remote Access controls in the router’s Administration section if you ever need to use it or simply want to verify it’s toggled off.
However, modern routers, gateways, and mesh systems now allow you to manage your network from afar through a mobile app and a linked cloud account, so you really don’t need the web-based remote management tool anymore.
Flaw #8: Your router broadcasts the manufacturer’s name
Click or tap on your device’s Wi-Fi icon, and chances are you’ll recognize some of the names on the resulting list: Linksys, NETGEAR, and so on. Owners of these routers never changed the default Service Set Identifier (SSID) name, which is the wireless network’s public name.
Why is that a problem? Anyone who sees “Linksys” or “NETGEAR” will know that someone owns one of these routers. With this information, hackers can launch an attack tailored to your router, break into your network, and steal your data.
Solution
Generally, you’re encouraged to change the default SSID during the setup. If you disable Smart Connect (band steering), you create a new SSID for each band. You can rename them to anything, whether it’s something simple or a label just to annoy your neighbors. Have fun or be practical—it’s all up to you.
If you never changed the SSID, you can do so through the mobile app provided by the manufacturer or by using the web interface. The following instructions use the TP-Link Archer AXE75 router as an example.
Using the web interface
Step 1: Connect to the router’s Wi-Fi.
Step 2: Open a browser and type in tplinkwifi.net.
Step 3: Select Wireless listed on the left.
Step 4: Select the Wi-Fi connection you want to change.
Step 5: Enter the new SSID name and save your changes.
Using the Tether app
Step 1: Connect to the router’s Wi-Fi.
Step 2: With the Home tab selected, tap on Wireless.
Step 3: Select the Wi-Fi connection you want to change.
Step 4: Enter the new SSID name and save your changes.
The best way to protect your Wi-Fi network is to know what your router, gateway, or mesh system can do. We tend to change a few settings in our router apps and move on with life, but if you look closely, you can probably adjust other settings and your own personal habits to make your Wi-Fi network even safer than before.
We walk you through nine suggestions that should help make your Wi-Fi network safer to use—but not before we highlight a few refresher suggestions you’ve probably read a billion times over. We’ll be quick about it. We promise.
Do you have the best speeds for your secured Wi-Fi network?
Don’t let a slow connection fool you into thinking someone hacked your network. You may need a faster plan to handle your increased in-home traffic. Enter your zip code below to see what’s available to you.
Before we begin: The settings you probably already changed (or didn’t need to)
Many how-tos you find (including some of ours) tell you to do this, to do that, and to do that too. But based on the dozens of routers we’ve set up and tested, we can guarantee that you’ve already completed most of the blanket suggestions during the initial setup. Let’s take a quick look.
Settings you changed during setup
Set a new administrator and account password
You were asked to create one or two things, depending on the model:
- A password or passcode containing letters, numbers, and symbols to access the router locally.
- A cloud account, like TP-Link ID and MyNETGEAR, using a password or passcode containing letters, numbers, and symbols to access the router or system locally or remotely.
This step is unavoidable. Hopefully, you created strong ones. If not, log back in and do so now. Like, pronto.
Set the Wi-Fi network name(s) and password(s)
This step is usually next. Here you were supposed to change the network name and password—two or three times if you disabled Smart Connect (a.k.a. band steering). If you’re still using the defaults, load up the web interface or app and change them now.
Settings you didn’t need to change during setup
Here are a few more features that were automatically enabled when you set up your router or mesh system.
Encryption
Routers and mesh systems enable encryption by default, so you had nothing to do during the setup. WPA3 is the latest version, although many still default to WPA2 Personal. Never, ever turn off encryption. Never. Ever. It can leave you vulnerable to a host of problems, like hackers.
Firewall
Routers and mesh systems automatically enable the firewall by default. In many cases, you can’t even disable it. Your computers have firewalls enabled by default, too, but you can always ensure they’re active by following our guide on enabling or disabling a firewall.
Automatic updates
Routers and mesh systems automatically update their firmware by default. Based on our testing, ASUS is the only company requiring you to enable automatic updates manually. If it’s not already, you should enable this feature or manually update the firmware.
Read our guide on how to update your router’s firmware for more information.
How to secure your home Wi-Fi network
Now, with the setup settings out of the way, we can jump into our nine suggestions for increasing the security of your Wi-Fi network. Some you may have read before, so consider them as Refresher Wi-Fi 101.
Suggestion #1—Use the built-in security features
Security features are a hit or miss in terms of what you get for free on a router, gateway, or mesh system. For example, TP-Link’s HomeCare suite for its standalone Archer-branded routers includes content filtering, website blocking, and antivirus. In contrast, HomeShield on its other routers and mesh systems locks antivirus and some parental controls behind a subscription.
Still, in both cases, you can manually block specific websites and services network-wide for free to keep friends and family safe. You can also block apps and websites on a per-profile basis using routers and mesh systems that support them.
The website and service-blocking function isn’t just a TP-Link thing, either. It’s typical across nearly every router and system we’ve tested to date.
Suggestion #2—Use QR codes to share Wi-Fi login info
Using QR codes should be your next step in protecting your Wi-Fi network. You worked hard to create a unique password or passphrase, right? The last thing you want is for someone to text, write down, or blurt it out to everyone entering your home—especially if you’re running an Airbnb or renting a room.
To prevent your password from ending up on a napkin, share it using a QR code. All routers and mesh systems have this capability in their mobile apps. Be sure to check out our guide on how to share your Wi-Fi password from your phone for more information.
Suggestion #3—Use profiles
Profiles are usually associated with parental controls, but they’re a good way to identify devices and lock them down to specific individuals accessing your Wi-Fi network, not just kids.
As previously mentioned, you can block specific users from accessing a website, app, or content type, like a troublesome teen who refuses to stop streaming those “free” movies still playing in theaters. This tool is essential in preventing them from downloading suspicious apps that can unleash malware across your network.
What’s also useful is you can pause their internet access indefinitely or just block every device they own. However, not all standalone routers support profiles and those that do may lock features behind a subscription. All mesh systems use profiles with some paid and premium features.
Suggestion #4—Enable connection alerts
Technically, this feature doesn’t secure your Wi-Fi network. Instead, it presents a notification on your screen whenever a wired or wireless device joins your network. If it’s a device you don’t recognize, you can quickly jump into the mobile app or web interface and block it. Case closed, and ask questions later.
Let’s look at an example of how this works. Suppose you didn’t use a QR code to share the Wi-Fi password with a family member. You created a profile and assigned their devices to that profile.
Soon you discovered the family member was downloading pirated movies, so you used the profile to block all their devices. The sneaky sneak then connects a new device to the network using the password you previously provided.
When the device connects for the first time, you receive an alert on your screen. You either block the device immediately or add it to the profile (which we recommend) and block it. Can you tell we deal with teens? It feels like a second job. Seriously.
Of course, connection alerts apply to any strange device that accesses your Wi-Fi, like a hacker who managed to figure out your easy-to-guess password.
Suggestion #5—Create a separate network for guests and IoT devices
Allowing friends and family to access your Wi-Fi network is okay. They’re people you can trust to use your internet connection responsibly—well, usually. If they get out of hand, you can always pause their internet or block their devices if you follow our previous suggestions to create profiles and enable connection alerts.
But for people you don’t really know, we suggest creating a guest network to separate their devices from yours. Technically, you’re all still on the same Wi-Fi network, but your guests use a virtual one that prevents their devices from accessing your devices, like a computer with shared folders or a network printer. Some routers and mesh systems allow you to give the guest network access to your local devices, but we suggest you keep the network isolated to prevent possible malware infections.
IoT devices should be on a separate network, too. Some routers allow you to create a third network specifically for IoT device use. If your router doesn’t, create a second “guest” network even if you never plan to provide Wi-Fi access to strangers (who can always use their mobile data). This virtual network helps keep your devices safe from a possible attack carried out by hackers infiltrating your IoT devices.
Read our guide on how to set up a guest Wi-Fi network for more information.
Suggestion #6—Disable remote management
Web-based remote management really isn’t a thing anymore, but some routers still offer it. In short, you can access the router’s web interface and change the settings from anywhere, but it can be an easy entry point for hackers—especially on older routers with their original login credentials still intact. Toggle this feature off if it’s not already.
However, don’t confuse web-based remote management with the cloud-based one. Most routers and all mesh systems now support remote management through cloud accounts and mobile apps. You can also disable this feature on standalone routers if you never intend to use it outside your Wi-Fi network.
Here are a few examples of where you can find the remote management setting:
| Manufacturer | Path |
|---|---|
| ASUS ROG Rapture GT-AX11000 | Advanced Settings > Administration > System Settings |
| TP-Link Archer AX5400 Pro | Advanced > System > Remote Management |
Suggestion #7—Disable Universal Plug and Play (UPnP)
Universal Plug and Play (UPnP) was initially designed to connect and use devices on a wired network without manually installing drivers or configuring settings. Now, many moons later, nearly all Wi-Fi routers support UPnP and enable it by default.
The problem is there are no means to authenticate and authorize UPnP devices, so they all essentially “trust” each other. They’re also now exposed to the internet, so a hacker can fool your router by posing as a UPnP device and march right in to infect every device you own with malware.
To keep hackers out, we suggest disabling UPnP. The drawback is UPnP devices use virtual connections (ports) to communicate, which are opened automatically with UPnP enabled. You’ll need to manually configure these ports on the router for your UPnP devices to work.
Here are a few examples of where you can find the UPnP setting based on the routers we’ve tested:
| Manufacturer | Path |
|---|---|
| ASUS ROG Rapture GT-AX11000 | Advanced Settings > WAN > Internet Settings > Basic Config |
| NETGEAR Nighthawk RAX80 | Advanced > Advanced Setup > UPnP |
| TP-Link Archer AX5400 Pro | Advanced > NAT Forwarding |
Suggestion #8—Disable Wi-Fi Protected Setup (WPS)
Wi-Fi Protected Setup (WPS) is supposed to be an easy way to connect any wireless device to your Wi-Fi network. You don’t need the password to do so, either—simply press the WPS button on the router, or enter the supplied eight-digit PIN. Easy, right?
The security issue lies with the PIN. Hackers can use software in a brute-force attack to uncover and use that PIN to take control of your Wi-Fi router and network. Why leave it on if you never plan to use the WPS function?
Unfortunately, some routers, like the NETGEAR Nighthawk RAX80 and RAXE500, don’t allow you to disable WPS.
| Manufacturer | Path |
|---|---|
| ASUS ROG Rapture GT-AX11000 | Advanced Settings > Wireless > WPS |
| Linksys EA8300 | Router Settings > Wi-Fi Settings > WPS |
| TP-Link Archer AX5400 Pro | Advanced > Wireless > WPS |
Suggestion #9—Schedule a reboot
Your standalone router, gateway, or mesh system router has two addresses: a private one that faces your devices and a public one assigned by your internet provider. The second address is viewable by all internet devices—including those controlled by hackers. It’s usually refreshed every 14 days, but you should reboot your router weekly to keep the target off your back. A reboot also clears any junk in the router’s memory that could reduce your speeds.
Unfortunately, some routers don’t have the means to schedule a reboot, so you’ll need a smart plug you can schedule to cut the power for a minute once a month (which may or may not work, depending on the router) or set yourself a reminder.
Here are a few examples of where you can find the setting based on the routers we’ve tested:
| Manufacturer | Path |
|---|---|
| ASUS ROG Rapture GT-AX11000 | Advanced Settings > Administration > System > Basic Config |
| ExpressVPN Aircove | Advanced Settings > Router Settings |
| TP-Link Archer AX5400 Pro | Advanced > System > Reboot |
Read more about how often you should reboot your router for more information.
Other suggestions
Add a firewall router
Want to really secure your Wi-Fi network? Get a wired firewall router. It sits between your modem or ONT and your Wi-Fi router or mesh system. Its sole purpose is to thoroughly examine every bit of data that flows to and from your modem or ONT, so your speeds will be slower than usual.
The Cisco Meraki Go GX50 is a good example. You can create up to four virtual networks and assign each to an Ethernet port. So, in theory, your Wi-Fi router can be on one network and your wired devices on another. You can isolate these networks or let them mingle—whatever works best for you.
But the GX50’s biggest selling point is how it thoroughly inspects all traffic, giving you an extra layer of security at the cost of reduced speeds. Some routers have a similar “stateful” firewall you can toggle on, but again, you’ll see a speed reduction since the deep inspection takes longer to process.
Hide your network name
Changing your Wi-Fi network’s name is smart. The default ones usually include the manufacturer’s name, which you want to avoid broadcasting to every hacker in the vicinity. Even if they see you have a NETGEAR router, your chances of getting hacked are slimmer now that manufacturers use random passphrases for setting up routers instead of static passwords. Still, you’d like to be as anonymous as possible. No sense in baiting the nefarious, right?
That’s probably why you’ll see suggestions to hide your network name altogether—even after you created something so unique and cool that you hoped would be applauded each time your neighbors saw it on the Wi-Fi list. But with your network name broadcast disabled, anyone searching for a Wi-Fi network will see “Hidden” instead of the name you painstakingly chose.
But keep this in mind: You’re hiding the Wi-Fi network from your neighbors, but hackers can see your network’s name by using software to eavesdrop on your devices’ unencrypted requests before they fully connect to Wi-Fi. In other words, your “hidden” network isn’t completely hidden, so disabling your network name broadcast is kinda pointless in terms of hiding from hackers.
Use a Virtual Private Network (VPN)
Virtual Private Networks (VPNs) don’t protect your Wi-Fi network as a whole—they protect individual connections, so this suggestion isn’t part of our main list.
For example, you may subscribe to ExpressVPN, but the only way to use it with your Xbox or PlayStation is to add the console’s IP address to your ExpressVPN account. After that, you enter the provided ExpressVPN DNS server IP address into the console’s settings. If anything, you’d use the router to create a static IP address for the console so it doesn’t change.
The only exception is if a router includes a VPN client. In this case, you’d enter your ExpressVPN login credentials directly into the router’s web interface. Now, every device connected to the router is redirected to the ExpressVPN network, including your devices that don’t support VPN software (like the Xbox).
Not all routers, gateways, and mesh systems have built-in VPN clients.
Our verdict: Know your router’s capabilities
Based on all the routers and mesh systems we’ve tested, you must set a new admin password, Wi-Fi name, and Wi-Fi password before you can even use your new network. There’s no getting around it, and hopefully, you made the right choices to keep your Wi-Fi network, devices, and people safe. Other features are automatically selected for you, so we didn’t zero in on those suggestions.
Overall, routers, gateways, and mesh systems have some free security you can utilize, like blocking websites and services, but you may have to dig into the web interface to use them. Most now also support QR codes and connection alerts, so you can safely share your Wi-Fi credentials and see who connects in real time.
Protecting your Wi-Fi network isn’t difficult, but you must be proactive. Block websites. Set filters. Create profiles. Disable unused features. Take the time to really dig into what your router or mesh system can do so everyone in your home can safely use the internet.


